|
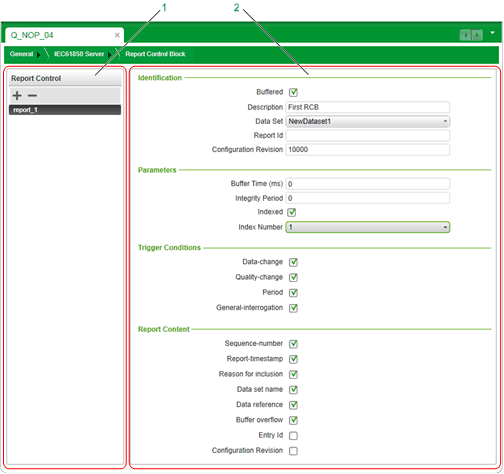
Configuring Report Control Blocks
|
|
|
(Original Document)
|

1Report Control list
2Report Control settings
|
Setting
|
Description
|
|---|---|
|
Identification area:
|
|
|
Buffered
|
Do one of the following:
This setting is disabled by default.
|
|
Description
|
The editable description of the report control block, from 0...50 characters long.
|
|
Data Set
|
Select the data set to include in the report control block.
|
|
Report Id
|
A string value, 0...129 characters long, used as the source identifier in report control block transmissions.
|
|
Configuration Revision
|
The read-only revision number for the report control block. The initial value is 10000.
NOTE: This setting is increased in increments of 10000 each time one of the following changes occurs:
|
|
Parameters area:
|
|
|
Buffer Time (ms)
|
The time interval in milliseconds for the buffering of internal notifications caused by data-change (dchg) or quality-change (qchg) by the BRCB for inclusion into a single report.
|
|
Integrity Period
|
Enter a value, in milliseconds, to periodically force the transmission of all values in the data set. Using this setting synchronizes data values in all clients that receive the transmission.
|
|
Indexed
|
Do one of the following:
This setting is enabled by default.
NOTE:
|
|
Index Number
|
Select an index number for the report control block.
|
|
Trigger Conditions area:
|
|
|
Data-change
|
Select this to transmit a report upon a change in value for an item in the data set.
|
|
Quality-change
|
Select this to transmit a report upon a change in quality for any item in the data set.
|
|
Period
|
Select this to transmit a report of all data set values upon expiration of the IntegrityáPeriod.
NOTE: Schneider Electric recommends that you do not use the integrity reporting function in a Hot Standby system, because the standby 140áNOPá850á00 module does not generate this report. |
|
General-interrogation
|
Select this to transmit a report, in response to a request from a client, containing values for all data items in the data set.
NOTE:
|
|
Report Content area:
|
|
|
Sequence-number
|
Select this to include an auto-generated transmission sequence number to the report control block transmission. This lets the client determine if all transmissions have been received.
|
|
Report-timestamp
|
Select this to include a time stamp in the report control block transmission.
|
|
Reason for inclusion
|
The reason for sending this report, for example:
|
|
Dataset name
|
Select this to include the configured data set name in the report control block transmission.
|
|
Data reference
|
The name of the data set referenced in the report.
|
|
Buffer overflow
|
Select either:
Enabled only if Buffered is selected.
|
|
Entry Id
|
Report entry identifier. Entry Id(0) is reserved for the client. If the client sets Entry Id to (0), the server reports all historic events in its buffer.
Enabled only if Buffered is selected.
|
|
Configuration revision
|
Select this to include the Configuration Revision setting of the report control block in the transmission.
|
|
Step
|
Action
|
|---|---|
|
1
|
In the ReportáControl list, click the + button.
A new report control block appears in list, with the default name report_n (where n represents the sequential number of the control block).
|
|
2
|
Enter values for the Identification, Parameters, TriggeráConditions and ReportáContent settings. Refer to the description of Report Control Settings (above).
NOTE: To enter a setting value, click Enter or move your cursor and click outside the setting input field. |
|
3
|
Save your edits.
|
|
Step
|
Action
|
|---|---|
|
1
|
In the ReportáControl list, select an existing control block.
The settings for the selected report control block appear in the Identification, Parameters, TriggeráConditions and ReportáContent areas.
|
|
2
|
Enter values for the Identification, Parameters, TriggeráConditions and ReportáContent settings. Refer to the section Report Control Settings (above).
NOTE: To enter a setting value, click Enter or move your cursor and click outside the setting input field. |
|
3
|
Save your edits.
|
|
Step
|
Action
|
|---|---|
|
1
|
In the ReportáControl list, select an existing control block.
The settings for the selected report control block appear in the Identification, Parameters, TriggeráConditions and ReportáContent areas.
|
|
2
|
Click the ľ button.
The control block is removed from the list.
|
|
3
|
Save your edits.
|