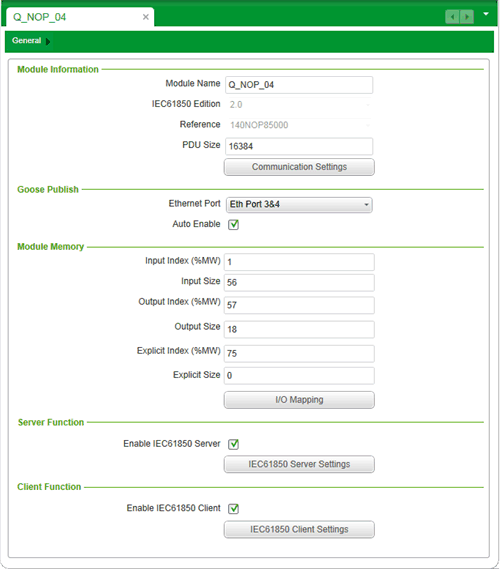
General Window
(Original Document)
Introduction
After you select an IEC61850 edition, the General window opens when you start up the Modicon IEC61850 Configuration Tool:
Use the General window to:
Editing Module Information
Use the Module Information section to edit the name of the module, and to view settings that describe the module commercial reference and protocol edition.
The Module Information section presents the following settings and commands:
Setting
Description
Module Name
A read-only string of ASCII characters. This value is entered in the module Configuration tab when the module is added to the Control Expert project.
NOTE: Control Expert uses this setting as the base string for naming module variables.
IEC61850 Edition
A previously selected, read-only description of the edition of the IEC61850 protocol supported by the 140 NOP 850 00 module
Reference
The read-only commercial reference, or product name, for the 140 NOP 850 00 module.
PDU Size
The size of the manufacturing message specification (MMS) protocol data unit (PDU), from 4K bytes to 64K bytes. Default = 16K bytes.
Opens the Communication Settings window, which consists of the following tabs:
  • IP Setting, where you can assign roles and IP addresses to the four Ethernet ports of the module.
  • RSTP, where you can enter settings to configure the embedded Ethernet switch to be part of a redundant, loop-free logical Ethernet network.
  • SNTP, where you can configure the internal clock of the module to synchronize with a network time server.
  • SNMP, where you can configure the SNMP client service in the module that allows access to module diagnostic and management information.
  • Security, where you can restrict access to the module via TCP port 502.
  • Switch, where you can set baud rates for the four Ethernet ports.
Selecting GOOSE Publication Port
Use the Goose Publish area to specify the Ethernet port or ports used to transmit GOOSE control blocks.
The Goose Publish area presents the following settings:
Setting
Description
Ethernet Port
Select the port used for GOOSE publication:
  • Eth Port 3&4 (default)
  • Eth Port 1
  • Eth Port 2
NOTE:
  • If the port you select shares an IP address with other ports, GOOSE transmissions are published over all ports that share the IP address.
  • GOOSE publication occurs if the Ethernet cable to the selected port is connected or disconnected. GOOSE diagnostic codes are unaffected by the cable being connected or disconnected to the port.
Auto Enable
Indicate if a GOOSE transmission is sent on start-up or re-start:
  • Selected = a GOOSE transmission is sent.
  • De-selected = a GOOSE transmission is not sent.
Viewing Module Memory Location and Size
The Module Memory area displays the size and starting location of memory space reserved for:
NOTE: The Modicon IEC61850 Configuration Tool automatically calculates the memory space allowed to each group of items, based on your I/O Mapping configuration. The beginning memory position is the position you specified as the %MW Start Address setting in the Configuration tab of the Properties window.
The Module Memory section presents the following settings:
Setting
Description
Input Index (%MW)
The starting address offset for input data.
Input Size
The number of 16-bit words dedicated to input data.
Output Index (%MW)
The starting address offset for output data.
Output Size
The number of 16-bit words dedicated to output data.
Explicit Index (%MW)
The starting address offset for explicit messaging data.
Explicit Size
The number of 16-bit words dedicated to explicit messaging data.
I/O Mapping button
Opens the I/O Mapping window, where you can map server and client data attributes to module memory addresses.
Enabling and Disabling the IEC61850 Server
Use the controls in the Server Function section to enable and disable the IEC61850 server.
The Server Function section presents the following settings:
Setting
Description
Enable IEC61850 Server
Select this to enable the IEC61850 server; de-select it to disable the server. This setting is de-selected by default.
NOTE:
  • When this setting is Selected: the IEC61850 Server Settings button is enabled.
  • If you enable and configure the IEC61850 server; and then disable the server, your server configuration settings are saved. The saved server settings are re-applied when you later select this setting and enable the server.
IEC61850 Server Settings button
Opens the Client Settings window, where you can complete the configuration of client settings.
NOTE: This button is enabled only when Enable IEC61850 Client is selected.
NOTE: Enabling the server does not complete the server configuration. After enabling the server, click the IEC61850 Server Settings button to open the IEC61650 Server window, where you can complete the server configuration.
Enabling and Disabling the IEC61850 Client
Use the controls in the Client Function section to enable and disable the IEC61850 client.
The Client Function section presents the following settings:
Setting
Description
Enable IEC61850 Client
Select this to enable the IEC61850 client; de-select it to disable the client. This setting is de-selected by default.
NOTE: When this setting is:
  • Selected: the IEC61850 Client Settings button is enabled.
  • De-selected: all previously configured client configuration settings for this module are permanently deleted.
IEC61850 Client Settings button
Opens the Client Settings window, where you can complete the configuration of client settings.
NOTE: This button is enabled only when Enable IEC61850 Client is selected.