|
Configuring the Module Name and Starting Memory Location
|
|


|
(Original Document)
|
|
Configuring the Module Name and Starting Memory Location
|
|
|
(Original Document)
|
|
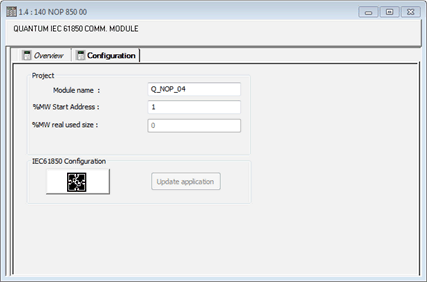
Step
|
Action
|
|---|---|
|
1
|
Right click the 140 NOP 850 00 module, then select Open Module in the context menu.
|
|
2
|
Select the Configuration tab.
|
|
3
|
Enter a Module name: an ASCII string up to a maximum of 10 characters.
NOTE: The beginning character cannot be an Arabic numeral. |
|
4
|
Enter a %MW Start Address: an integer value from 1 to the maximal %MW address, which depends upon the memory capacity of the CPU.
|
|
5
|
Select Validate in the main menu.
A message opens informing you that the module name cannot be edited after validation.
|
|
6
|
Click OK to close the message.
The Module name becomes read-only.
|
