

At a Glance
The (right-click) contextual menu of the DTM Browser offers functions that depend on item clicked on.
The DTM Browser Contextual Menu accesses:
Adding and deleting DTMs
Connecting and disconnecting DTMs to their physical devices
Displaying and printing the properties of a DTM
Transferring DTM configuration information to and from the physical device
DTM-specific functions (via the Device menu function)
Field Bus Discovery used to scan the physical devices in a fieldbus network
Host PC
The contextual menu:
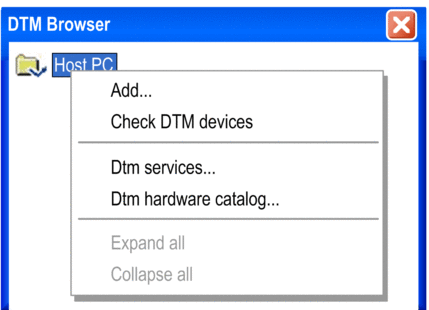
The HostPC contextual menu has the following items:
Name |
Description |
|---|---|
(1) |
The dialog box opens, a version of the , allowing the selection of a Communication DTM. |
(1) |
This function checks the current project for invalid or non-PC-installed DTMs. Refer to Check DTM devices below. |
(1) |
This function allows the users to select/unselect all the DTMs added in the project and performed actions on the selected DTMs. Refer to DTM Services below. |
(1) |
This function open the tab in the . |
(2) |
All DTMs in the project are shown. |
(2) |
Only the Commutation DTMs in the project are shown. |
(1) This function is available via the menu. (2) This function is similar to Project Browser Expand/Collapse all. |
|
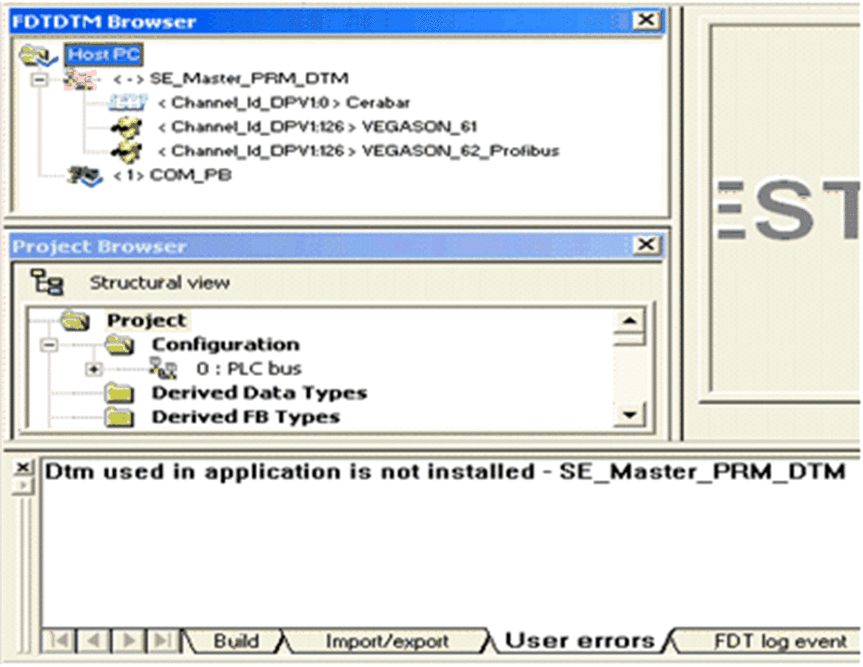
Check DTM Devices
If the results of the check include invalid or non-installed DTMs, they are displayed in the User errors tab in the bottom information window and a Red X is placed over their icons in the DTM Browser:
DTM Services
The users can select/unselect DTMs added in the project and performed actions on the selected DTMs:
The DTMs services dialog box menu contains the following group boxes:
Name |
Description |
|---|---|
|
The user can select or unselect all communication DTMs and attached DTMs currently added in the project. |
|
The area lists all DTMs added in the project. The set of selected DTMs can be modified by selecting or unselecting the DTMs in the Structure tree control. |
|
The user can perform actions for each DTMs contained in the set of DTMs previously selected in the Structure tree control. |
|
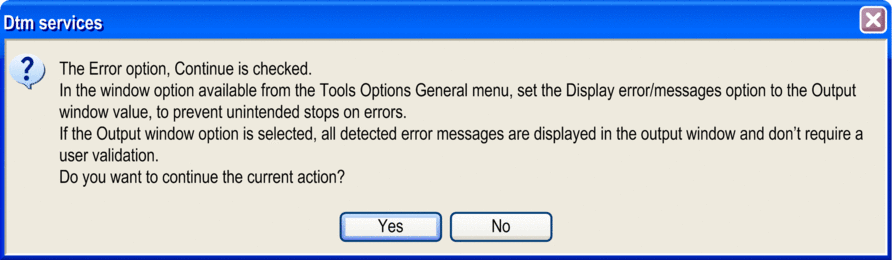
The user can select to or the process if an error is detected. A dialog box is displayed whatever options is selected. |
|
To select either all DTMs added in the project or none. |
The dialog box below is an example when the user selects either or in the On errors group box:
Communication and Other DTMs
The available DTM Browser contextual menu items differ according to the DTM selected:
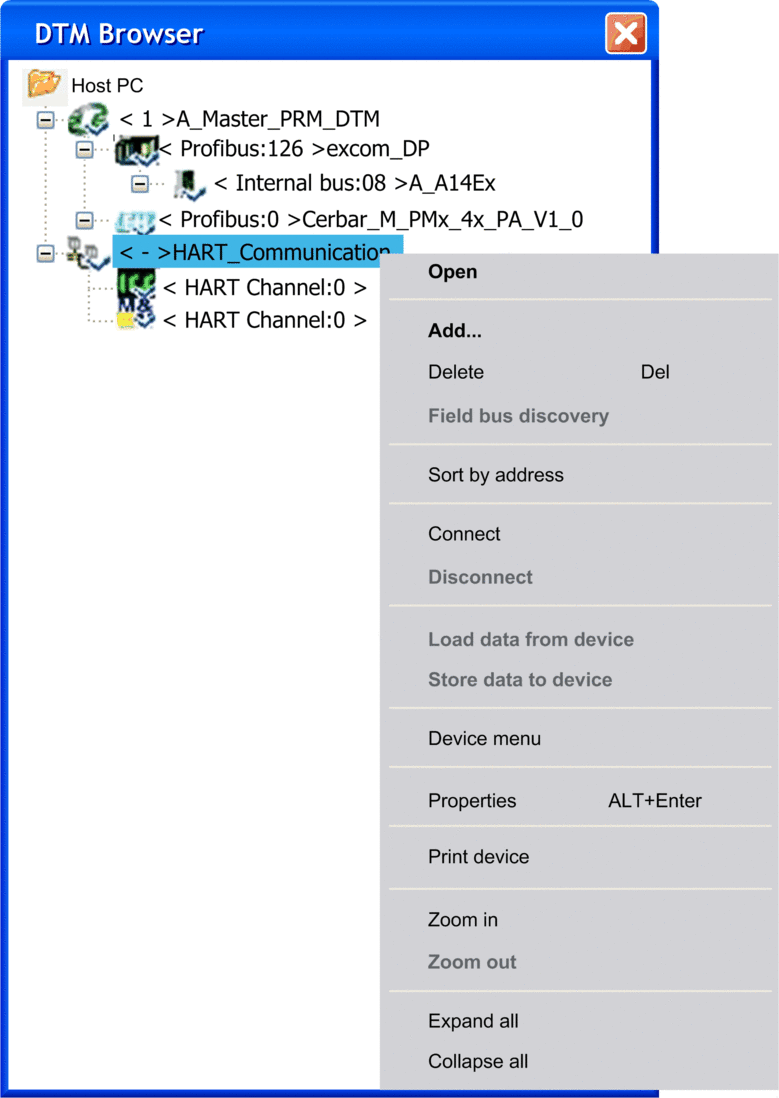
The contextual menu has the following items:
Name |
Description |
|---|---|
(1) |
This opens the “<device name> - DTM Configuration” window with the Configuration and Device Description information supplied by the device vendor. A double-click on the DTM in the DTM Browser also opens this window. |
(1) |
This opens the dialog box, a version of the , allowing the instantiation of a DTM. The DTMs are filtered, that is, the window only displays DTMs compatible with the DTM selected in the DTM Browser. To add a device refer to Add device below |
(1) |
If the selected DTM allows this function, this deletes the selected DTM and its sub-node DTMs from the DTM connectivity tree. Deletion from the DTM connectivity tree does not effect the DTMs link to the I/O Scanning table. NOTE: If the DTM you want to delete is a Gateway, and is not
installed on the Host PC:
|
|
This scans the connected physical devices to create the corresponding field bus connection topology. This item is only available in the contextual menu if a device connected. Refer to Field Bus Discovery service. NOTE: The DTM to scan has to be installed in the PC and
the Hardware Catalog must be up to date.
|
|
This displays the DTMs sorted under their parent DTMs according to the bus address of its physical device in ascending order. |
(1) |
This connects the DTM to its physical device on the network. This connection does not depend on the PLC online/offline status of the Control Expert project application. Connecting a Gateway- or Device-DTM implicitly connects its parent DTM. While the device is connected, is not available. |
(1) |
This disconnects the DTM from its physical device. This disconnection does not depend on the PLC online/offline status of the Control Expert project application. Disconnecting a DTM implicitly disconnects all its child DTMs. While the device is disconnected, is not available. |
(1) |
This uploads the configuration parameters from the physical device to the local DTM, but not from the application (binary) in the PLC. While the device is disconnected, is not available. |
(1) |
This downloads the local DTM parameters to the physical device. Each DTM must be stored manually (one by one). While the device is disconnected, is not available. To make an application in the PLC consistent with the stored DTM, the user must build the Control Expert application and download the new version of the application to the PLC |
|
The functions in this menu are vendor dependent, such as:
When configuring a DTM, the changes are validated in Control Expert in 2 ways, depending on the changes:
|
|
Refer to the DTM Properties Tabs section. |
|
If this optional function is supported by a DTM, it opens the vendor device documentation in Internet Explorer, which can then be printed. Only one DTM information can be printed out at time. A print of the whole network is not available. |
(1),(2) |
This displays only the selected DTM node and its child DTMs. While zoomed-in, is not available. |
(1),(2) |
This returns to the full display of the DTM connectivity tree. While there is a full display, is not available. |
(3) |
This displays all DTMs below the selected DTM. |
(3) |
This displays only the selected DTM. |
(1) This function is available via the menu. (2) This function is similar to Project Browser Zoom in/out. (3) This function is similar to Project Browser Expand/Collapse all. (4) Advanced option are available DTM configuration screen |
|
Add a DTM Device
To add a new DTM to the connectivity tree in the DTM Browser:
Step |
Action |
|---|---|
1 |
Make sure that the DTM appears in the . If it is not in the catalog, perform an update of the using the button. If it still does not appear in the , the DTM must be installed on the PC. |
2 |
In the DTM Browser select the node where the DTM is to be added. |
3 |
Right-click and select |
4 |
In the window select the DTM to be added to the DTM connectivity tree. |
5 |
Either:
Results: The 4-tab DTM dialog opens. |
6 |
Using the 4 tabs, verify that the correct DTM has been added to the DTM connectivity tree and verify its configuration. |
7 |
If the DTM Alias name does not meet the Control Expert (or the user application) naming rules, it must be changed before closing the dialog. |
8 |
Click on the button to finish adding the DTM to the network tree or click on the button to close the dialog without adding anything. |