Context Menu Commands
The Topology Manager makes extensive use of context menu commands, which you can access by right-clicking various objects of the user interface, such as windows, panes, nodes, rows, devices.
Topology Manager Window
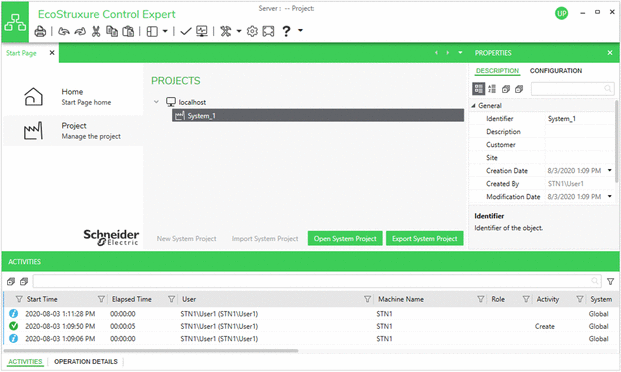
The following figure shows an example of the Topology Manager window when Control Expert is connected to a system server but no system project is open. By default, the opens.

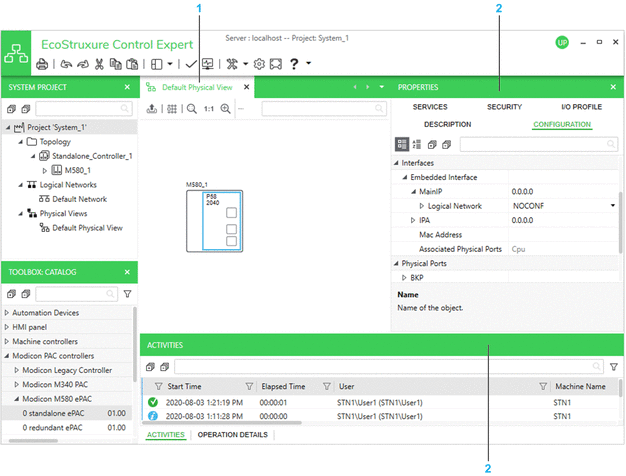
The following figure shows an example of the Topology Manager window when a system project is open.

| Item | Description |
| 1 | Refer to the topic describing views. |
| 2 | Refer to the topic describing panes. |
Toolbar Description

Item |
Description |
|
|---|---|---|
1 |
Opens the . |
|
2 |
Lets you print the contents of the active window to file (for example, PDF). The button is available only for certain views, such as physical views or rack views. |
|
3 |
Undo and redo buttons. Lets you undo/redo actions recorded in the history of actions of the system project that is open. You can view the history of actions and undo/redo several actions at once by using the pane. |
|
4 |
Cut, copy, and paste buttons. Refer to the description of views and panes for more information on how to use the functionality. |
|
5 |
Opens the menu, which lets you open various views and panes of the Topology Manager. If a view or pane is already open, it becomes the active one. The menu does not let you to open views of which you can open several instances per system project, such as physical views. |
|
6 |
Analyzes the consistency of the system project. |
|
7 |
Activates/deactivates system monitoring. The button is highlighted when system monitoring is active. |
|
8 |
Opens the menu, which contains the following submenus: |
|
|
Lets you update the local DTM with the DTMs that you have installed by using an executable or the EDS/GSD installation tool. This also updates the DTM of Control Expert Classic. |
|
|
Opens the , which compares the DTMs that are used by devices of the system project with those installed on the computer and informs you of discrepancies. |
|
|
Contains commands that let you manage the EDS files, which are used to create DTMs for EtherNet/IP devices. |
|
|
Contains commands that let you add and remove GSD files, which are used to create DTMs for PROFIBUS devices. Additional commands let you export the GSD files that are installed on the local computer to a library file and import such a file. |
|
|
Contains commands that open the EcoStruxure Control Engineering web platform in a window inside the Topology Manager. The URL appears in the section of the window. Internet connection and registration required. NOTE: Microsoft Edge
WebView2 runtime needs to be installed on the local computer.
|
|
9 |
Opens the window. |
|
10 |
Switches the active view to full screen mode. Does not work when the active view is a floating window. |
|
11 |
Opens the menu, which contains the following submenus: |
|
|
Opens the Control Expert global HTML help. |
|
|
Opens a help page, which describes the main steps to engineer a control system. |
|
|
Contains commands that open the Schneider Electric Exchange web platform in a window inside the Topology Manager. It lets you:
Internet connection required. NOTE: Microsoft Edge WebView2 runtime needs to be installed on the
local computer.
|
|
|
Opens a dialog box from where you can save log files. |
|
|
Opens the dialog box from where you can start a self-test of the local Control Expert installation. The section lets you see which hotfixes are installed and what they apply to.
|
|
12 |
Network address of the system server to which Control Expert is connected and name of the system project that is open. |
|
13 |
Notification icon. Lets you view notifications generated by the system server to which you are connected. Click the icon to view the list of notifications. Once you delete a notification, you cannot view it anymore. |
|
14 |
Click the icon to view the following information:
The command locks the user interface of the Control Expert instance. Operations that are in progress continue executing while the lock is active. To unlock, you must enter in the dialog box the password of the user who is logged in . NOTE: You can disable the automatic lock and configure the inactivity
period after which the lock is active.
|
|


