|
Subscribing to GOOSE Control Blocks from External References
|
|


|
(Original Document)
|
|
Subscribing to GOOSE Control Blocks from External References
|
|
|
(Original Document)
|
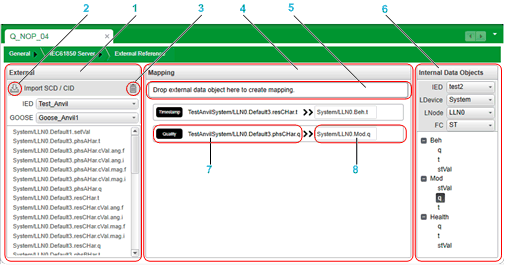
1External GOOSE data reference
2Import SCD / ICD button
3Delete remote IED button
4Mapping table
5Target drop area for the creation of a new mapping item
6Internal Data Objects filter (for the 140 NOP 850 00 module)
7External mapped data item
8Internal mapped data item
|
Step
|
Action
|
|---|---|
|
1
|
In the External panel, click the Import SCD / CID button.
The Importing external IED dialog appears.
|
|
2
|
In the Importing external IED dialog, click the ellipsis button.
The Open dialog displays.
|
|
3
|
In the Open dialog, navigate to and select an SCD or CID file; then click Open.
|
|
4
|
In the Select IED to Import list, select the IED that publishes the data you want to import, and click OK.
NOTE: Because all imported IEDs are managed in the same space, each imported IED needs to have a unique name. The software will not import IEDs with same name as previously imported IED. |
|
5
|
In the GOOSE list, select the control block that contains the data you want to import.
The external reference list – located below the External filtering selections – presents the external references that satisfy the selected filtering criteria.
|
|
6
|
In the External panel, select a data attribute from the external references list, then drag it to the area marked Drag external data object here to create mapping. A row is added to the Mapping table, and the data attribute you added appears on the left side of the newly added mapping item.
the right box of the data item in the Mapping table to which you want the external reference mapped.
Repeat this step as many times as there are mapping items to populate.
|
|
7
|
In the Internal data panel, use the filtering lists to select the data attribute you want to add to PLC memory. Filtering items include:
The data attribute list – located below the filtering selections – presents the data attributes that satisfy the selected filtering criteria.
|
|
8
|
Use your cursor to select a data attribute in the Internal Data Objects data attribute list, and drag it to the right box of the data item in the Mapping table to which you want the internal data item mapped.
NOTE: When you select an internal data attribute, it needs to be of the same data type as the data item to which it is mapped. If you attempt to map data items of different types, a message box opens indicating the attempted mapping is not permitted. Repeat this step as many times as there are mapping items to populate.
|
|
9
|
When you finish adding mapping items, Save your edits.
|
|
Step
|
Action
|
|---|---|
|
1
|
In the Internal Data Objects filter, navigate to the data attribute you want to add.
|
|
2
|
Select the replacement internal data item, and drag it to the right box of a mapping item. The new internal data item overwrites the old one.
|
