Use the
Access Control page to restrict access to the Ethernet communication module in its role as either a Modbus TCP or EtherNet/IP server. When access control is enabled in the
Services page, add the IP addresses of the following devices to the list of
Authorized Addresses to permit communication with that device:
-
the Ethernet communication module itself, so that the module can use EtherNet/IP explicit messaging for any of the following purposes:
-
any client device that may send a request to the Ethernet communication module, in its role as either Modbus TCP or EtherNet/IP server
-
your own maintenance PC, so that you can communicate with the PLC via Control Expert to configure and diagnose your application, and to view the module’s web pages
-
any target device to which the Ethernet communication module may send a Modbus TCP explicit message
NOTE: You need not add to list the IP address of devices that will be the target of EtherNet/IP explicit messages.
When access control is disabled in the Services page, the Ethernet communication module will accept Modbus TCP and EtherNet/IP requests from any device.
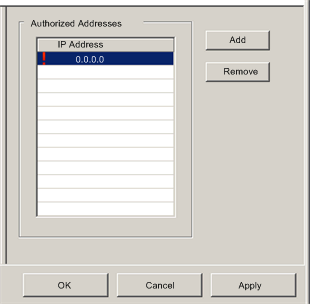
The following graphic depicts the Access Control page immediately after a new row has been added to the list of Authorized Addresses, but before the new item has been configured:
To display this page:
|
Step
|
Description
|
|
1
|
Select the Services node in the navigation tree located on the left side of the Device Editor. The Services page opens.
|
|
2
|
In the Services page, set the Access Control field to Enabled and click either OK or Apply. The Access Control node appears in the navigation tree.
|
|
3
|
Select the Access Control node in the navigation tree.
|
Adding and Removing Devices in the Authorized Address List
To add a device to the Authorized Addresses list:
|
Step
|
Description
|
|
1
|
In the Access Control page, click Add.
A new row appears in the Authorized Addresses list, displaying:
-
a red exclamation point, indicating editing has begun, and
-
a placeholder IP address of 0.0.0.0
|
|
2
|
Double-click the left mouse button on the placeholder IP address.
The IP address field expands and becomes editable.
|
|
3
|
In the new IP address field, type in the IP address of the device which will be able to access the communication module, then press Enter.
|
|
4
|
Repeat steps 1 through 3, above, for each additional device to which you want to grant access to the communication module.
|
|
5
|
Refer to the topic Configuring Properties in the Device Editor for instructions on how to save your configuration edits. |
To remove a device from the Authorized Addresses list, select its IP address in the list, then click Remove. The selected IP address is removed.
