

Overview
You can open the Communication Mapping View from the context menu of the device or module whose scanner service you want to use either way:
By clicking a protocol in the submenu.
By clicking .
It lets you establish communication between devices of the system project and scanner services of a given PAC and between PACs.
Two distinct views exist to manage communication for the following protocols:
Modbus TCP
EtherNet/IP
Communication Mapping Views
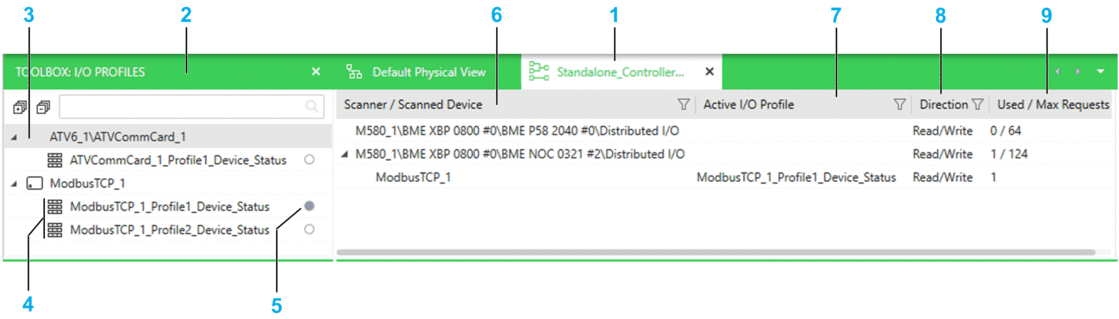
The following figure shows an example of the Communication Mapping View for devices communicating by using the Modbus TCP protocol.
Communication Mapping View for devices communicating by using the EtherNet/IP protocol.

Item |
Description |
|---|---|
1 |
Name of the PAC whose scanner services appear in this view. The communication protocol is indicated in a tooltip. |
2 |
pane that lists the devices and their modules that exist in the system project and which can be scanned. Devices appear in the pane only once their I/O profile data is available. The content of the pane is contextual and related to the Communication Mapping View that is active. You can filter the list by using the search field. NOTE: Devices that appear under this
node may already be scanned by using the scanner services of another PAC.
|
3 |
Node representing a device that can be scanned. |
4 |
I/O profiles that exist for each device including local slaves. NOTE: The values that you see in the pane when you select an I/O profile in this pane are
those that re configured for the device.
|
5 |
An indicator that is shown selected indicates that an instance of the I/O profile has been added to a scanner. The information is related to the Communication Mapping View that is active. |
6 |
Column showing the scanner services of the PAC and the devices that they are scanning including local slaves. When a PAC is equipped with an RIO scanner, it appears in the Communication Mapping View for EtherNet/IP. |
7 |
Column showing the I/O profile of the device that is being used for scanning and that is the active profile. It is an instance of the I/O profile of the device. You can edit certain attributes of the active profile and its requests/connections without impacting the values of the device I/O profile. |
8 |
For each scanner and I/O profile, indicates the direction of the communication. |
9 |
|
10 |
When you add a drop with a CRA adapter module to a PAC and apply changes, the adapter module and its I/O profile appear automatically under the RIO scanner of the CPU module and cannot be moved. In general, modules of a PAC that appear automatically under a scanner in the Communication Mapping View cannot be moved and do not appear in the pane. |
Context Menu Commands
The table describes the commands of the context menu of the active I/O profile.
Command |
Description |
|---|---|
|
Replaces the values of the active I/O profile with the values that are configured in the I/O profile of the device. (These are the values that appear in the tab of the pane when you select the device or its I/O profile in the pane.) The command applies to the following attributes:
|
|
Removes the active I/O profile from the scanner and adds it to the Clipboard. |
|
Adds the active I/O profile to the Clipboard. |
|
Removes the active I/O profile from the scanner. Values that you have changed in the active I/O profile are discarded. |
|
Opens a submenu containing commands that pertain to the device that is scanned. |
The table describes the commands of the context menu of the scanner. For a description of the other commands, refer to the topic describing device context menu commands.
Command |
Description |
|---|---|
|
Adds the communication profile that you have cut or copied to a scanner in the same or another compatible Communication Mapping View. |
Multiselection of Entries
When you select multiple entries in the Communication Mapping View or pane, the pane shows the tabs and attributes that the objects have in common.