

Overview
Some tables let you group data in categories, which correspond to one or more column headers.
You can also open a filter menu that lets you refine data that is displayed according to criteria and/or conditions that you define.
In addition, you can sort data in ascending or descending alphanumeric order.
Grouping Data
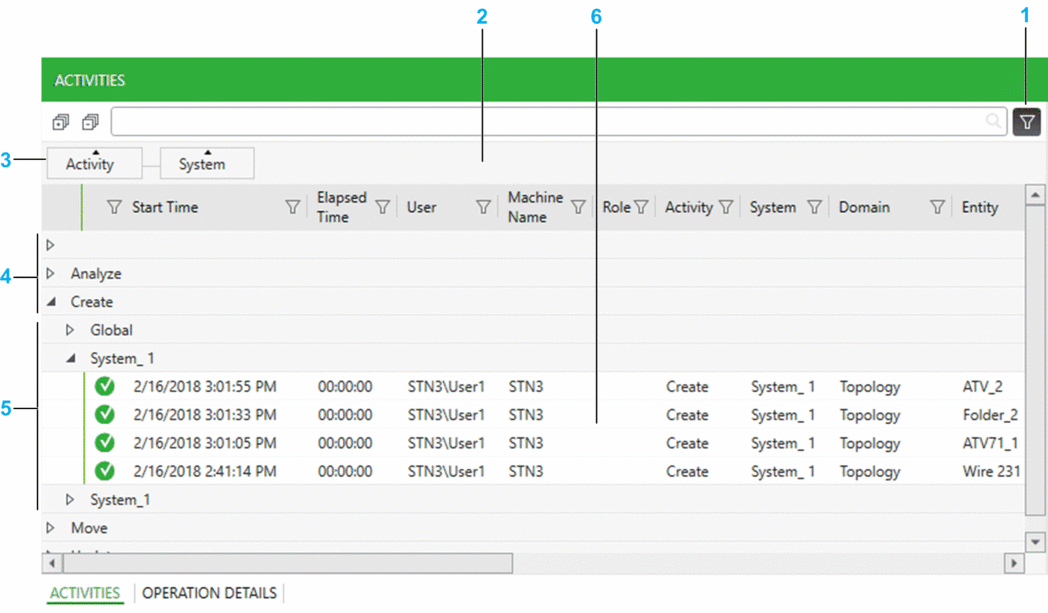
The following figure shows the tab of the notification pane as an example where two categories have been created to group entries shown in the tab.
Item |
Description |
|---|---|
1 |
Button to toggle the grouping bar. Groupings that you have defined remain when you hide the bar. |
2 |
Grouping bar. |
3 |
Drag any category (column header with a label) to the bar to group data by that category. The column is removed from the table:
|
4 |
Group that corresponds to the first-level category ( in this example). |
5 |
Group that corresponds to the second-level category ( in this example). |
6 |
Data that is displayed in the table. You can use the sorting and filter features of each column. |
Using the Filter Menu
The following figure shows an example of the filter menu that is displayed for the column.

Item |
Description |
|---|---|
1 |
Column filter icon. Click the icon to open the filter menu of the column. The icon turns green to indicate that you have applied a filter on the column. NOTE: You can filter data of several columns simultaneously
by using the filter menu of each of the columns.
|
2 |
Data field. The field displays in a flat list one of each of all the entries that the column contains. That is, if an entry appears more than once in the column, it is displayed only once in the data field. If the column contains only partial data because, for example, a keyword search has been performed, the data field displays also only the partial data. Select one or more entries. Only entries that you select will be displayed when you apply the filter. |
3 |
Expression builder. Lets you build custom filter expressions by selecting one or two conditions and an operator from a list. The list of available conditions varies and is adapted to the data type of the column. NOTE: If you build an expression and select an entry in the
data field, your selection is used as an additional condition in the
expression with the AND operator. If you select
several entries in the data field, each one is treated as OR condition before the result is used as an additional
condition.
|
4 |
Match case button. Click the button to enable case-sensitive filtering as an additional condition. The button appears only for columns showing data of String type. |
5 |
Click the button to apply the filter to the column. |
6 |
Click the button to clear the filter for the column. |
Sorting Data
When sorting is enabled, a triangle appears in the column header.
Click a column header to enable sorting of the data that the column contains.
Clicking the column header repeatedly toggles between the following states:
Arrow up: Sorts in ascending alphanumeric order.
Arrow down: Sorts in descending alphanumeric order.
No arrow: No sorting. Data is displayed by using the default display order defined for the column.
Hold to enable sorting of multiple columns (when available). Maintain pressed to change the sorting order.
When data is grouped by category, objects are sorted within their respective category.