|
CANopen Configuration
|
|


|
|
|
CANopen Configuration
|
|
|
|
|
Step
|
Action
|
|---|---|
|
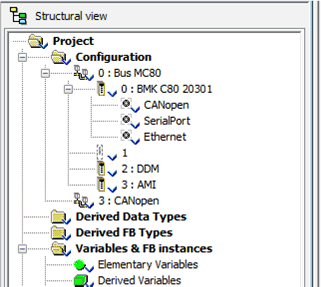
1
|
From the project navigator, expand the Configuration directory.
Result: The following screen appears:
 |
|
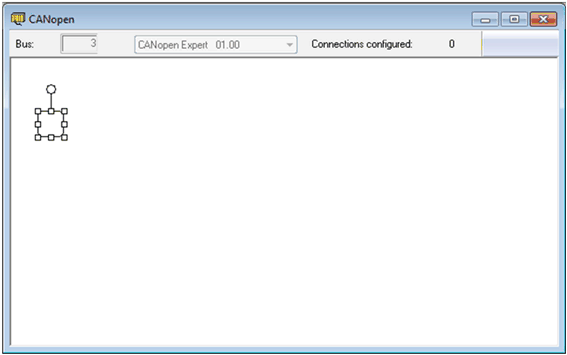
2
|
To open the CANopen bus screen, select one of the following methods:
Result: The CANopen window appears.
 |
|
Step
|
Action
|
|---|---|
|
1
|
Access the CANopen configuration screen.
|
|
2
|
Double-click the place where the module should be connected.
Result: The New Device screen appears.
|
|
3
|
Enter the number of the connection point corresponding to the address.
By default, the Unity Pro software offers the first free consecutive address.
|
|
4
|
In the Communicator field, select the element type enabling communication on the CANopen bus.
For modules with built-in communicators, this window does not appear.
|
|
5
|
Validate with Ok.
Result: The module is declared.
|
|
Step
|
Action
|
|---|---|
|
1
|
Access the CANopen configuration screen.
|
|
2
|
Right-click the connection point of the device to be deleted, then click Delete the drop.
|
|
Step
|
Action
|
|---|---|
|
1
|
Access the CANopen configuration screen.
|
|
2
|
Select the connection point to be moved (a frame surrounds the selected connection point).
|
|
3
|
Drag and drop the connection point to be moved to an empty connection point.
Result: The Move Device screen appears.
|
|
4
|
Enter the number of the destination connection point.
|
|
5
|
Confirm the new connection point by pressing OK.
Result: The Move Device screen appears.
|
|
6
|
Confirm the modification by selecting Yes to modify the addresses of the inputs/outputs objects in the program and move the variables associated with these objects.
|
|
Step
|
Action
|
|---|---|
|
1
|
Access the CANopen configuration screen.
|
|
2
|
Right-click the device to be copied, then click Copy.
|
|
3
|
Right-click the connection point desired, then click Paste.
Result: The New Device screen appears.
|
|
4
|
Enter the number of the destination connection point.
|
|
5
|
Confirm the new connection point by selecting OK.
|
|
Step
|
Action
|
|---|---|
|
1
|
Open the CANopen directory under BUS MC80 directory
Result: The following screen appears:
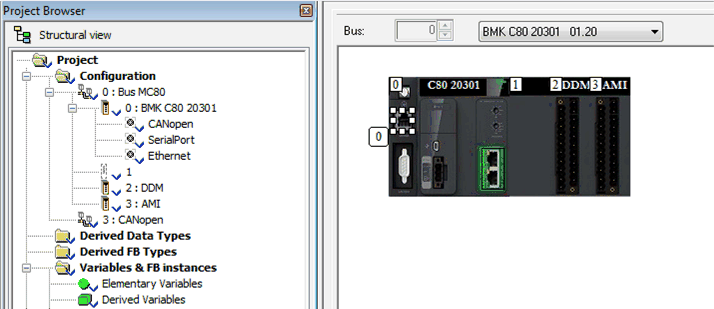 Double-click the processor's CANopen port.
|
|
2
|
The master configuration screen appears:
 |
|
Address
|
Element
|
Function
|
|---|---|---|
|
1
|
Tab
|
The tab in the foreground indicates the type of screen displayed. In this case, it is the configuration screen.
|
|
2
|
Module area
|
This area is made up of the abbreviated heading of the processor equipped with a CANopen port.
|
|
3
|
Channel area
|
This zone allows you to select the communication channel to be configured.
By clicking the device, you display the tabs:
Overview: Gives the characteristics of the built-in CANopen port,
By clicking a channel, you display the tabs:
Configuration: Enables you to declare and configure the CANopen master
|
|
4
|
General parameters area
|
This field enables you to:
The tasks are asynchronous in relation to exchanges on the bus.
|
|
5
|
Configuration area
|
This field enables you to:
|
|
Parameter
|
Description
|
|---|---|
|
Outputs- Fallback
|
The fallback information area contains two options, which defines the behavior of the device when the CPU is in STOP or in HALT:
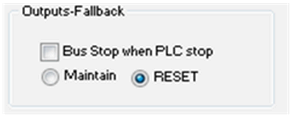 NOTE: The Bus Stop when PLC stop check box in the fallback area configuration is only available in CANopen expert mode.
|
|
Bus Parameters
|
To configure the bus, it is necessary to indicate the following parameters:
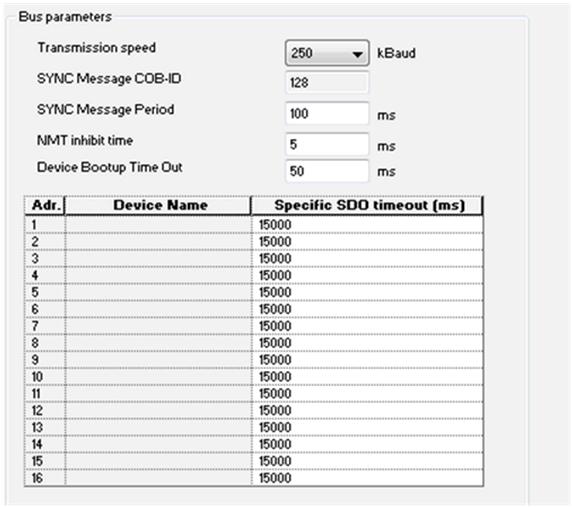 NOTE: Only 16 devices are supported in 16 possible addresses from 1…16. |
|
Step
|
Action
|
|---|---|
|
1
|
Access the CANopen bus configuration screen.
|
|
2
|
Double-click the slave to be configured.
|
|
3
|
Configure the Bootup Procedure using the Bootup tab.
|
|
4
|
Integrate a third pary product using the Object Dictionary tab.
|
|
5
|
Configure the usage function using the Configuration tab.
|
|
6
|
Configure the PDOs using the PDO tab.
|
|
7
|
Select the error control using the Error control tab.
|
|
Address
|
Element
|
Function
|
|---|---|---|
|
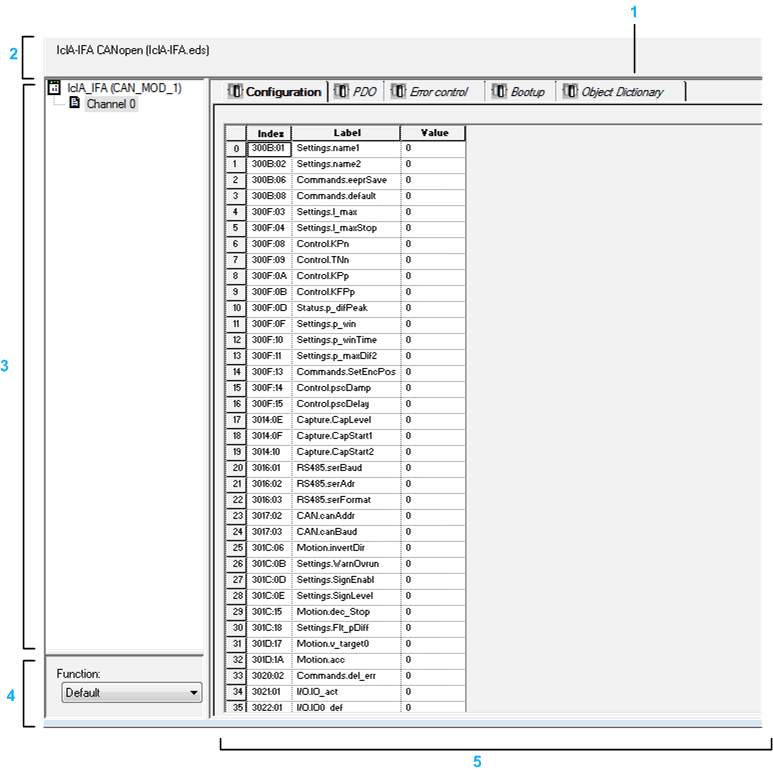
1
|
Tab
|
The tab in the foreground indicates the type of screen displayed. In this case, it is the configuration screen.
|
|
2
|
Module area
|
Gives a reminder of the device’s shortened name.
|
|
3
|
Channel area
|
This zone allows you to select the communication channel to be configured.
By clicking the device, you display the following tabs:
By clicking the channel, you display the following tabs:
|
|
4
|
General parameters area
|
This field allows you to select the slave function.
|
|
5
|
Configuration area
|
This area is used to set up the channels of the devices.
Some devices can be configured with an external tool. In this case, the configuration is stored in the device and you cannot enter configuration parameters because this field is empty.
|

|
Zone
|
Description
|
|---|---|
|
PDO
|
PDOs make it possible to manage the communication flow between the CANopen Master and the slaves. The PDO tab allows you to configure a PDO.
|
|
Error Control
|
The Error control tab for CANopen slave modules allows you to configure monitoring.
|
|
Bootup
|
The goal of bootup procedure tab is to bypass the standard bootup procedure for devices which do not comply with CANopen standards.
|
|
Object Dictionary
|
The Object Dictionary tab allows you to configure and integrate third party products, by:
|
|
NOTE: The I/O vision of CANopen devices is based on Device DDT. |
|
|
Step
|
Action
|
|---|---|
|
1
|
Verify that Unity Pro software is not running
|
|
2
|
Select:
Start ->Programs->Schneider Electric->Unity Pro->Hardware Catalog Manager
|
|
Zone
|
Description
|
|---|---|
|
Overview
|
In this screen, you can enter a text description of the device and the related functions. It will be displayed in the Unity Module Editor.
|
|
PDO Mapping
|
The PDO mapping tab opens a CANopen expert screen for PDO configuration.
The PDO mapping configuration is composed of 3 parts:
|
|
Parameters
|
The parameters tab is used to modify the properties of parameters.
The properties of parameters are:
|
|
Bootup Procedure
|
The goal of bootup procedure tab is to bypass the standard bootup procedure for devices which do not comply with CANopen standards
|
|
Object Dictionary
|
The object dictionary screen is a CANopen Expert editor, and allows to:
|
|
EDS
|
The EDS tab displays in read-only mode the content of the EDS used to build the device.
|
|
Step
|
Action
|
|---|---|
|
1
|
Open the Catalog Manager.
|
|
2
|
|
|
3
|
A windows dialog box appears to select the EDS or DCF file to import:
|
|
4
|
Only one EDS or DCF file can be selected at a time - multiple selections are not permitted.
By default, the name of the EDS or DCF file is used as device name although it can be modified.
The device name cannot be changed after this step.
|
|
5
|
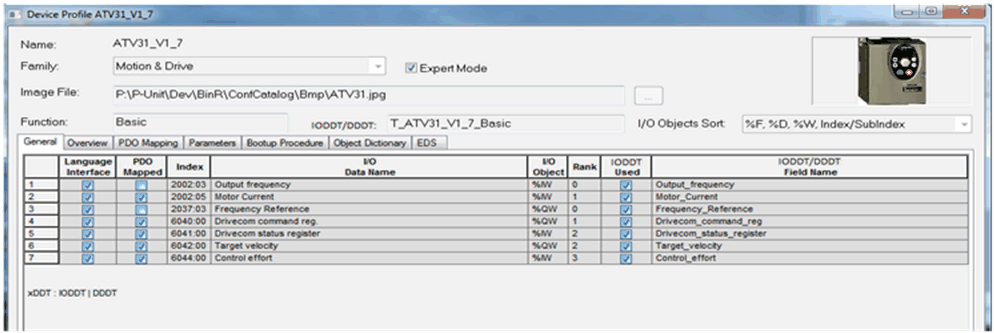
A screen appears showing the new device parameters. In this tab, you can sort the objects in different ways: either clicking the column head or selecting the checkboxes then clicking the column head again.
|
|
6
|
Some parameters on the device profile screen can be changed by the user:
When all configuration parameters are set as required, click OK.
|
|
7
|
Return to the Catalog Manager main screen and click the button ‘Build Catalog’ in order to save any changes, and to load the new device into the Catalog Manager database.
A window appears showing the progress of the catalog build.
When the build is complete, the device is indicated with a
 icon. icon. |
|
Step
|
Action
|
|---|---|
|
1
|
Open the Catalog Manager.
|
|
2
|
There are different ways to access the configuration screen:
|
|
3
|
A windows dialog box appears showing the basic configuration parameters.
|
|
4
|
When configuration is complete, click OK.
Return to the Catalog Manager main screen and click the button ‘Build Catalog’ in order to save any changes and to load the new function into the Catalog Manager database.
|
|
Step
|
Action
|
|---|---|
|
1
|
Verify that your changes have been saved:
|
|
2
|
Select File → Exit
OR
Select Close on the main windows.
|
