|
Configuring the Ethernet Port of the CPU
|
|


|
|
|
Configuring the Ethernet Port of the CPU
|
|
|
|
|
Step
|
Action
|
|---|---|
|
1
|
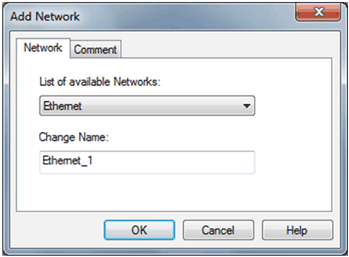
In the Project Browser, right-click the Network subdirectory in the Communication directory and select the New Network option.
Result: The Add Network screen appears.
 |
|
2
|
Choose Ethernet in the List of available networks and choose a meaningful name for your selection:
 |
|
3
|
Click OK. A new logic network will be created.
|
|
Step
|
Action
|
|---|---|
|
1
|
Open the project browser in order to see the logic networks of your application.
|
|
2
|
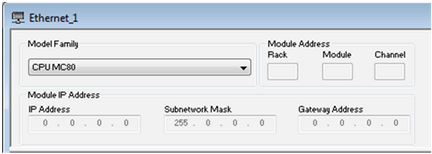
Right-click the Ethernet logic network to be configured and select Open.
Result: The Ethernet configuration screen is displayed.
 |
|
3
|
Scroll to choose the Model Family of your network.
|
|
Step
|
Action
|
|---|---|
|
1
|
Open the Ethernet configuration screen.
|
|
2
|
Configure the Ethernet link with the ETH TCP IP function.
|
|
3
|
Link to the Ethernet network.
|
|
Step
|
Action
|
|---|---|
|
1
|
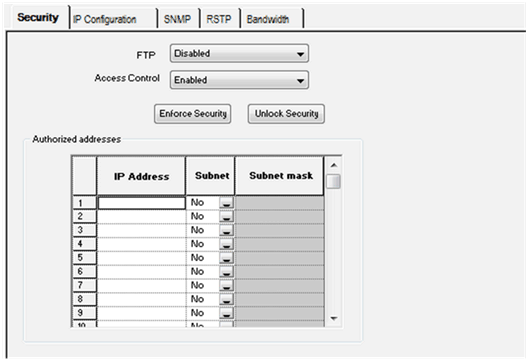
Access the module configuration screen.
|
|
2
|
Select the Security tab as shown in the following figure.
|
|
Feature
|
Characteristic
|
|---|---|
|
FTP
|
Enabled or Disabled
|
|
Access Control
|
Enabled or Disabled
|
|
ACL with 128 lines
|
1 hidden reserved for USB
|
|
NOTE: By default, the Security is Enforced (FTP Disabled and Access Control Enabled). |
|
|
Step
|
Action
|
|---|---|
|
1
|
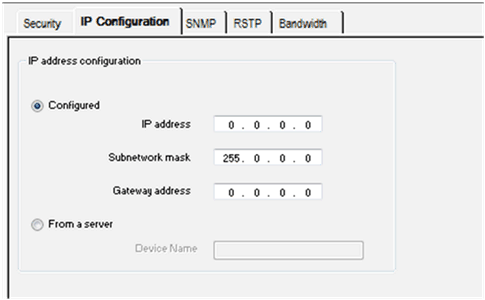
Access the module configuration screen.
|
|
2
|
Select the IP configuration tab as shown in the following figure.
|
|
Zone
|
Description
|
|---|---|
|
IP address configuration
|
On the IP Configuration tab, you can define the IP address of a module in the IP address configuration zone. The options are:
NOTE: To configure IP addresses, obtain the appropriate network address and subnetwork mask from your system administrator. |
|
Configured
|
Selecting the Configured option allows manual configuration according to your own requirements:
NOTE:
|
|
From a server
|
Selecting the From a server option allows the configuration of module’s IP address from a remote device acting as a DHCP server. When the From a server button is active:
NOTE: The maximum length for the device name is 16 characters. Valid characters include alphanumerics (0…9, A…Z) and underscores. |
|
Application
|
Switch Setting
|
||||
|---|---|---|---|---|---|
|
DHCP (device name from rotary switches)
|
DHCP
|
STORED
|
CLEAR IP
|
DISABLED
|
|
|
None
|
DEFAULT: Get IP address. (1)
|
DEFAULT: Get IP address. (1)
|
DEFAULT: Use default IP address. (1)
|
DEFAULT: This switch setting implements device’s default IP parameters regardless of the application type.
|
LED off. This switch setting stops communications between the module and the network, so the application type is inconsequential.
|
|
Configured
|
MISMATCH: Get IP address. (1)
|
MISMATCH: Get IP address. (1)
|
NO ERROR: Get IP address from application. (2)
|
Configured
|
|
|
From a server without device name (3)
|
NO ERROR: Get IP address. (2)
|
NO ERROR: Get IP address. (2)
|
NO ERROR: Get IP address with DHCP. (2)
|
From a server without device name (3)
|
|
|
From a server with device name
|
NO ERROR: Get IP address. Device name derived from switches (2) (5)
|
MISMATCH: Get IP address. (1)
|
NO ERROR: Get IP address with DHCP (device name from application). (2)(4)
|
From a server with device name
|
|
|
(1) Start default services only
(2) Start application-configured services
(3) Leaving the From a server/Device Name field empty on the IP Configuration tab facilitates communications that are compatible with any rotary switch setting.
(4) To use the device name from the IP Configuration tab in the Control Expert application, the lower rotary switch must be set to one of its STORED positions.
(5) When the server returns a name that matches the one you configure on the IP Configuration tab, communications are OK. When there is a mismatch, there is a communications error.
(6) The MC80 Ethernet modules will not receive an IP address from a DHCP server on application download if the IP configuration has not changed.
|
|||||
 CAUTION CAUTION |
|
UNINTENDED EQUIPMENT OPERATION
The communications port can enter the idle state when the position of the rotary switches does not match the port network configuration in the application. For example, the switches may be set to DHCP while the application calls for a fixed IP address.
Failure to follow these instructions can result in injury or equipment damage.
|
|
Step
|
Action
|
|---|---|
|
1
|
Access the module configuration screen.
|
|
2
|
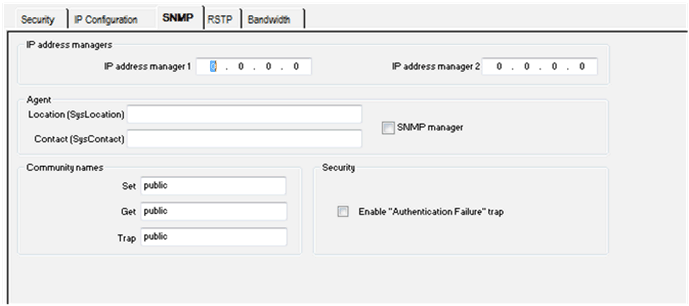
Select the SNMP tab as shown in the following figure.
|
|
Step
|
Action
|
|---|---|
|
1
|
Enter the IP address managers addresses:
|
|
2
|
Fill in the Agent fields:
Or alternatively check the SNMP manager check box to indicate that the information will be completed by the SNMP manager.
|
|
3
|
If you want to set access rights, fill in the Community names:
|
|
Zone
|
Description
|
|---|---|
|
SNMP
|
Parameters on the SNMP configuration tab are divided into four categories:
NOTE: Only 7-bit ASCII characters can be used in the character string entry fields. |
|
IP address managers
|
This zone allows you to complete the IP addresses of the SNMP managers. The modules authorize a maximum of two managers.
These addresses are used during possible transmission of events (TRAP). The transmission of supervised data is detailed at the topic SNMP.
|
|
Agent
|
This zone allows the localization and identification of an agent from the SNMP manager.
It consists of two fields:
|
|
Community names
|
This zone is used to define community names for the Set, Get and Trap utilities. It consists of three fields:
The purpose of these fields are to define the access rights for the MIB objects of the SNMP agent (local module) in relation to requests sent by the manager.
Example: If the manager sends a SetRequest request with the community name Test and the module has the community name Public, the request is not executed.
|
|
Security
|
This zone contains the Enable "Authentication Failure" trap check box. Checking this box allows you to validate the transmission of an authentication failure event (TRAP) from the SNMP agent to the configured manager. In this way, the agent warns the manager that the request has been refused following an identification error (community name configured in the manager is different from the one configured in the agent).
|
|
CAUTION |
|
UNEXPECTED NETWORK BEHAVIOR - SNMP PARAMETERS RESET
The SNMP manager is able to modify the value of certain configurable parameters (Enabling "Authentication failure," Location, Contact. etc.). The SNMP Manager box is not checked and there is a cold start, warm restart, or application download, the initially configured values are restored.
Failure to follow these instructions can result in injury or equipment damage.
|
|
Step
|
Action
|
|---|---|
|
1
|
Access the module configuration screen.
|
|
2
|
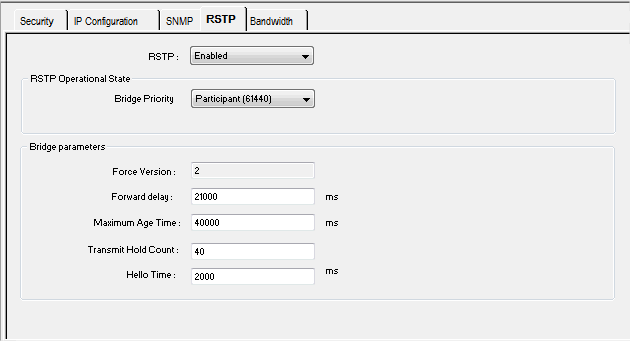
Select the RSTP tab as shown in the following figure.
|
|
Zone
|
Description
|
|---|---|
|
Bridge Priority
|
Select one of the following values in the drop-down list:
NOTE: Network switches running RSTP software periodically exchange information about themselves using special packets called Bridge Protocol Data Units (BPDUs), which act as a heartbeat. The Bridge Priority value is stored in the BPDU and it establishes the relative position of the switch in the RSTP hierarchy. |
|
Forward delay
|
The delay used by STP Bridges to transition Root and Designated Ports to Forwarding.
|
|
Maximum Age
|
This value is set to the length of time, from 6…40 seconds the switch waits for receipt of the next hello message, before initiating a change to the RSTP topology. Default = 40 s.
|
|
Transmit Hold Count
|
The maximum number of BPDUs, from 1…40, the switch can transmit per second. Default = 40.
|
|
Hello Time
|
When the frequency is set at 2 seconds, the embedded switch sends heartbeat BPDUs.
|
|
Step
|
Action
|
|---|---|
|
1
|
Access the module configuration screen.
|
|
2
|
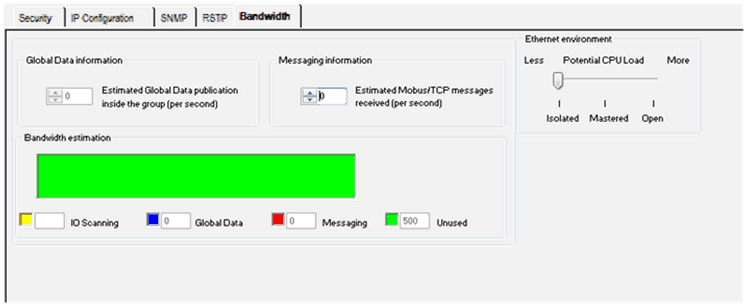
Select the Bandwidth tab as shown in the following figure.
|
|
3
|
Select the appropriate Ethernet Environment zone.
|
|
4
|
Enter the estimate for the Messaging information zone.
|
|
5
|
If the module overflows, the message "The maximum number of messages for the Extended Ethernet network must not exceed 2,000 messages" appears.
|
|
Feature
|
Description
|
|---|---|
|
addressing
|
STORED
|
|
CLEAR IP
|
|
|
DHCP
|
|
|
supported application protocols
|
Stored IP (from application)
|
|
IP from BootP
|
|
|
IP from DHCP
|
|
|
MAC-based IP
|
|
|
Modbus messaging
|
|
|
FDR client
|
|
|
FDR server
|
|
|
SNMP agent
|
|
|
Bandwidth Management
|
|
|
FTP
|
|
|
ARP
|
|
|
RSTP
|
|
|
auto MDI/MDI-X
|
supported
|
|
auto-negotiation
|
supported
|
|
connector type
|
dual-shield RJ45
|
|
max. connections for Modbus TCP (port 502) all services included
|
16 Modbus TCP connections as server
|
|
max. connections for Modbus TCP (port 502) messaging only
|
Modbus TCP connections as server not taking into account IO scanner, from which only one connection is used by Control Expert in programming mode.
|
|
Modbus TCP connections as client not taking into account IO Scanner, i.e. 6 simultaneous communication EFB on Ethernet.
|
|
|
max. connections for FTP
|
1 (for firmware upgrade only)
|
|
max. server requests per cycle
|
8
|
|
max. client requests per cycle
|
4
|
|
max. message length
|
1026 including network headers
|
|
max. message throughput for Modbus TCP
|
This value is a function of the PLC cycle (PLC cyc * max req/cyc).
|
|
The default value in not configured in an M340 system.
|
|
|
max. message throughput for Modbus TCP
|
The Ethernet Environment (or CPU load) identified in the Bandwidth window:
|
