|
Creating a Project in Control Expert
|
|
|
(Original Document)
|
|
Step
|
Action
|
|---|---|
|
1
|
Open Control Expert.
|
|
2
|
In the Control Expert main menu, select File → New....
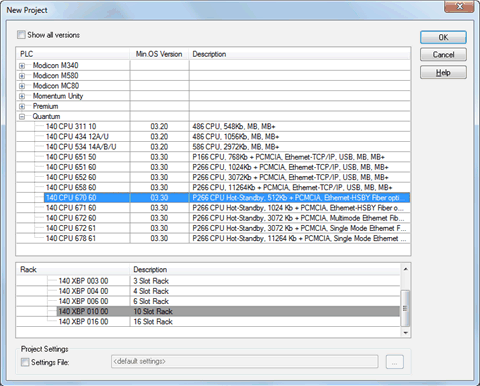
The New Project window opens displaying a list of Schneider Electric controller types.
|
|
3
|
In the New Project window, expand the Quantum node and select both a CPU and a rack. In this example, a 140 CPU 670 60 controller (which supports Hot Standby) and a 10 slot rack are selected:
 |
|
4
|
Click OK. Control Expert displays the Project Browser.
|
|
5
|
To save the project, select File → Save. The Save As dialog opens.
|
|
6
|
In the Save As dialog, do the following:
NOTE: If you do not save the project as an .STU or .STA file type, Control Expert does not save the 140 NOP 850 00 IEC61850 configuration. |
|
Step
|
Action
|
|---|---|
|
7
|
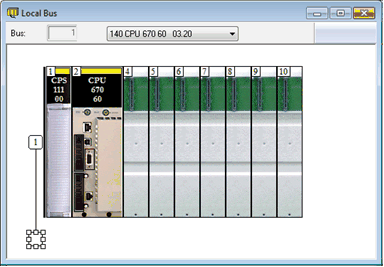
In the Project Browser, double-click Local Bus. Control Expert displays both the:
|
|
8
|
In the Hardware catalog, under the Supply node, select then drag a power supply (in this example, a 140 CPS 111 00) to the slot 1 position in the rack.
 |
|
9
|
In the File menu, select Save, to save your edits.
NOTE: Schneider Electric recommends that you periodically save your changes as you make edits. |
|
Step
|
Action
|
|---|---|
|
10
|
Contact your Schneider Electric sales agent to obtain the installation files for the Modicon IEC61850 Configuration Tool.
|
|
11
|
Insert the installation CD into your PC, then navigate to and double-click Setup.exe. The Modicon IEC61850 Configuration Tool installation wizard starts-up.
|
|
12
|
Follow the wizard instructions to install the Modicon IEC61850 Configuration Tool. This process adds the 140 NOP 850 00 to the Hardware Catalog.
|
|
13
|
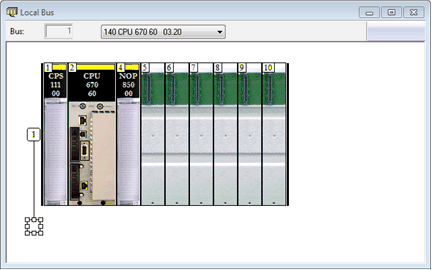
In the Hardware catalog, under the Communication node, drag a 140 NOP 850 00 module to an open slot in the rack — in this example, slot 4:
 |
|
14
|
In the File menu, select Save to save your edits.
|