

Assemble a Local Rack
In Control Expert, assemble a Quantum rack:
Step |
Action |
Comment |
|---|---|---|
1 |
In Control Expert, create a project. |
Click . Result: The New Project window appears.) |
2 |
Add a PLC from the window. |
For this example, double-click the 140 CPU 651 50 module. (). |
3 |
In the , double-click . |
Click . Result: The window opens, and the rack includes the processor you selected.) |
4 |
Add a power supply to the . |
Drag the module to slot 1. () |
5 |
Add a 140 CRP 312 00 remote I/O head module to an available slot in the local rack. |
Drag the module to slot 4. () |
6 |
Use the same method to add a 140 NOC 780 00 distributed I/O head module to the . |
Drag the module to slot 5. () |
7 |
Double-click any empty slot to add modules to the . |
This step is optional, but you can provide Ethernet transparency between the device network and the control network by adding a 140 NOC 781 00 control head module to the local rack. |
8 |
Save the file. |
Click . |
The local rack in your Control Expert configuration should look like this:
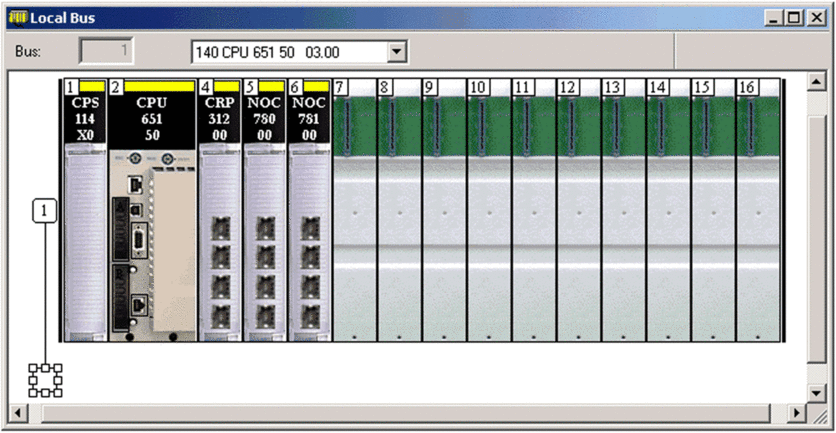
Note that the contains these modules:
power supply (140 CPS 114 •0)
CPU (140 CPU 651 50)
remote I/O head module (140 CRP 312 00)
distributed I/O head module (140 NOC 780 00)
control head module (140 NOC 781 00)
Rack Parameters
Double-click the 140 CRP 312 00 module in the window to access these configuration parameters for the local rack:
Rack Considerations
Remember:
The copy/cut/paste commands are not available for the 140CRP31200 module.
You can cut or copy other devices in the local rack or the drop and paste them in any rack of the same type. You can perform these actions (cut, copy, paste) only in the same device editor. You cannot move objects from the local rack to the drop or vice-versa.
The number of the first slot in a rack is 1. Therefore, a 4-slot rack has slot numbers 1, 2, 3, 4.