|
Obtaining and Installing Predefined Configuration Files
|
|


|
Original instructions
|
|
Obtaining and Installing Predefined Configuration Files
|
|
|
Original instructions
|
|
Step
|
Action
|
|---|---|
|
1
|
Connect your PC to, and configure your PC to scan, the network that includes the switch or switches you want to configure.
|
|
2
|
Place the ConneXium Resource CD into the disk drive of your PC.
Result: The ConneXium Resource CD navigation screen opens.
|
|
3
|
Click the link that reads Install ConneXium Configuration Software.
Result: The CD automatically installs the Ethernet switch configuration tool onto your PC. The tool should automatically open.
NOTE: If the Ethernet switch configuration tool does not automatically open, manually start it by selecting Start → Programs → Schneider Electric → ConneXium → Ethernet Switch Configurator. |
|
4
|
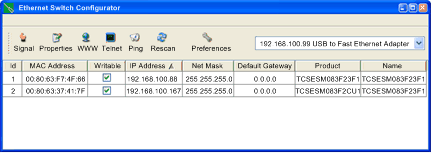
On start-up, the tool searches your network for all TCSESM-E DRSs, and displays a list of the devices it finds:
 |
|
5
|
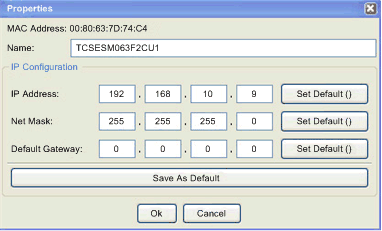
To change or assign an IP address to the desired switch (from the list displayed in the previous step), perform one of the following:
Edit the fields as necessary, and press Ok to accept your changes.
 |
|
6
|
Select the switch you want to configure, and click the WWW button to open the embedded web pages for the selected switch.
|
|
7
|
Use the tree control on the left side of the web page and select Basic Settings → Load/Save:
 |
|
8
|
In the Delete section of the page, select Current Configuration, then select Delete configuration.
Result: The existing configuration is deleted from RAM.
NOTE: Do not select Current Configuration and from Device before deleting the configuration. If you do, the configured IP address may be lost, and you may have to begin again the process of loading the predefined configuration. |
|
9
|
In the Load section of the page, select via PC, then select Restore.
Result: The Open dialog opens.
|
|
10
|
Use the Open dialog to navigate to and select the predefined configuration file you want to load onto the selected DRS, then click OK.
|
|
11
|
After a short wait, the message Configuration updated completed successfully displays, indicating the predefined configuration file has been loaded onto the DRS. Close this message dialog.
NOTE: When you close the dialog, the icon next to the Load/Save node changes to the  icon, indicating that the configuration has been written to the DRS RAM, but not yet stored in flash memory. icon, indicating that the configuration has been written to the DRS RAM, but not yet stored in flash memory. |
|
12
|
In the Save section of the web page, select to Device, then click Save.
Result: This writes your predefined configuration settings to DRS flash memory.
NOTE: When you click Save, the icon next to the Load/Save node changes back to the  , indicating that the configuration has been stored in flash memory. , indicating that the configuration has been stored in flash memory. |
|
13
|
For your changes to take effect, perform either a cold or a warm restart of the DRS. Do one of the following:
NOTE: Refresh the web pages in your browser before viewing the DRS configuration settings. |
