|
Configuring the DHCP and FDR Servers
|
|


|
Original instructions
|
|
Configuring the DHCP and FDR Servers
|
|
|
Original instructions
|
|
Step
|
Action
|
|---|---|
|
1
|
Open the 140 NOC 78• 00 head module in the DTM browser.
|
|
2
|
In the Services page, set the Address Server field to Enabled.
|
|
3
|
Click the Address Server node in the Services navigation tree in the left panel.
|
|
4
|
|
|
5
|
Click Apply to save changes, or click OK to save changes and close the window.
|
|
Step
|
Description
|
|
|---|---|---|
|
1
|
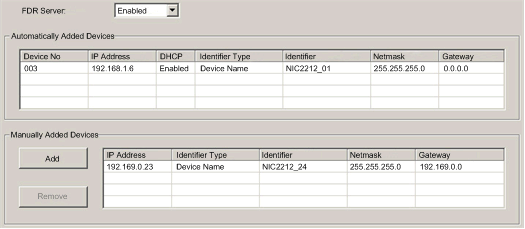
In the Address Server page, click the Add button in the Manually Added Devices field. Control Expert adds an empty row to the list of Manually Added Devices.
|
|
|
2
|
In the new row, configure the following parameters for the client device:
|
|
|
IP Address
|
Type in the IP address of the client device.
|
|
|
Identifier Type
|
Select the type of value the client device will use to identify itself to the FDR server:
|
|
|
Identifier
|
Depending upon the identifier type, type in the client device setting for the MAC address or name.
|
|
|
Netmask
|
Type in the client device subnet mask.
|
|
|
Gateway
|
Type in the gateway address that remote devices can use to communicate with devices located on other networks. Use 0.0.0.0 if remote devices will not communicate with devices located on other networks.
|
|
|
3
|
Refer to the topic Configuring Properties in the Device Editor for instructions on how to apply edited properties to networked devices.
|
|
|
Property
|
Description
|
|---|---|
|
Device No
|
The number assigned to the device in the Control Expert configuration.
|
|
IP Address
|
The client device IP address.
|
|
DHCP
|
TRUE indicates that the device subscribes to the DHCP service.
|
|
Identifier Type
|
Indicates the mechanism used by the server to recognize the client (MAC address or DHCP device name).
|
|
Identifier
|
The actual MAC address or DHCP device name.
|
|
Netmask
|
The client device subnet mask.
|
|
Gateway
|
The IP address a DHCP client device will use to access other devices that are not located on the local subnet. A value of 0.0.0.0 constrains the DHCP client device by allowing it to communicate only with devices on the local subnet.
|
|
Step
|
Action
|
|
|---|---|---|
|
1
|
In the DTM Browser, select the 140 NOC 780 00 head module that is connected to the remote device that you want to add to the DHCP service. In the following example, the module with the alias name of Q_NOC78000 is selected:
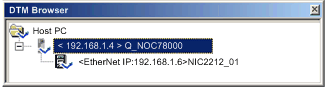 NOTE: The selected module is connected to the STB NIC 2212 network interface device bearing the alias name NIC2212_01, which is the module you want to add to the DHCP service. |
|
|
2
|
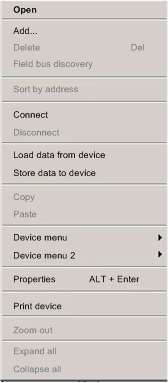
With Q_NOC78000 selected in the DTM Browser, right-click and select Open in the pop-up menu.:
 The Device Editor opens.
|
|
|
3
|
In the navigation tree on the left side of the Device Editor, expand the Device List node and select the device for which you want to enable the DHCP service. In this example, select NIC2212_01:
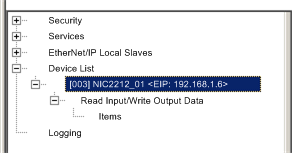 Control Expert displays the properties for the selected remote device in the right pane of the window.
|
|
|
4
|
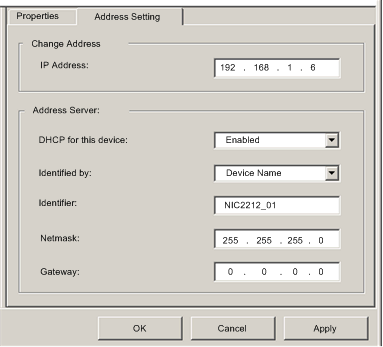
In the right pane of the window, select the Address Setting tab to display the following page:
 |
|
|
5
|
In the Address Server area of this page, configure the following properties:
|
|
|
DHCP for this device
|
Select Enabled
|
|
|
Identified by
|
The choices are:
Select Device Name.
|
|
|
Identifier
|
Control Expert has automatically added the device name Q_NOC78000. For the purpose of this example, accept this default value.
|
|
|
Netmask
|
Control Expert has automatically applied the same netmask used for the 140 NOC 780 00 head module. For the purpose of this example, accept the default value of 255.255.255.0.
|
|
|
Gateway
|
For the purpose of this example, accept the default value of 0.0.0.0.
|
|
|
6
|
Click Apply to save changes, or click OK to save changes and close the window.
NOTE: Refer to the topic Configuring Properties in the Device Editor for more information on editing and saving property settings in this window. |
|
