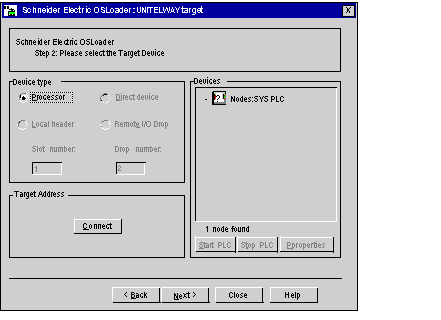
In this screen, you choose the target device according to the Uni-Telway communication type selected in the previous step.
The main elements of the Uni-Telway Target screen are described in the following paragraphs.
The device types
supported by OSLoader and available for the Uni-Telway communication type are displayed in the
Device Type area.
Processor is the only Uni-Telway target enabled.
Press the Connect button in the Target Address area to connect OsLoader to the device.
If the connection is established, the target device is added to the directory tree in the Devices area.
If the connection cannot be established, an error message explaining the reason is displayed.
The directory tree in the Devices area displays the list of connected devices. At OSLoader startup, when no connection is enabled, the directory tree is empty.
The following table shows the list of icons used in the directory tree and the corresponding description.
|
Icon
|
Description
|
|
|
Processor in stop mode (Stop)
|
|
|
Processor in run mode (Run)
|
|
|
Processor is not configured (no application was ever loaded into the PLC)
|
|
|
Host adapter (SA85 or PCMCIA Modbus Plus card)
|
|
|
Bridge or Bridge plus or Bridge mux
|
|
|
Input/output port
|
|
|
Remote input/output module
|
|
|
Device unknown
|
Proceed to the Device Properties dialog box by double-clicking on a specific device.
The Start PLC and Stop PLC buttons are only available if a processor in the directory tree of the Devices field is selected. In other cases, they are disabled.
Stop the processor by pressing the Stop PLC button.
Restart the processor by pressing the Start PLC button.
The
Device Properties dialog
box, which is accessible by pressing the
Properties button in the
Devices area, gives access to information concerning the selected device.
Use the navigation buttons, located at the bottom of the screen, as follows:
Back:
to return to the previous step
Next:
to proceed to the next step
Close:
to exit the software
Help:
to access the online help