At a Glance
The following operations can be carried out when accessing Control Expert software in off-line mode:
Creating,
Opening,
Converting,
Analyzing,
Generating,
Saving,
Closing.
Creating a Project
To create a new project, carry out the following actions:
Step |
Action |
|---|---|
1 |
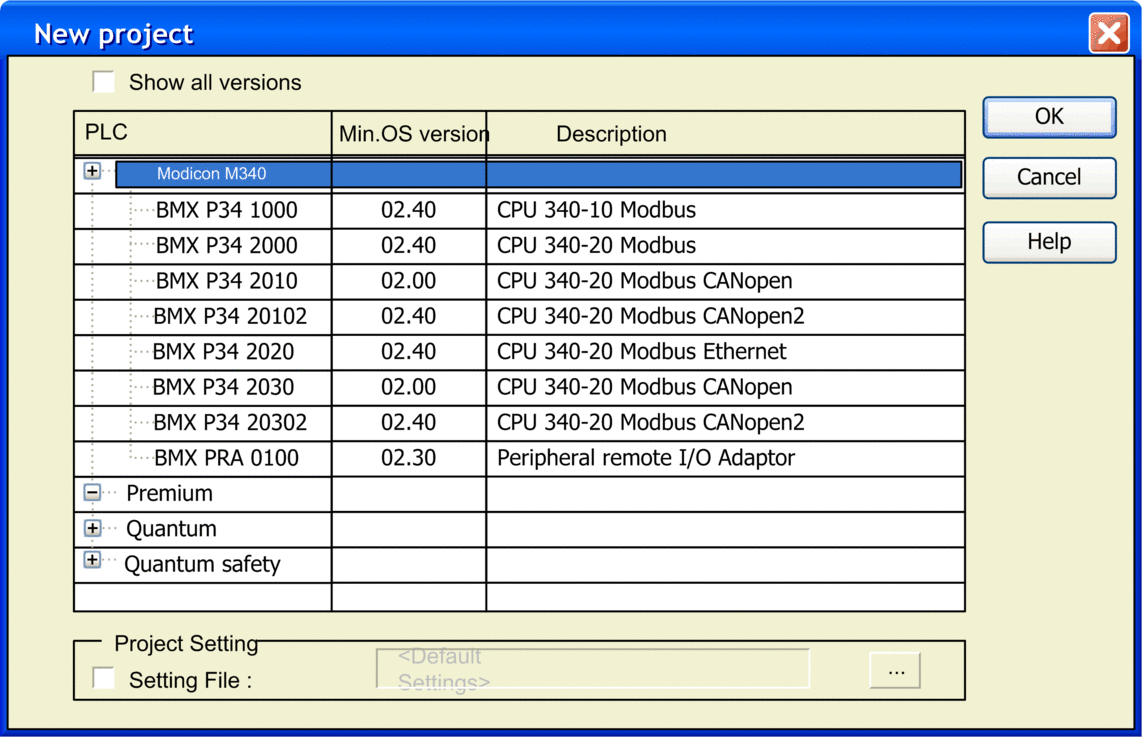
Activate the New command in the File menu. Result: The New Project screen appears.  |
2 |
To see all PLC versions, check box. |
3 |
Select the processor you wish to use from those proposed. |
4 |
To create a project with specific values of project settings, check Settings File box and use the browser button to localize the .XSO file (Project Settings file). It is also possible to create a new one. If the Settings File box is not checked, default values of project settings are used. |
5 |
Confirm with OK. |
Open Dialog
project dialog

Element |
Description |
|---|---|
|
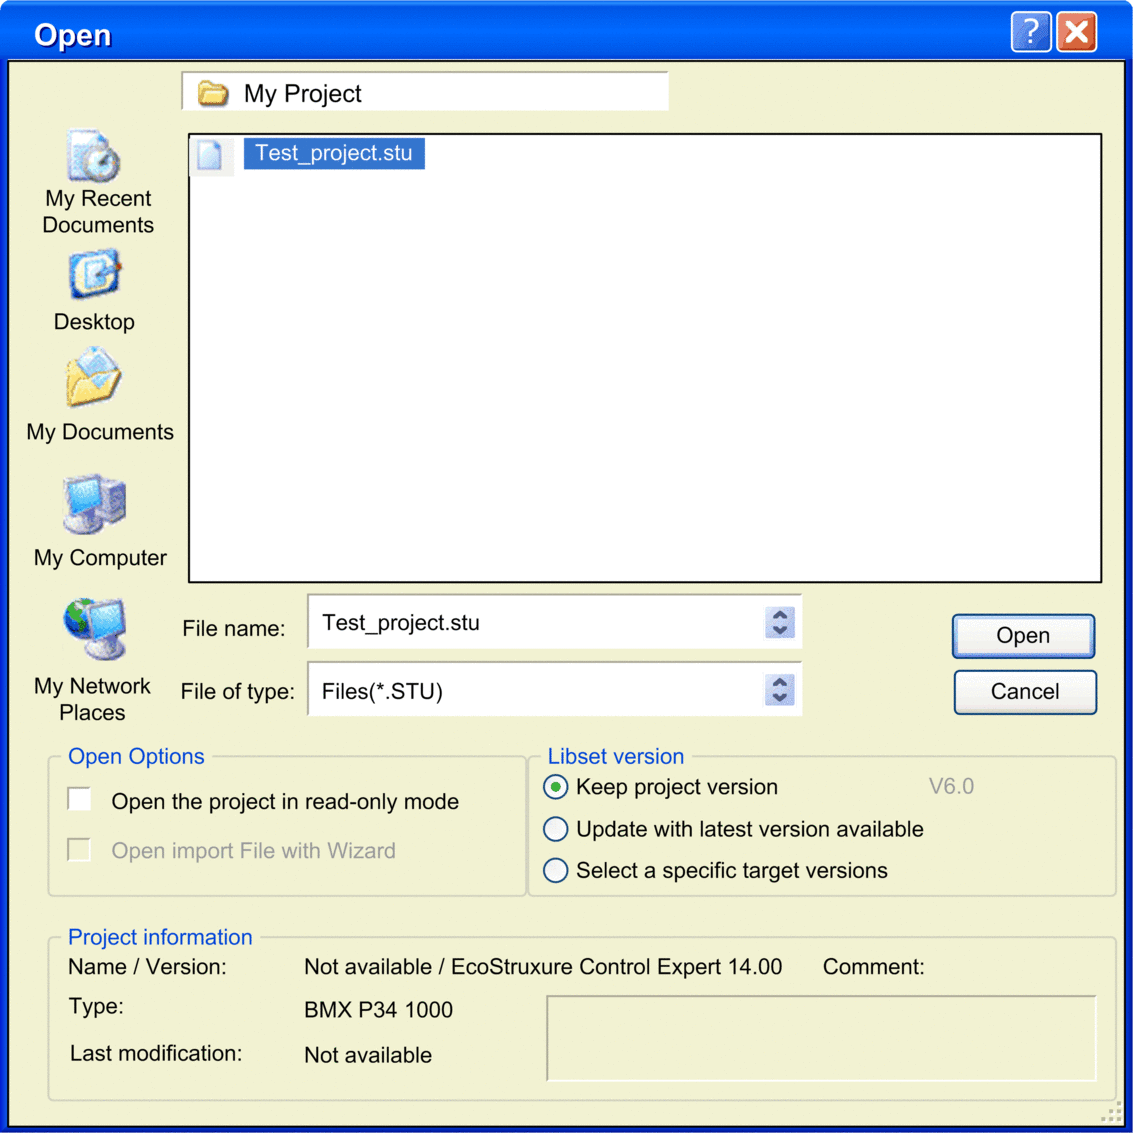
The upper part of this dialog displays a standard Windows dialog. |
Opening a legacy LL984 project |
Please refer to Importing an LL984 Application. |
|
|
|
Opens the project in read-only mode. |
|
Select this check box to use the import wizard. |
(set of libraries) contains all libraries, families, functions and variables (I/O data structures) that can be used to develop an automation project. In general, to open an existing project (.STU file) or an archived project (.STA file) the Libset version can be selected. To import a .ZEF or .XEF file, the latest Libset version must be selected. More information on the default version used to open a project according to the file type is provided in the libset section. |
|
|
Select this option to keep the version used at file creation time. If the respective is not installed, the latest version will be used. |
|
Select this option to update the project with the latest version. |
|
Select this option to choose a specific version. The box can be used to select a version. |
|
|
|
Target PLC. |
|
Project name and software package version. |
|
Date and time of last modification of the project. |
|
Comment associated to the project. |
Opening a Project
To open an existing project, carry out the following actions:
Step |
Action |
|---|---|
1 |
Choose the Open command from the File menu. |
2 |
Select the file related to the project (file *.STU). |
3 |
Select one of the options. |
4 |
Confirm with Open. |
Opening a project also restores the Control Expert context, which was saved when the project was closed. This involves:
The list of open tools,
For each tool: its window size, position, contents and animation status,
taskbar and tool configuration.
The context file is a companion file to the <Project_name>.STU file. It is saved in the same directory with the name <Project_name>.ZTX. The .ZTX file is not required to open an application. If no .ZTX is provided the application is open with default context.
A The file not found message appears each time the configuration screen of the TSX CPP 110 PCMCIA card is opened. Select the required .CO file to update the CANopen configuration.
Opening an Archived Project
To open a project archived in STA format, carry out the following actions:
Step |
Action |
|---|---|
1 |
Choose the Open command from the File menu. |
2 |
Select the file related to the project (file *.STA). |
3 |
Select one of the options. |
4 |
Confirm with Open. |
An STA file is a project archive file that can be accessed using the Archive command in the File menu.
The properties of the .STA file are the following:
The .STA file is very compressed (approximately 50 times more so than the STU). It is used to transfer projects to networks (local or Internet, for example).
The .STA file can be used to transfer projects between versions of Control Expert software.
The .STA file contains the entire project:
The PLC binary,
The Upload information: comments and animation tables,
The operator screens.
The project name,
Associated comment,
Version and date the project was generated,
Target PLC,
Date of last modification to the source code,
The version of Control Expert used to create this archive.
Converting an Existing PL7 or Concept Project
To convert an existing PL7 or Concept project, carry out the following actions:
Step |
Action |
|---|---|
1 |
Choose the Open command from the File menu. |
2 |
Select the file related to the project:
|
3 |
Confirm with Open. |
Conversion Wizard
To convert a legacy project partially or as a whole the can be used.
The provides options to remap I/O objects (channels, variables etc.) during conversion and to adapt the hardware configuration of the new project concurrently in Control Expert.
Shortcuts to Recent Projects
To simplify access to the current project(s), the software provides a shortcut for accessing the last 8 projects used. In the File menu, activate the shortcut to the project you would like to open.
Archiving a Project
To archive a project in STA format, carry out the following actions:
Step |
Action |
|---|---|
1 |
Select the Save Archive command from the File menu. |
2 |
If necessary, select the directory where the project will be stored (disk and path). |
3 |
Enter the file name. |
4 |
Confirm with Save. |
the Upload information and Comments check boxes are checked, with the Animation tables check box unchecked
the Upload information, Comments and Animation tables check boxes are checked
the Upload information, Comments and Animation tables check boxes are unchecked
Analyzing a Project
To analyze the syntax of your project, carry out the following actions:
Step |
Action |
|---|---|
1 |
Activate the Analyze project command in the Build menu. Result: the software analyzes the project. |
2 |
Any errors detected are displayed in the information window at the bottom of your screen. |
Analyzing and Generating a Project
To analyze and generate your project at the same time (generation of links between input/output modules and declared objects in the project, etc.), carry out the following actions:
Step |
Action |
|---|---|
1 |
Activate the Rebuild all Project command in the Build menu. Result: the software analyzes and generates the project. |
2 |
Any errors detected are displayed in the information window at the bottom of your screen. |
Analyzing and Generating Modified Project Parts
To analyze and generate only the modified parts of your project, carry out the following actions:
Step |
Action |
|---|---|
1 |
Activate the Build Changes command in the Build menu. Result: the software analyzes and generates the modified parts of your project. |
2 |
Any errors detected are displayed in the information window at the bottom of your screen. |
Backing up a New Project
To back up a new project, carry out the following actions:
Step |
Action |
|---|---|
1 |
Activate the Save or Save As command in the File menu. |
2 |
If necessary, select the directory where the project will be stored (disk and path). |
3 |
Enter the file name. |
4 |
Confirm with Save. |
Backing up an Existing Project
To back up your modifications, select the Save command from the File menu.
Closing a Project
To close your project, carry out the following actions:
Step |
Action |
|---|---|
1 |
Activate the Close command in the File menu. |
2 |
If you have modified your project, a dialog box is displayed with the message that you must save your project. |
3 |
Save your project or close it without saving changes. |
Exiting Control Expert
To exit Control Expert, carry out the following actions:
Step |
Action |
|---|---|
1 |
Activate the Exit command in the File menu. |
2 |
If you have modified your project, a dialog box is displayed with the message that you must save your project. |
3 |
Save your project or exit it without saving changes. |


