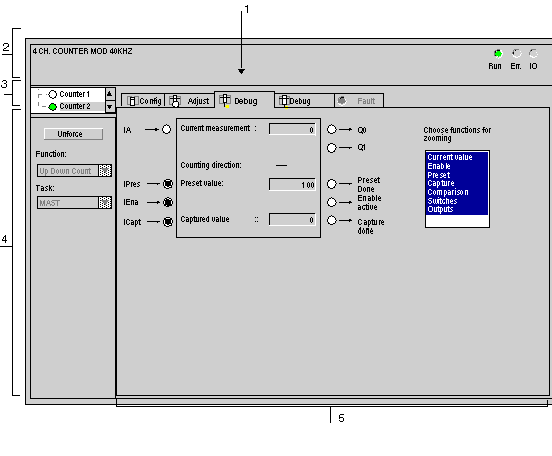
Description of the minimized debug screen
(Original Document)
At a Glance
The minimized debug screen is used to monitor the operation of a project at counting module level. It displays the status of inputs, outputs and main channel bits, contents of registers, and possible faults.
To switch to the maximized screen, just click on the second Debug tab.
Illustration
The figure below shows an example of a minimized debug screen.
Description
The table below shows the different elements of the debug screen.
Number
Element
Function
1
Tabs
The tab in the foreground indicates the current mode (Debug for this example). Each mode can be selected by means of the corresponding tab. The available modes are:
  • Debug only accessible in on-line mode,
  • Diagnostics (Fault) only accessible in online mode.
  • Adjustment,
  • Configuration.
2
Module zone
Shows the abbreviated name of the module.
There are three indicators in the same field that provide the status of module in online:
  • RUN indicates the operating status of the module.
  • ERR signals an internal error to the module.
  • I/O signals an external error or an application error to the module.
3
Channel field
Is used:
  • By clicking on the reference number, to display the tabs:
    • Description which gives the characteristics of the device.
    • I/O Objects which is used to presymbolize the input/output objects.
    • Fault which shows the device faults (in online mode).
  • To select the channel,
  • To display the Symbol, name of the channel defined by the user (using the variable editor).
4
Zone general parameters
Allows bits to be unforced and the counting function to be displayed:
  • Unforce: this button allows forced bits to be unforced.
  • Function: calls up the configured counting function. This heading is fixed.
  • Task: specifies the MAST or FAST task configured. This heading is fixed.
5
Current parameters field
This zone displays the status of the inputs and outputs and the various counting parameters in progress. If the contents of the counting register cannot be used following an input fault, the Invalid measurement indicator or LED appear in red.
Note: with CTY 2A/4A modules only, the functions to be displayed in the extended screen can be selected in a window in the parameter field on the right. For the CTY 2C module, all functions will be displayed systematically.