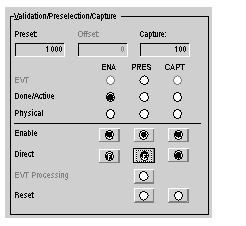
This section shows the general principles for using LEDs and buttons.
The LEDs

are used to display the status of a bit.
The buttons

are used to set a bit, triggering an action or not (depending on the case).
When the bit is at 0, the LED is off (white) (see the example below).
When the bit is at 1, the LED is on (black, blue or red). Some LEDs display a little black dot in status 1.
There are also position LEDs

which use a bold dash to display the measurement or capture position in relation to a threshold or a set point. These latter are represented by a thin central dash.
In the example below the
Direct enabling and
Direct capturebuttons are set to 1
.
Clicking on this button

sets the associated bit to 1. The button and possibly the LED above light up (switch to a color).
Clicking on this button

sets the associated bit to 0. The button and possibly the LED above go out (switch to white).
These actions are temporary, in the sense that the project or counting can change the bit status.
NOTE: the LED status can be different from the button status. Some LEDs are reserved for storing the action carried out by the physical input (capture, preset or reset). These LEDs can be recognized by the presence of a reset button (action carried out) in the same column. In this case you can switch off the LED, if necessary, by pressing this button.
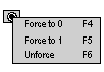
To lock the status of a bit (i.e. to make it permanent), use the forcing commands, which can be accessed by right-clicking on the mouse.
The button goes on or off in the same way as before but with the letter
F superimposed

. Conversely, use the same menu to delete bit forcing.
You can also unforce all forced bits by clicking on the Unforce button in the General parameters field.