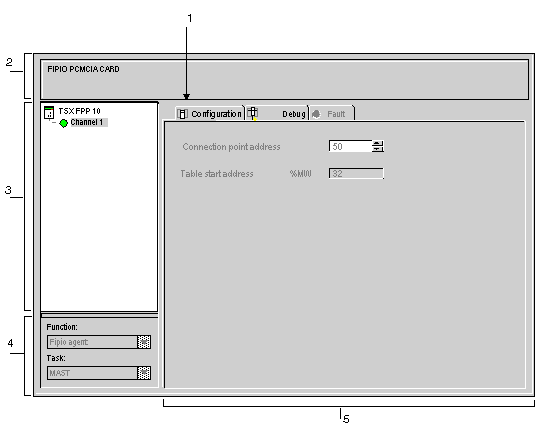
Configuration Screen of a Fipio Agent
(Original Document)
At a Glance
This screen, separated into two areas, is used to declare the communication channel and to configure the necessary parameters for a Fipio Agent link.
Illustration
The following figure shows an example of a Fipio Agent configuration screen.
Description
The following table shows the various elements of the configuration screen and their functions.
Number
Element
Function
1
Tabs
The tab in the foreground indicates the mode in progress (Configuration in this example). Every mode can be selected using the respective tab. The available modes are:
  • Configuration,
  • Debug which can be accessed only in online mode.
  • Fault (channel level) accessible only in online mode.
2
Module area
Gives a reminder of the device’s shortened name.
3
Channel area
Is used:
  • By clicking on the device reference number, to display the tabs:
    • Description which gives the characteristics of the device.
    • I/O Objects which is used to presymbolize the input/output objects.
    • Fault which shows the device faults (in online mode).
  • By clicking on the Channel, to select the channel to be debugged. To the left of the symbol there is a copy of the CHx channel LED.
4
General parameters area
This area displays the task (MAST or FAST) in which the channel's implicit exchange objects will be exchanged.
The function menu is used to select the Fipio Agent function. None is selected by default.
5
Configuration area
Used to select and enter the following parameters:
  • the address of the connection point on the Fipio bus,
  • the address of the start of the table.
Table Start Address
This parameter indicates the table address to be reserved for periodic data exchanges between the bus manager and the Fipio Agent.
The table contains 64 words: