|
Configuring the Ethernet Network with Control Expert
|
|


|
Original instructions
|
|
Configuring the Ethernet Network with Control Expert
|
|
|
Original instructions
|
|
Step
|
Action
|
|---|---|
|
1
|
Locate the Communications directory in the Project browser.
|
|
2
|
Right click the Network subdirectory located under the Communications directory.
|
|
3
|
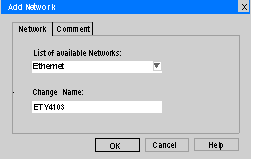
Select the New Network option to bring up the Add Networkdialog box.
|
|
4
|
Scroll to Ethernet in the List of available Networks field.
|
|
5
|
Enter a meaningful name for your network in the Change Name field (ETY 4103 was used in our example).
 |
|
6
|
Click OK.
|
|
Step
|
Action
|
|---|---|
|
1
|
Double click XBus in the Project browser to bring up the rack configuration.
|
|
2
|
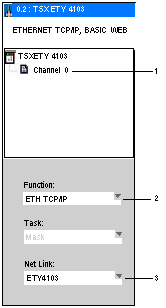
Double click TSX ETY 4103 module located at slot 2 to bring up the network link screen.
 |
|
3
|
Under TSX ETY 4103, click Channel 0 (item 1, above) to display the Function box.
|
|
4
|
In the Function box (item 2, above), scroll to ETH TCP IP to bring up the Net Link.
|
|
5
|
In the Net Link box (item 3, above), scroll to the name of your logical network (ETY 4103 in the example).
|
|
6
|
Click the validate check box in the upper toolbar to confirm the network link configuration.
 |
|
Step
|
Action
|
|---|---|
|
1
|
Locate the Communications\Networks directory in the Project browser.
|
|
2
|
Double-click your new logical network (ETY 4103 in our example) to open the ETY 4103 configuration screen.
 |
|
3
|
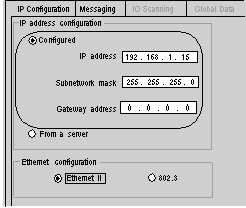
Click Configured in the IP Address Configuration group (circled area shown above).
Note: Be sure to contact you network administrator and request the IP, Subnetwork mask, and Gateway addresses prior to performing the next step.
|
|
4
|
Enter the appropriate values in the IP address, Subnetwork mask, and Gateway address fields. In our example, we assigned 192.168.1.15, 255.255.255.0, and 0.0.0.0 respectively.
|
|
5
|
Click the validate check box in the upper tool bar to confirm the IP configuration settings.
 |
