|
Configuration of Nodes 2 and 3
|
|


|
(Original Document)
|
|
Configuration of Nodes 2 and 3
|
|
|
(Original Document)
|
|
Step
|
Action
|
|---|---|
|
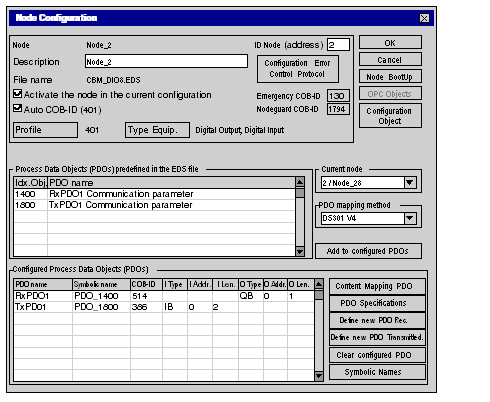
1
|
Double-click on node 2.
Result: the configuration screen appears and displays the grid of the two PDOs (Predefined Process Objects) of the node. A reception PDO (RxPDO) used to configure the outputs and a transmission PDO (TxPDO) used to configure the inputs.
|
|
2
|
Double-click on the first line (PDO RxPDO1) to display the window containing the PDO specifications.
|
|
3
|
Confirm with OK, as we will use the default configuration.
Result: the PDO now appears in the Configured Process Data Objects (PDOs) area.
|
|
4
|
Repeat steps 2 and 3 for the second PDO.
Result: the screen should be configured as follows:
 |
|
5
|
Click OK to confirm the configuration of node 2.
Note: As the PDOs have been configured, the Sycon software now possesses all the configuration information for node 2 in order to use the corresponding EDS file.
|
|
Step
|
Action
|
|---|---|
|
1
|
Double-click on node 3.
Result: the configuration screen appears and displays the grid of the four PDOs (Predefined Process Objects) of the node. Two reception PDOs (RxPDO) that can be used to configure the outputs and two transmission PDOs (TxPDO) that can be used to configure the inputs.
|
|
2
|
Double-click on the first line (PDO RxPDO1) to display the configuration window of the first PDO.
|
|
3
|
Confirm with OK, as we will use the default configuration.
|
|
4
|
Repeat steps 2 and 3 for the 3 other PDOs.
|
|
5
|
Click on the Configure object button to activate transmission of analog inputs.
Note: By default, transmission of analog inputs is disabled; it is therefore necessary to activate this functionality.
|
|
6
|
Scroll down to the bottom of the scroll bar in the Predefined objects specified in the EDS file area and double-click on the 6423 0 Analog Input Global Enable line in the list of supported predefined objects.
|
|
7
|
In the Chosen value column, enter the value 1.
|
|
8
|
Click OK to confirm the configuration the objects.
|
|
9
|
Click OK to confirm the configuration of node 3.
Result: node 3 is now configured. If you have also configured node 2, you can save the Sycon project, which can now be used in the PLC, under the name Demo_cfg.co.
|
