|
CANopen Master Module Configuration Window
|
|


|
Original instructions
|
|
CANopen Master Module Configuration Window
|
|
|
Original instructions
|
|
Step
|
Action
|
|---|---|
|
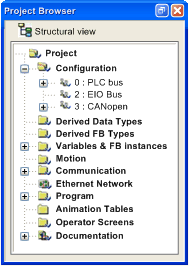
1
|
From the Structural view of the Project Browser, expand (+) the Configuration directory:
 |
|
2
|
Expand (+) the bus (PLC bus or EIO Bus) where is declared the CANopen X80 master module you want to configure.
NOTE: You can also right-click the bus CANopen you want to configure the master in the Configuration directory, and click Go to Bus Master. |
|
3
|
Right-click the BMECXM module, and click Open.
Result: The module configuration window for the CANopen X80 master module is displayed.
|
|
Element
|
Function
|
|---|---|
|
Scanner configuration
|
Provide the scanner, protocol, and profile of the scanner chosen at module insertion in Control Expert project. This is not editable.
NOTE: To change scanner association (assuming that the choice is available), the module needs to be deleted and inserted again with the new scanner association. |
|
IP/DHCP configuration
|
Click Update IP/DHCP configuration hyperlink to access an Ethernet Network window where you can edit:
|
|
Other configuration
|
