|
DTM User Interface
|
|


|
Original instructions
|
|
DTM User Interface
|
|
|
Original instructions
|
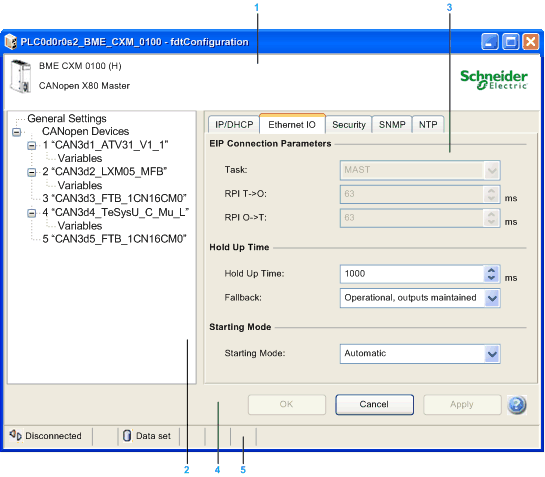
1Identification area
2Navigation area
3Application area
4Action area
5Status bar
|
Element
|
Function
|
|---|---|
|
Identification area
|
Shows the device type name and product name.
|
|
Navigation area
|
The device tree contains:
|
|
Contains parameters, most of them being editable.
|
|
|
Action area
|
Contains these buttons:
NOTE: Your changes take effect only when they are successfully downloaded from your PC to the CPU and from the CPU to the BMECXM modules and network devices. |
|
Shows status information with:
|
|
Tab
|
Function
|
|---|---|
|
IP/DHCP
|
These read-only parameters are displayed:
NOTE: These parameters can be changed in Control Expert. |
|
These parameters are displayed:
|
|
|
These parameters are displayed:
|
|
|
These parameters are displayed:
|
|
|
The NTP Client Configuration parameter is displayed: NTP, IP addresses, and polling period.
|
|
|
(1) The refresh period for this connection is in ms (2...2550).
|
|
|
Field
|
Function
|
|---|---|
|
IO Structure Name
|
These parameters are displayed:
NOTE: The variable name is reinitialized when clicking the Default Name button or if the structure name has been changed. |
|
Variables Management
|
The Import Mode (read-only): displays the automatic option only.
|
|
Tab
|
Function
|
|---|---|
|
Input
|
Displays Type, Offset, Name, and Comment columns.
|
|
Input(bit)
|
Displays Offset, Position, Name, and Comment columns.
|
|
Output
|
Displays Type, Offset, Name, and Comment columns.
|
|
Output(bit)
|
Displays Offset, Position, Name, and Comment columns.
|
|
Data types
|
BOOL
|
BYTE
|
INT, UINT, WORD
|
DINT, UDINT, DWORD
|
REAL
|
|
|---|---|---|---|---|---|---|
|
Visual representation
|
 |
 |
 |
 |
 |
 |
|
Icon
|
Description
|
|---|---|
 |
The entered value is not known. The Apply button does not work until a correct value is entered.
|
 |
The entered value is not valid. The Apply button does not work until a valid value is entered.
|
 |
This parameter has changed. The Apply button does not work until the value is corrected.
|
|
Icon
|
Element
|
Function
|
|---|---|---|
 |
Disconnected
|
The DTM is offline.
|
 |
Connected
|
The DTM is online.
|
 |
Connecting
|
The DTM is connecting.
|
 |
Disconnecting
|
The DTM is disconnecting.
|
 |
Communication problem
|
There are communication errors detected, for example wrong IP address.
|
|
Icon
|
Element
|
Function
|
|---|---|---|
 |
Communication in progress
|
The DTM communicates with the device.
|
 |
Data set
|
Displays the offline data stored in the DTM.
|
 |
Device
|
Displays the offline data stored in the device itself.
|
 |
Summary
|
Displays the summary state of the data when at least one parameter value has been modified (none by default).
|

 : Open an online help page.