|
Configuring Remote Device Properties
|
|


|
Original instructions
|
|
Configuring Remote Device Properties
|
|
|
Original instructions
|
|
In this page...
|
Do the following...
|
|---|---|
|
General
|
Enter configuration settings, as described below.
|
|
Connections
|
Enter configuration settings, as described below.
|
|
Online Parameters
|
Not accessible offline. No configuration required.
|
|
Port Configuration
|
Not accessible offline. No configuration required.
|
|
EDS File
|
(Read-only page - no configuration required)
|
|
Step
|
Action
|
|
|---|---|---|
|
1
|
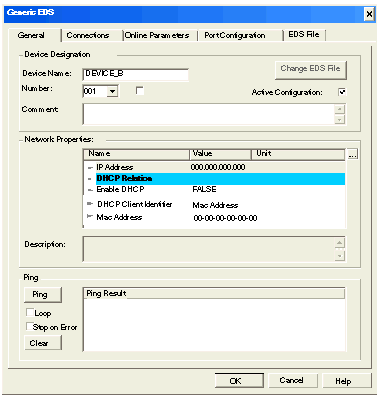
Click on the General page:
 |
|
|
2
|
In the General page, edit the following settings:
|
|
|
Device Name
|
The label for the remote device in the EtherNet/IP device list. Either:
|
|
|
Number
|
The relative position in the EtherNet/IP device list. Either:
|
|
|
Link Parameters
|
Select this setting to:
De-select this setting to unlock the IP Address setting.
|
|
|
Active Configuration
|
Select this setting to include this remote device in EtherNet/IP network communications.
De-select this setting to exclude this device from network communications, but save the device’s configuration settings.
|
|
|
IP Address
|
The IP Address of this remote device. This setting is:
By default:
|
|
|
Enable DHCP
|
TRUE activates the DHCP client in this remote device. On startup, this device requests its IP address from a DHCP server.
Note: the EtherNet/IP module can be configured to act as a DHCP server.
|
|
|
DHCP Client Identifier
|
If the DHCP client is enabled, select the identifier the DHCP server will use to recognize this remote device:
|
|
|
Mac Address/Device Name
|
Type in the value of the DHCP client identifier.
Note: The Device Name referenced here is not the same as the Device Name described in the first row of this table.
|
|
|
Step
|
Action
|
|
|---|---|---|
|
1
|
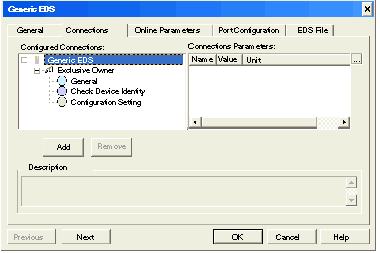
Click on the Connections page:
 |
|
|
2
|
In the Configured Connections list, click on General to display the general connection settings in the Connection Parameters list, shown below:
 |
|
|
3
|
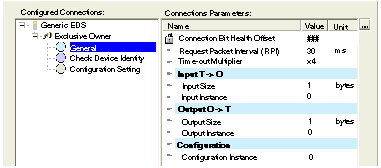
In the Connections page, edit the following general connection settings:
|
|
|
Connection Health Bit Offset
|
(read-only)
|
|
|
Request Packet Interval (RPI)
|
The refresh period for this I/O connection.
Value range: 2...65535 ms
Default = 30 ms
|
|
|
Time-out Multiplier
|
The value, multiplied against the RPI rate, which triggers an inactivity timeout.
Value list: 4, 8, 16, 32, 64, 128, 256, 512
Default: 4
|
|
|
Input Size (in bytes)
|
The number of bytes reserved for input data, in bytes.
Value range: 1...509
Default: 1
|
|
|
Input Instance
|
The instance identifier for inputs: 101.
|
|
|
Output Size (in bytes)
|
The number of bytes reserved for output data, in bytes.
Value range: 1...505
Default: 1
|
|
|
Output Instance
|
The instance identifier for outputs: 102.
|
|
|
Configuration Instance
|
The instance identifier for configuration data: 103.
|
|
|
Note: The Input Size and Output Size parameter settings are determined by the size—in bytes—of the input data and output data sections of your specific application.
|
||
|
4
|
Click OK to save your settings and close the Properties window.
The next step is to configure I/O settings. For an example of I/O configuration for a generic remote device, see how the following I/O items were configured:
|
|
