|
Configuring I/O Items
|
|


|
Original instructions
|
|
Configuring I/O Items
|
|
|
Original instructions
|
|
Step
|
Action
|
|---|---|
|
1
|
In the Advantys configuration software, select Island → I/O Image Overview. The I/O Image window opens to the Fieldbus Image page.
|
|
2
|
Select the first cell (word 1, cell 0) in the Input Data table to display—in the middle of the page—a description of the cell data and its source module.
|
|
3
|
Make a note of the word, bit(s), module and item information for that cell.
|
|
4
|
Repeat steps 2 and 3 for each cell containing either an S or an integer.
|
|
Advantys Fieldbus Image
|
Control Expert EIP Items
|
STB Module
|
Description
|
||
|---|---|---|---|---|---|
|
Word
|
Bit(s)
|
Byte
|
Bit(s)
|
||
|
1
|
0-15
|
0
|
0-7
|
NIC 2212
|
NIC status
|
|
1
|
0-7
|
||||
|
2
|
0-1
|
2
|
0-1
|
DDI 3230
|
input data
|
|
2-3
|
2-3
|
DDI 3230
|
input status
|
||
|
4-5
|
4-5
|
DDO 3200
|
output data echo
|
||
|
6-7
|
6-7
|
DDO 3200
|
output status
|
||
|
8-11
|
3
|
0-3
|
DDI 3420
|
input data
|
|
|
12-15
|
4-7
|
DDI 3420
|
input status
|
||
|
3
|
0-3
|
4
|
0-3
|
DDO 3410
|
output data echo
|
|
4-7
|
4-7
|
DDO 3410
|
output status
|
||
|
8-13
|
5
|
0-5
|
DDI 3610
|
input data
|
|
|
14-15
|
6-7
|
NA
|
not used
|
||
|
4
|
0-5
|
6
|
0-5
|
DDI 3610
|
input status
|
|
6-7
|
6-7
|
NA
|
not used
|
||
|
8-13
|
7
|
0-5
|
DDO 3600
|
output data echo
|
|
|
14-15
|
6-7
|
NA
|
not used
|
||
|
5
|
0-5
|
8
|
0-5
|
DDO 3600
|
output status
|
|
6-15
|
8
|
6-7
|
NA
|
not used
|
|
|
9
|
0-7
|
||||
|
6
|
0-15
|
10
|
0-7
|
AVI 1270
|
input data ch 1
|
|
11
|
0-7
|
||||
|
7
|
0-7
|
12
|
0-7
|
AVI 1270
|
input status ch 1
|
|
8-15
|
13
|
0-7
|
NA
|
not used
|
|
|
8
|
0-15
|
14
|
0-7
|
AVI 1270
|
input data ch 2
|
|
15
|
0-7
|
||||
|
9
|
0-7
|
16
|
0-7
|
AVI 1270
|
input status ch 2
|
|
8-15
|
17
|
0-7
|
AVO 1250
|
output status ch 1
|
|
|
10
|
0-7
|
18
|
0-7
|
AVO 1250
|
output status ch 2
|
|
8-15
|
NA
|
NA
|
NA
|
not used
|
|
|
Advantys Fieldbus Image
|
Control Expert EIP Items
|
Module
|
Description
|
||
|---|---|---|---|---|---|
|
Word
|
Bit(s)
|
Byte
|
Bit(s)
|
||
|
1
|
0-1
|
0
|
0-1
|
DDO 3200
|
output data
|
|
2-5
|
2-5
|
DDO 3410
|
output data
|
||
|
6-7
|
6-7
|
NA
|
not used
|
||
|
8-13
|
1
|
0-5
|
DDO 3600
|
output data
|
|
|
14-15
|
6-7
|
NA
|
not used
|
||
|
2
|
0-15
|
2
|
0-7
|
AVO 1250
|
output data ch 1
|
|
3
|
0-7
|
||||
|
3
|
0-15
|
4
|
0-7
|
AVO 1250
|
output data ch 2
|
|
5
|
0-7
|
||||
|
Step
|
Action
|
|---|---|
|
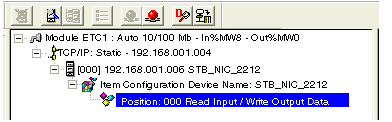
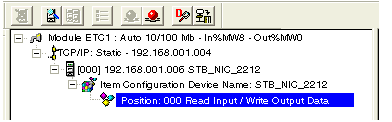
1
|
In the Devices window of the Control Expert EtherNet/IP configuration tool, navigate to and select the connection item at Position 000, as shown below:
 |
|
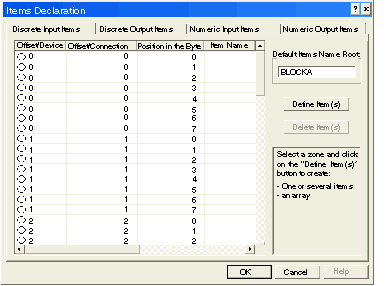
2
|
Select Devices → Properties. The Items Declaration window opens:
 |
|
3
|
In the Default Items Name Root input box type: NICstatus.
|
|
4
|
In the Items List, select the rows that correspond to bits 0-7 in bytes 0 and 1—i.e., the first 16 rows:
 |
|
5
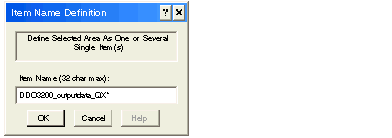
|
Click the Define Item(s) button.The Item Name Definition dialog opens:
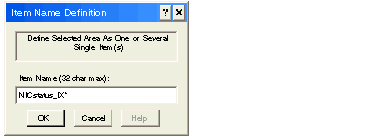 Note: The asterisk (*) indicates a series of discrete items with the same root name will be created.
|
|
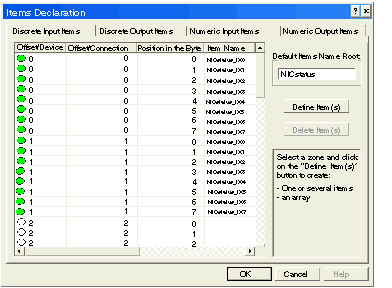
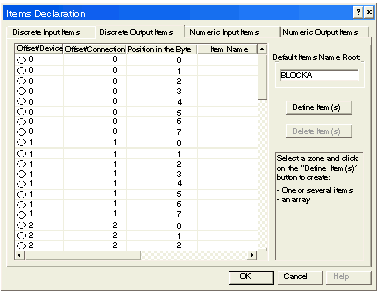
6
|
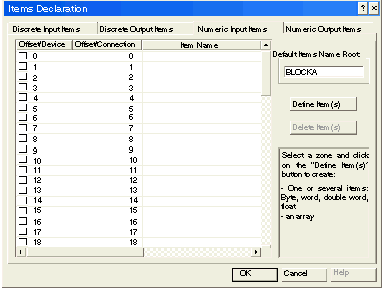
Accept the default Item Name and click OK. 16 discrete input items are created:
 |
|
7
|
Repeat steps 3 - 6 for each group of discrete input items you need to create. In this example, that includes items for each of the following groups:
|
|
8
|
Click on the Discrete Output Items tab to open that page.
|
|
Step
|
Action
|
|---|---|
|
1
|
The discrete output items page looks like this:
 Note: Again, both the Offset/Device and Offset/Connection columns represent the byte address of the discrete output, while the Position in the Byte column indicates the bit position of the discrete output item.
|
|
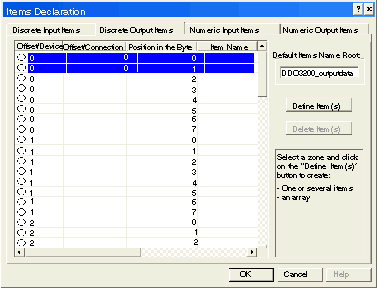
2
|
In the Default Items Name Root input box type: DDO3200_outputdata.
|
|
3
|
In the Items List, select the rows that correspond to bits 0-1 in byte 0—i.e., the first 2 rows:
 |
|
4
|
Click the Define Item(s) button.The Item Name Definition dialog opens:
 Note: The asterisk (*) indicates a series of discrete items with the same root name will be created.
|
|
5
|
Accept the default Item Name and click OK. 2 discrete input items are created:
 |
|
6
|
Repeat steps 2 - 5 for each group of discrete output items you need to create. In this example, that inlcudes items for each of the following groups:
|
|
7
|
Click on the Numeric Input Items tab to open that page.
|
|
Step
|
Action
|
|---|---|
|
1
|
The Numeric Input Items tab looks like this:
 Note: In this example, both the Offset/Device and Offset/Connection columns represent the byte address. All items you create will be either an 8-bit byte or a 16-bit word.
|
|
2
|
In the Default Items Name Root input box type: AVI1270_CH1_inputdata.
|
|
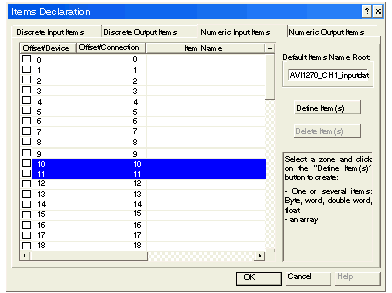
3
|
In the Items List, select bytes (or rows) 10 and 11:
 |
|
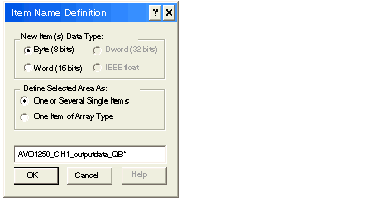
4
|
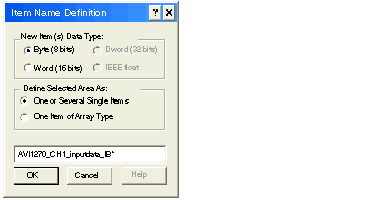
Click the Define Item(s) button.The Item Name Definition dialog opens:
 |
|
5
|
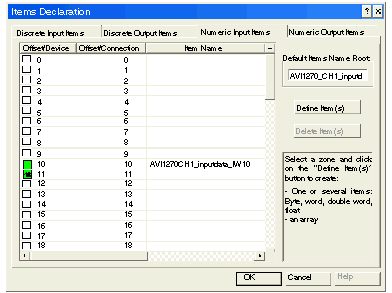
Select Word (16 bits) as the New Item(s) Data Type, then click OK. A new item is created:
 |
|
6
|
Repeat steps 2 - 5 for each group of numeric input item you need to create. In this example, that inlcudes items for each of the following groups:
|
|
7
|
Click on the Numeric Output Items tab to open that page.
|
|
Step
|
Action
|
|---|---|
|
1
|
The Numeric Output Items tab opens:
 Note: In this example, both the Offset/Device and Offset/Connection columns represent the byte address. All items you create will be 16-bit words comprising 2 bytes.
|
|
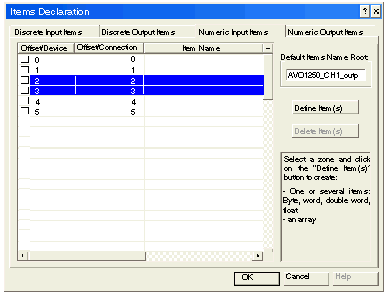
2
|
In the Default Items Name Root input box type: AVO1250_CH1_outputdata.
|
|
3
|
In the Items List, select bytes (or rows) 10 and 11:
 |
|
4
|
Click the Define Item(s) button.The Item Name Definition dialog opens:
 |
|
5
|
Repeat steps 2 - 5 for the AVO 1250 channel 2 output data at bytes 4 and 5.
|
|
6
|
Click OK to close the Items Declaration window.
|
|
7
|
Select File → Save to save your edits.
|
|
Step
|
Action
|
|---|---|
|
1
|
In the Devices window of the Control Expert EtherNet/IP configuration tool, the item at Position 000 should still be selected. If not, select it, as shown below:
 The automatically configured input and output items appear on the right side of the screen in the I/O area (as depicted in the next step, below).
|
|
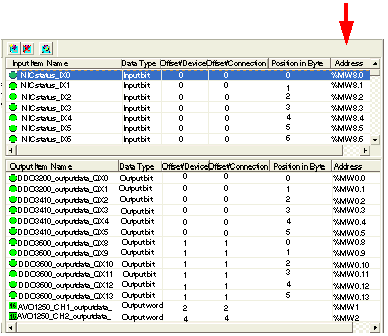
2
|
If necessary, use the horizontal scroll bar to scroll to the far right of the input or output area and display the Address column, which identifies the location of the input or output in the TSX ETC 100:
 |
