|
|
Original instructions
|


|
Element
|
Description
|
|---|---|
|
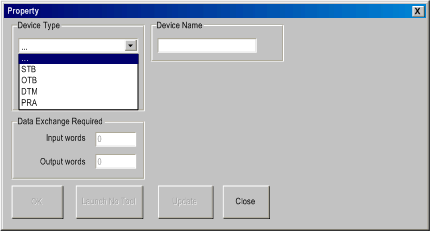
Device Type
|
Selection of a STB or OTB device is made from this drop-down list.
After the first validation (using the OK or Launch Advantys button) the Device Type cannot be changed.
|
|
Device Name
|
The Device Name is used as a prefix to all variables created for an Advantys island in ACS. This allows unique variables for duplicated islands.
After validation (using the OK or Launch Advantys button) the Device Name cannot be changed.
|
|
Data Exchange Required
|
These are the minimum number of words necessary for communication between the Control Expert module and the Advantys island.
These values cannot be changed via the Property box.
NOTE: Increasing the RD/WR lengths via the I/O Scanning tab leaves enough data exchange words for the future expansion of your Advantys island. Expanding an island that does not use the last line in the I/O Scanning table requires changing the values for all the lines below the line that needs the additional exchange words. |
|
Use Device Name as prefix
|
If this checkbox is unchecked, the user is in charge of giving unique names to the variables and symbols in all Advantys islands.
This checkbox is only available for ASC V5.5 or higher. For versions less than 5.5 the Device Name is automatically added to all variables and symbols in all Advantys islands.
|
|
OK
|
This button is only available after entering the Device Type and Device Name.
When clicked, the Device Type and Device Name are checked to see if they are valid.
If there is a problem, a message box opens explaining the why they were not valid.
OK is only available during the first use of the Property box for a new island.
|
|
Launch Advantys Configuration Software
|
This button is only available if both:
This button does two things:
|
|
Update
|
When clicked, the ACS modifications are synchronized with your Control Expert application (after these modifications have been validated in ACS).
It also imports and updates all ACS symbols and variables into the Control Expert variable manager.
NOTE: All variables modified in ACS are deleted and rewritten in the Control Expert Data Editor. But they are not updated in the program. |
|
Close
|
This button closes the Property box without saving anything.
|

|
Element
|
Description
|
|---|---|
|
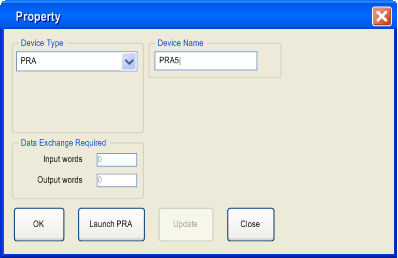
Device Type
|
Selection of the PRA device is made from this drop-down list.
After the first validation (using the OK or Launch PRA button) the Device Type cannot be changed.
|
|
Device Name
|
The Device Name is the name of PRA application.
|
|
Data Exchange Required
|
This is not used when configuring a PRA device.
|
|
OK
|
This button is only available after entering the Device Type and Device Name.
When clicked, the Device Type and Device Name are checked to see if they are valid.
If there is a problem, a message box opens explaining why they are not valid.
OK is only available during the first use of the Property box for a new PRA configuration.
|
|
Launch PRA
|
This button is only available if the Device Type and Device Name has been entered.
This button does two things:
|
|
Close
|
This button closes the Property box without saving anything.
|

|
Element
|
Description
|
|---|---|
|
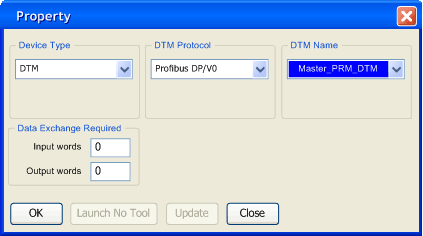
Device Type
|
Selection of DTM device type is made from this drop-down list.
|
|
DTM Protocol
|
Select the protocol to be used from this drop-down list.
This list contains the DTM protocols of all the DTMs in the DTM Browser that can be linked with I/O Scanning.
|
|
Device Name
|
Select a PRM Master DTM from this drop-down list.This list uses the DTM Browser Alias names.
This list contains all the PRM Master DTMs in the DTM Browser that support the selected DTM Protocol.
To validate the choices, click on the OK button.
|
|
Data Exchange Required
|
These are the minimum number of words necessary for communication between Control Expert and the PRM Master DTMs.
These values cannot be changed via the Property box.
NOTE: Increasing the RD/WR lengths via the I/O Scanning tab leaves enough data exchange words for the future expansion of your DTM topology tree. Expanding a tree that does not use the last line in the I/O Scanning table requires changing the values for all the lines below the line that needs the additional exchange words. |
|
OK
|
The OK button is only available after selecting the Device Type, DTM Protocol and DTM Name.
When clicked, the DTM Protocol and DTM Name are checked to see if they are valid.
If there is a problem, a message box opens explaining the why they were not valid.
The OK button is only available during the first use of the Property box for a new PRM Master DTM.
|
|
Launch No Tool
|
This button is never available for PRM Master DTMs.
|
|
Update
|
Use the Update button after validating or changing the configuration of the linked PRM Master DTM. Refer to Update I/O Scanning for a PRM Master DTM.
|
|
Close
|
The Close button closes the Property box without saving anything.
|