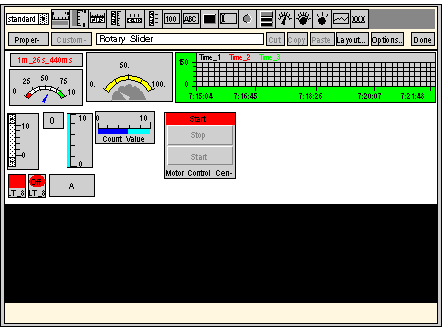
The user functions available from the Graphic Editor display window allow you to select, move, and size objects. Moving and sizing operations require that your first select those graphic object(s) that you want to modify. A selected object is indicated by its surrounding selection box; an unselected or deselected object has no surrounding selection box.
The figure below shows the Graphic Editor display.
Selecting Graphic Objects
A graphic objectís selection state (selected/deselected) can be set via the following user actions:
-
A single graphic object can be selected by simply clicking on it with a mouse. If any other objects are currently selected, they will be deselected.
-
Multiple graphic objects can be selected with a selection box in the display window. If you press a mouse button in an open area of the display window (i.e., not on a graphic object) and drag the mouse without releasing it, you will see a dotted outline box. One corner of the box is fixed where the mouse button was initially pressed while the opposite corner tracks the current mouse position. When the mouse button is released, every object that intersects the selection box is selected. Objects outside the box are deselected.
-
A graphic object's selection state can be toggled between selected and deselected without affecting the selection state of other objects by pressing the CTRL key when clicking on the object. With this action, graphic objects can be individually added or removed from the group of selected objects.
-
A graphic object can be selected without affecting the selection state of any other objects by pressing the SHIFT key when clicking on the object. When an object is selected this way, it becomes the
reference object (see Layout Dialog
Top Window User Functions) for the group of selected objects. The primary purpose of this action is to change the reference object in a group of selected objects prior to invoking one of the
Layout operations.
-
Previously selected graphic objects can be deselected by clicking the mouse in an open area of the display window, that is, not on a graphic object.
A graphic object's size can be changed by first selecting it, then using the mouse to change the size of the object's selection box. As you move the mouse over an object's selection box, the mouse pointer changes to reflect the type of sizing operation to be performed. If you press a mouse button while the mouse is over an object's selection box and drag the mouse without releasing it, a dotted outline box appears. When the mouse button is released, the object's size is changed to match the size of the outline. There are eight possible sizing actions depending on which part of an object's selection box is dragged. Each corner of the box will allow only its adjacent sides to move; each side of the box will allow only that side to move.
A graphic object can be moved in the display window with the mouse. If you press a mouse button while the cursor is over an object and drag without releasing the button, then a selection box will be shown. When the mouse button is released, the object moves to the location of the selection box.
Multiple graphic objects can be moved by first selecting the objects to be moved, and then dragging the entire group of objects in the same way a single object is moved. While a group of objects is moved, a selection box is shown for each object in the group.
Setting Graphic Object Properties
You can set a graphic objectís properties via the Property Sheet. If the Property Sheet is visible, the properties of the selected graphic object are presented for editing. Display the Property Sheet by pressing the Properties... button or by double-clicking the mouse anywhere on the selected object in the display window.
Customizing Complex Graphic Objects
Some complex graphic objects have a very large number of properties. Configuring such an object with the Property Sheet can be cumbersome. An available Customizer can ease the configuration of complex graphic objects. A Customizer is a dialog window designed specifically to configure its associated graphic object. When the Graphic Editor detects that a selected graphic object has a Customizer, it will enable the Customizer... button, which brings up the graphic objectís Customizer. When you double-click on a graphic object that is associated with a Customizer, the Customizer comes up (instead of the Property Sheet). If a graphic object is associated with a Customizer, the only item in the Property Sheet is its name.
A Graphic Editor display has a Background Image property that can be used to designate an image as the displayís background. The image can be a GIF or JPEG file. File locations are relative to the Embedded Serverís /wwwroot directory. For example, if the image "cool.gif" was put in the Embedded Serverís /wwwroot/images directory, then the Background Image property should be set to /images/cool.gif.
