|
Working with Derived Data Type Variables
|
|


|
Original instructions
|
|
Working with Derived Data Type Variables
|
|
|
Original instructions
|
|
Step
|
Description
|
|
|---|---|---|
|
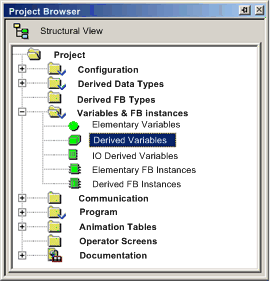
1
|
In the Project Browser, navigate to and double-click the left mouse button on Variables & FB instances → Derived Variables:
 |
|
|
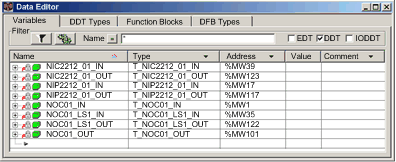
2
|
The Data Editor opens, displaying the Variables page:
 NOTE:
|
|
|
Inputs
|
Order
|
Outputs
|
|---|---|---|
|
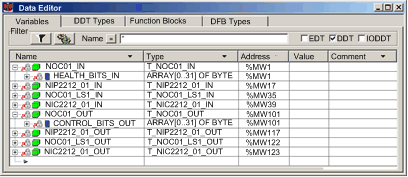
Health bits 1
|
1
|
Control bits 1
|
|
Modbus TCP input variables 2
|
2
|
Modbus TCP output variables 2
|
|
Local Slave input variables 3
|
3
|
Local Slave output variables 3
|
|
EtherNet/IP input variables 2
|
4
|
EtherNet/IP output variables 2
|
|
1. Health and control bits are sub-ordered as follows:
i.
by device type: a. Modbus TCP; b. local slave; c. EtherNet/IP
ii.
within each device type:
a. by device or local slave number
b. within a device: by connection number
2. Device variables are sub-ordered as follows:
i.
by device number
ii.
within a device: by connection number
iii.
within a connection: by item offset
3. Local slave variables are sub-ordered as follows:
i.
by local slave number
ii.
within each local slave: by item offset
|
||
|
Step
|
Action
|
|
|---|---|---|
|
1
|
In the Device Editor for the Ethernet communication module, under the Device List node, navigate to and select:
|
|
|
2
|
For a Modbus TCP device, open the Request Setting page and look for the Connection Bit number:
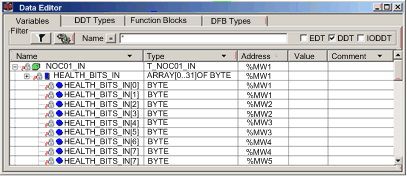
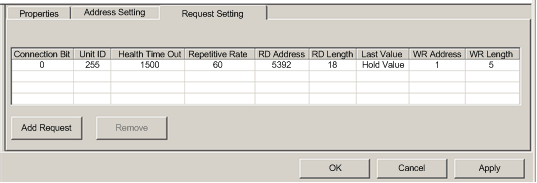 In the above example (which displays the left portion of a truncated Request Setting page), the Connection Bit value of 0 maps to the first bit in the first byte of the HEALTH_BITS_IN array, which can be represented as HEALTH_BITS_IN[0].0.
|
|
|
3
|
For an EtherNet/IP device, open the Connection Settings page and look for the Connection Bit number:
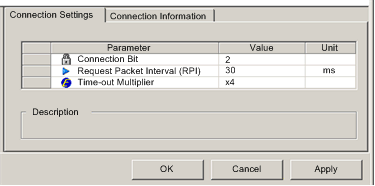 In the above example, the Connection Bit value of 2 maps to the third bit in the first byte of the HEALTH_BITS_IN array, which can be represented as HEALTH_BITS_IN[0].2.
|
|
|
4
|
For a local slave, open the local slave configuration page and look for the Connection Bit number:
|
|
|
Step
|
Action
|
|
|---|---|---|
|
1
|
In the Project Browser, select the Animation Tables node and click the right mouse button. A pop-up menu opens.
|
|
|
2
|
Select New Animation Table.
|
|
|
3
|
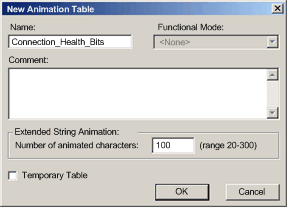
In the New Animation Table dialog, type in values for the following fields:
|
|
|
Name
|
Type in a name for the new animation table. In this example, type in Connection_Health_Bits.
|
|
|
Number of animated characters
|
Accept the default value of 100.
|
|
|
The completed dialog looks like this:
 |
||
|
4
|
Click OK. The dialog closes and the new Connection_Health_Bits animation table opens.
|
|
|
5
|
Double-click on the first empty row in the Name column, then click the ellipsis button
 . The Instance Selection dialog opens. . The Instance Selection dialog opens. |
|
|
6
|
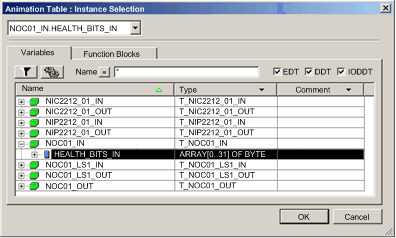
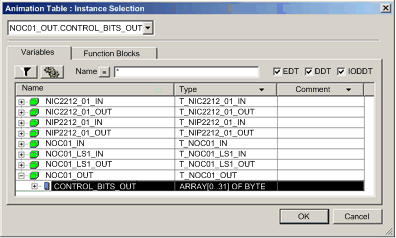
In the Instance Selection dialog, navigate to and select the entire HEALTH_BITS_IN array:
 |
|
|
7
|
Click OK to add the array to the Connection_Health_Bits animation table:
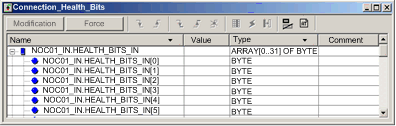 Keep in mind that each row represents a byte, which contains eight individual connection health bits. When the DTM for the Ethernet communication module is connected to the physical module, the Value field displays a value for the entire byte.
|
|
|
Step
|
Action
|
|
|---|---|---|
|
1
|
With the Connection_Health_Bits animation table open, double-click on the next empty row in the Name column, then click the ellipsis button
. The Instance Selection dialog opens. |
|
|
2
|
In the Instance Selection dialog, navigate to and select the entire CONTROL_BITS_OUT array:
 |
|
|
3
|
Click OK to add the control bit array to the Connection_Health_Bits animation table:
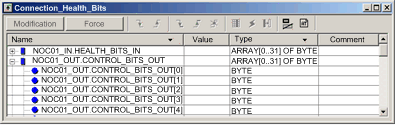 Keep in mind that each row represents a byte, which contains eight individual connection control bits. When the DTM for the Ethernet communication module is connected to the physical module, the Value field displays a value for the entire byte.
|
|
|
4
|
With the DTM for the Ethernet communication module connected to the physical module, double click in the Value column for the row (byte) that contains the control bit you want to toggle.
|
|
|
5
|
Type a value that toggles the bit (or bits) in the byte you want to change to on or off. For example, suppose the Value field of the control bit displays an initial value of 7. This indicates that the first three (0, 1, and 2) are not established. If you intend to establish the third connection (connection 2), modify the corresponding bit to 0 (type a value of 3).
NOTE: When the control bit is 0, the connection is established. When the control bit is 1, the connection is closed. |
|
|
6
|
On your keyboard, press Enter. The control bit for the third connection (i.e. connection number 2) is toggled off.
|
|
