|
Configuration of the Lexium 15 MP/HP Node
|
|


|
(Original Document)
|
|
Configuration of the Lexium 15 MP/HP Node
|
|
|
(Original Document)
|
|
Step
|
Action
|
|---|---|
|
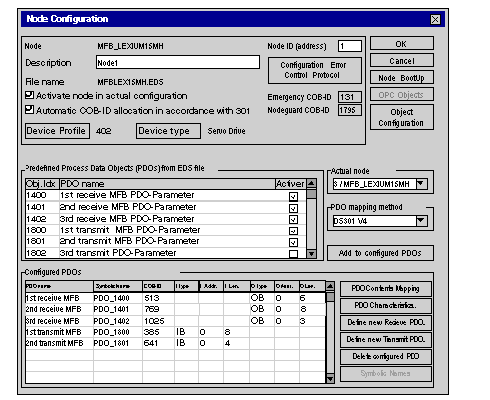
1
|
In the main screen, double-click on Node 1.
Result: the node configuration screen is displayed:
 |
|
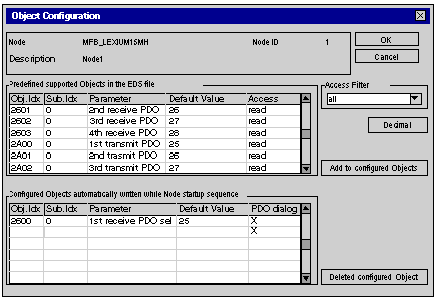
2
|
Click on Object Configuration.
Result: the object configuration window is displayed.
|
|
3
|
In the Predefined supported Object in the EDS file zone, find and double-click on object 2600 sub-index 0.
Result: object 2600 sub-index 0 is dragged to the table in the Configured Objects zone:
 |
|
4
|
Repeat stage 3 for objects 2601, 2602, 2A00, 2A01 and 2015 sub-index 1.Result: objects 2600, 2601, 2602, 2A00, 2A01 and 2015 sub-index 1 are added to the table in the Configured Objects zone.
|
|
5
|
Click OK to confirm object configuration.
|
|
6
|
Click OK to confirm node configuration.
|
|
7
|
Save the CANopen project with the name MFB_Lexium15MH.co.
Note: remember where the .CO file is saved since the configuration will be imported in Control Expert.
|
|
Type of servodrive
|
Name given to node
|
Name of .eds file
|
PDOs to add
|
Configuration object to add
|
|---|---|---|---|---|
|
Lexium 15 MH
|
MFB_LEXIUM15MH
|
MFBLEX15MH.eds
|
1st receive PDO
2nd receive PDO
3rd receive PDO
1st transmit PDO
2nd transmit PDO
|
2015 sub-index 1
2600 sub-index 0
2601 sub-index 0
2602 sub-index 0
2A00 sub-index 0
2A01 sub-index 0
|
