|
BMX P34 2010 or BMX P34 2030 Specific Update Procedure
|
|


|
(Original Document)
|
|
BMX P34 2010 or BMX P34 2030 Specific Update Procedure
|
|
|
(Original Document)
|
|
Step
|
Action
|
|---|---|
|
1
|
Click Start → Program → Schneider Electric → Unity Loader to launch Unity Loader.
|
|
2
|
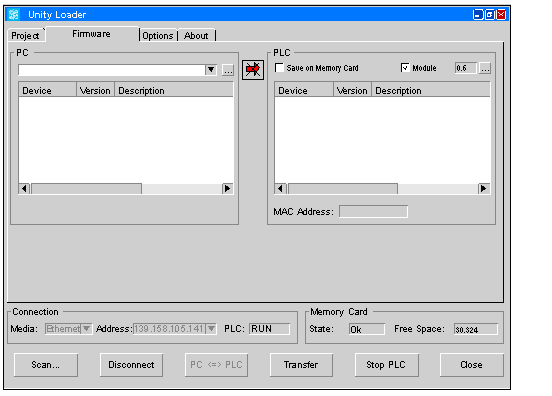
Select the Firmware tab:
 |
|
3
|
In the Connection dialog box, select the media in accordance with the chosen physical connection:
|
|
4
|
Click Connect.
NOTE: The connection is confirmed when the Connect button changes to Disconnect button. If the button does not change, verify that the CPU is turned on and the physical connection between the PC and the CPU is correctly set. |
|
5
|
Stop the CPU.
|
|
6
|
In the PLC dialog box, select the CPU to be updated in the window list, if necessary.
|
|
7
|
In the PC dialog box, click
 to browse the PC files. to browse the PC files. |
|
8
|
To update the CPU from a BMX P34 2010 or BMX P34 2030 to a BMX P34 20102 or BMX P34 20302, select the Bmx2010_to_20102_B.ldx or Bmx2030_to_20302_B.ldx file and click Open.
|
|
NOTICE
|
|
EQUIPMENT DAMAGE
During the download:
Failure to follow these instructions can result in equipment damage.
|
|
Step
|
Action
|
|---|---|
|
1
|
After selecting the appropriate *.ldx firmware file in the Firmware tab of Unity Loader, check if the firmware of the PC is:
|
|
2
|
Click Transfer.
Result: A Security Advice popup window is displayed.
|
|
3
|
Check that:
|
|
4
|
Click Yes to start downloading the firmware file.
Result: The Transferring data to PLC window is displayed with the remaining time. The duration depends on the protocol used and the PC configuration.
|
|
5
|
In the Transferring data to PLC window, check if the download is completed.
Result: The Firmware upgraded successfully message is displayed.
NOTE: If this message is not displayed, check each step and contact your local Schneider Electric office for assistance. |
|
6
|
Do not reset the CPU.
|
|
Step
|
Action
|
|---|---|
|
1
|
Select the file to update the updated CPU now considered as a BMX P34 20102 or BMX P34 20302.
|
|
2
|
After selecting the appropriate *.ldx firmware file in the Firmware tab of Unity Loader, check if the firmware of the PC is:
|
|
3
|
Click Transfer.
Result: A Security Advice popup window is displayed.
|
|
4
|
Check that:
|
|
5
|
Click Yes to start downloading the firmware file.
Result: The Transferring data to PLC window is displayed with the remaining time. The duration depends on the protocol used and the PC configuration.
|
|
6
|
In the Transferring data to PLC window, check if the download is completed.
Result: The Firmware upgraded successfully message is displayed.
NOTE: If this message is not displayed, check each step and contact your local Schneider Electric office for assistance. |
|
7
|
Click Close.
Result: The CPU is automatically reset once the download of the firmware file is completed.
|
