|
Attaching the terminal label
|
|
|
(Original Document)
|

|
Stage
|
Action
|
|---|---|
|
1
|
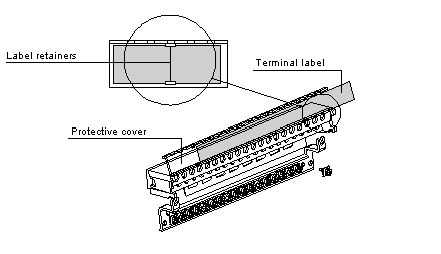
Cut out the correct part of the terminal label: label 1 for terminal 1, for clear marking. (The TBX diagrams on the edges of the label indicate which part to use, according to the position of the module).
|
|
2
|
Complete the terminal label if necessary: connection point address and module number, label for each of the channels.
|
|
3
|
Raise the removable protective cover.
|
|
4
|
Slide the terminal label inside the protective cover, being careful to position it behind the 4 tabs which will hold the label in place. The terminal labels can be read through the protective cover: label 1 is positioned opposite terminal 1, etc.
|
|
5
|
Close the protective cover over the terminal and push the two ends firmly into place. Any information that it was perhaps necessary to add to the label will then be visible through the cover.
|