

Introduction
The LD editor window is made up of cells and 1 object can be placed in each one. The cells are separated visually using a grid which can be switched off.
When creating a program with the keyboard, the selected (active) cell has a gray background, see also Programming with the keyboard.
When creating a program with the mouse, this gray field is not relevant.
Creating an LD program with the mouse
Process the following steps to create an LD program with the mouse:
Step |
Action |
|---|---|
1 |
|
2 |
Select the desired object (see also Pasting objects) using:
Result: The mouse pointer indicates the selected object (placement mode). Note: As soon as the text is entered several checks are made, such as syntax/semantic error checks, correct spelling of variable names etc. A detailed description of syntax is found in chapter Ladder Diagram (LD) in the Reference manual. The results of the checks are indicated by a colored folder, see also Syntax and semantics check during programming. |
3 |
Click the target cells in the LD section. Result: The selected object is inserted and the selection mode is active again. Example:  Note: If you want to insert several objects of the
same type, press and hold the Ctrl key and insert any number
of selected objects by clicking with the left mouse button. Return
to selection mode by clicking the |
4 |
To enter the respective actual parameters (variable/address), double-click the object. Result: The properties dialog box for the object is opened. Example: 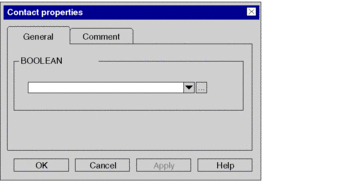 |
5 |
Enter the desired actual parameter and a comment (if required) and confirm the entries with . Result: In entry mode, the names of the associated variables are displayed above the object. In mixed display mode, the addresses and comments are displayed in addition to the names of the variables (if available), see also Mixed display mode. Example (entry mode):  Example (mixed display mode):  |
6 |
Repeat these steps until all objects are entered. |
 symbol or pressing the Esc key.
Creating an LD program with the keyboard
Process the following steps to create an LD program with the keyboard:
Step |
Action |
|---|---|
1 |
|
2 |
Place the field with the gray background on the cell where the object should be inserted, see also Navigating with the keyboard. |
3 |
Select the desired object (see also Pasting objects) using the function keys for the objects. Result: The cursor symbol indicates the selected object. Note: As soon as the text is entered several checks are made, such as syntax/semantic error checks, correct spelling of variable names etc. A detailed description of syntax is found in chapter Ladder Diagram (LD) in the Reference manual. The results of the checks are indicated by a color folder, see also Representation. |
4 |
Confirm the selection using the Enter key. Result: The selected object is inserted into the cell with the gray background and the gray field is automatically shifted to the next cell. Example:  Note: If you want to insert several objects of the same type, press and hold the Ctrl key and insert any number of selected objects with the Enter key. To return to selection mode, press the Esc key. |
5 |
Press the Enter key to open a shortcut menu for the selected object. |
6 |
To enter the respective actual parameters (variable/address), use the menu command from the shortcut menu. Result: The properties dialog box for the object is opened. Example:  |
7 |
Enter the desired actual parameter and a comment (if required) and confirm the entries with . Result: In entry mode, the names of the associated variables are displayed above the object. In mixed display mode, the addresses and comments are displayed in addition to the names of the variables (if available), see also Mixed display mode. Example (entry mode):  Example (mixed display mode):  |
8 |
Repeat these steps until all objects are entered. |