Using Fiber Optics in a RIO System
The following represent four typical configurations that show the wide range of the network architecture:
Point-to-Point Topology with Fiber Optic Repeater
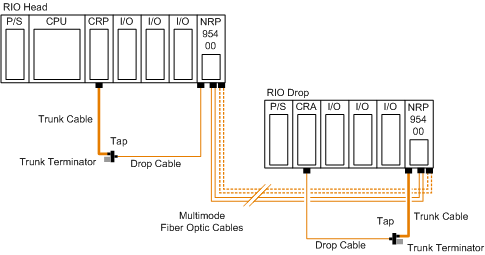
Point-to-point configuration (see the following figure) allows communication over the distance of up to 3 km through harsh industrial environments. The following figure shows the point-to-point configuration.
NOTE:
-
Using 2 optical fiber pairs provides a better service and diagnostics.
-
Using only one fiber pair, looping back the unused optical ports with a short fiber helps using the diagnostics.
For more details on the diagnostics, refer to the Modicon 140 NRP 954 00 and 140 NRP 954 01C Fiber Optic Repeater Modules User Guide.
Bus Topology with Fiber Optic Repeater
This type of configuration is used when it is required to increase the length of the fiber link and increase the distance between drops on the RIO network.
The following figure shows the bus topology:
NOTE: The distance between nodes on fiber is limited by the maximum allowable power loss from end-to-end (3 km over 62.5 µm fiber). Power loss includes the fiber optic cable attenuation, connector losses at the fiber optic receiver and transmitter ports, and the system margin of 3 dB.
NOTE: At each end of the bus, looping back the unused optical ports with a short fiber helps using the diagnostics. For more details on the diagnostics, refer to the Modicon 140 NRP 954 00 and 140 NRP 954 01C Fiber Optic Repeater Modules User Guide.
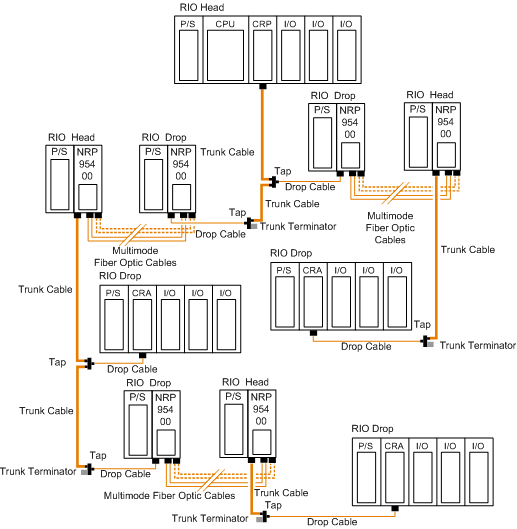
Tree Topology with Fiber Optic Repeater
Tree topologies, which cannot be established with coaxial cable alone can be built legally using fiber optic repeaters.
NOTE: The
limitations in bus and self-healing configurations are applicable for each drop in tree topology.
The following illustration shows an example of a tree topology:
NOTE:
-
Using 2 optical fiber pairs provides a better service and diagnostics.
-
Using only one fiber pair, looping back the unused optical ports with a short fiber helps using the diagnostics.
For more details on the diagnostics, refer to the Modicon 140 NRP 954 00 and 140 NRP 954 01C Fiber Optic Repeater Modules User Guide.
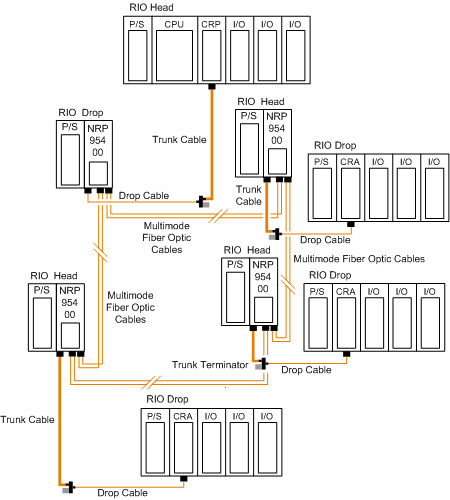
Self-Healing Ring Topology with Fiber Optic Repeater
This configuration can be achieved by connecting the unused fiber optic ports of the first and last 140 NRP 954 00 directly or through the fiber optic repeater. This type of connection has all the advantages of the previously described configurations, along with built-in redundancy. A broken connection between any two Quantum NRP modules in the ring will automatically reconfigure the RIO network and continue the communication.
NOTE: The maximum length of the fiber cable in a ring configuration, 16 km, is calculated in the the case of a break that occurs anywhere.
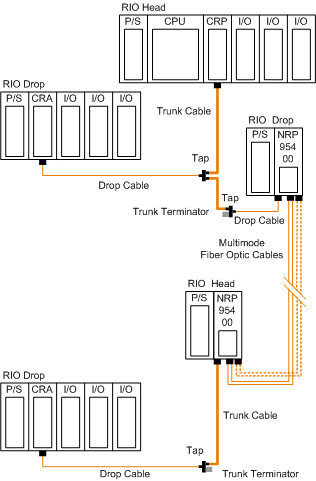
Hot Standby Systems with Fiber Optic Repeater
The following figure shows an example of hot standby systems using fiber optic repeaters:
NOTE:
-
Using 2 optical fiber pairs provides a better service and diagnostics.
-
Using only one fiber pair, looping back the unused optical ports with a short fiber helps using the diagnostics.
For more details on the diagnostics, refer to the Modicon 140 NRP 954 00 and 140 NRP 954 01C Fiber Optic Repeater Modules User Guide.
Instead of placing each fiber optic repeater modules with its own power supply module(s) in a standalone backplane, you can take the advantage of the quantum form factor.
The following figure shows two segments of RIO coaxial cable connected point-to-point by two 140 NRP 954 00 fiber optic repeaters placed on the Quantum racks where the RIO head and RIO drop modules are located:
NOTE:
-
Using 2 optical fiber pairs provides a better service and diagnostics.
-
Using only one fiber pair, looping back the unused optical ports with a short fiber helps using the diagnostics.
For more details on the diagnostics, refer to the Modicon 140 NRP 954 00 and 140 NRP 954 01C Fiber Optic Repeater Modules User Guide.
Recommended Materials for Fiber Optic Links
Modicon does not manufacture fiber optic products such as cables, connectors, or special tools. However, we have experience with third party suppliers of materials and can give some guidelines on what will work with our products.
The following table shows the connector types
|
Connector Type
|
Part Number
|
Operating Temperature
|
|
ST Bayonet (Epoxy)
|
3M 6105
|
–40...+80 °C (–40...+176 °F)
|
|
ST Bayonet (Hot Melt)
|
3M 6100
|
–40...+80 °C (–40...+176 °F)
|
|
ST Bayonet (Epoxy)
|
AMP 501380 Series
|
–30...+70 °C (–22...+158 °F)
|
|
ST Cleave and Crimp
|
AMP 504034 Series
|
–40...+65 °C (–40...+149 °F)
|
|
Mechanical Line Splice (one size fits all)
|
3M 2529 Fiberlok™ II
|
–40...+80 °C (–40...+176 °F)
|
NOTE: All connectors must have a short boot for strain relief.
The following table shows the termination kits.
|
Kit Type
|
Part Number
|
Description
|
|
Bayonet or Push-Pull ST (Hot Melt)
|
3M 6355
|
110 Vac, only for 3M connectors
|
|
Bayonet ST (Epoxy)
|
AMP 501258-7
|
110 Vac, only for AMP connectors
|
|
Bayonet ST (Epoxy)
|
AMP 501258-8
|
220 Vac, only for AMP connectors
|
|
Mechanical Line Splice
|
3M 2530
|
Fiber Splice Prep Kit, complete with cleaving tool
|
Light Sources, Power Meters
For Photodyne light sources and power meter products, contact 3M Telecom Systems Division.
Observing Safety Precautions
Before installing the 140 NRP 954 00 fiber optic repeater module, read the warning messages below. Follow them at all times during the installation of the fiber optic repeater.
Prior to installing 140 NRP 954 00 fiber optic repeater, network cables must be prepared and installed to the repeater’s site with their connectors.
To prepare optic cables:
-
Follow the cable manufacturer’s recommendations for routing, installing, and testing the cable. Take care when terminating the ends of each fiber optic cable in order to minimize loss of optical signal. Follow the manufacturer’s guidelines for installing optical connectors.
-
Test the cable for proper attenuation prior to the connection of the fiber optic repeaters. The cable ends should be accessible at each fiber optic installation site. Allow sufficient cable length for a service loop and strain reliefs.
-
Label each cable end to facilitate future maintenance.
To prepare and install coaxial cables, refer to Remote I/O Cable System Planning and Installation Guide.
Connecting the Fiber Optic Cable
The following steps show how to connect the fiber optic cable.
|
Step
|
Action
|
|
1
|
Remove the protective plastic coverings from the cable ports and the tips of the cable. Snap one of the fiber cable clasps (shipped with the module) over the cable so that the wider end of the tool is closest to the cable end. 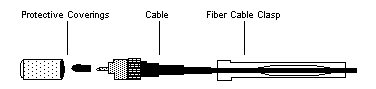 |
|
2
|
Turn the connection ring so that one of the arrows on the side of the ring lines up with the ridge inside. 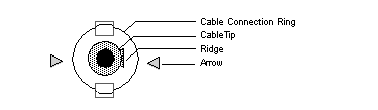 |
|
3
|
a. Slide the tool up to the connection ring.
b. Gripping the cable with the plastic cable clasp, slide the cable end onto the lower cable port. The arrow and the ridge on the connection ring should lineup with the slot on the left of the cable port.
c. Use the clasp to push the cable over the tab on top of the port.
d. Turn the cable to the right, so that the tab locks securely
e. Remove the clasp.
f. Repeat this process with the remaining strand of cable. 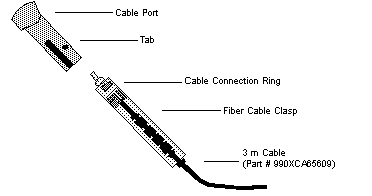 |


 CAUTION
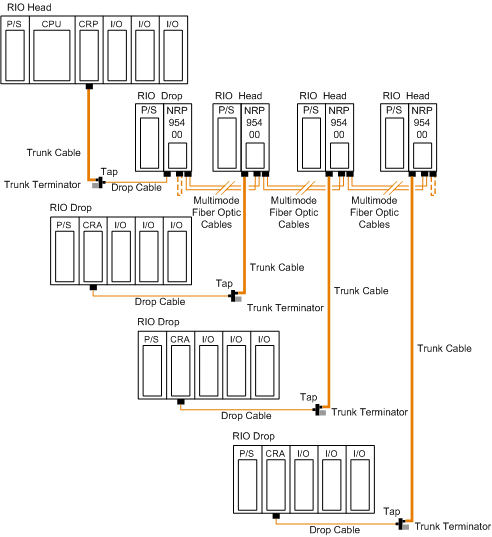

 DANGER