|
Manual Mode (Manu)
|
|


|
(Original Document)
|
|
Manual Mode (Manu)
|
|
|
(Original Document)
|
|
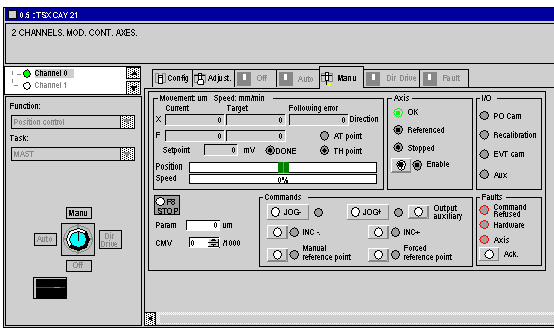
Display zone
|
Description
|
|---|---|
|
X Current
|
Displays the moving part position using the measurement unit defined in the configuration.
|
|
X Target
|
Displays the moving part position setpoint (target position)
|
|
X Following error
|
Displays the deviation between the setpoint position calculated and the actual position of the moving part (following error).
|
|
F Current
|
Displays the moving part speed using the measurement unit defined in the configuration.
|
|
F Target
|
Displays the setpoint speed of the moving part: target speed (manual speed modified by CMV coefficient)
|
|
Setpoint
|
Displays (in mV) the setpoint value applied to the analog output
|
|
Position
|
The bar chart shows the progress of the moving part within the limits defined in the configuration screen. The bar chart is colored green, and becomes red if the limits are exceeded
|
|
Speed
|
The bar chart expresses the speed of the moving part in relation to maximum speed as a percentage. The bar chart is colored green, and becomes red if the maximum speed is exceeded
|
|
Indicator
|
State
|
Indication
|
|---|---|---|
|
+ Direction
- Direction
|
/
|
Indicates that the part is moving in a positive direction
Indicates that the part is moving in a negative direction
|
|
AT Point
|
Lit
|
Indicates that the movement in progress has finished, and that the moving part is in the target window (with INC+ or INC- commands)
|
|
DONE
|
Lit
|
Indicates that the movement in progress has finished
|
|
TH Point
|
Lit
|
Indicates that the theoretical setpoint has been reached
|
|
LED / Button
|
State
|
Indication
|
|---|---|---|
|
OK
|
Lit
|
Axis in operational state (no blocking fault)
|
|
Referenced
|
Lit
|
Referenced axis
|
|
Stopped
|
Lit
|
Moving part stationary
|
|
Enable
|
/
|
This button is used to control the variable speed controller enable relay
|
|
LED
|
Indication
|
|---|---|
|
PO Cam
|
Signal state (0 or 1) on Reference point input
|
|
Recalibration
|
Signal state (0 or 1) on Recalibration input
|
|
Event Cam
|
Signal state (0 or 1) on Event input
|
|
Aux
|
Signal state (0 or 1) on auxiliary output
|
|
Command
|
Description
|
|---|---|
|
STOP
|
Stops the moving part according to deceleration defined in the configuration
|
|
Param
|
Used to enter the value of either an incremental movement (INC+ or INC- command) or a forced reference point
|
|
CMV
|
Used to enter a value from 0 to 2000 which determines the speed multiplier coefficient (0.000 to 2000 in intervals of 1/1000)
|
|
Command
|
Description
|
|---|---|
|
JOG-
|
Command to move view in a negative direction (1)
|
|
JOG+
|
Command to move view in a positive direction (1)
|
|
INC-
|
Incremental movement command in negative direction for a distance defined in the Param field
|
|
INC+
|
Incremental movement command in positive direction for a distance defined in the Param field
|
|
Manual reference point
|
With an incremental encoder, manual reference point and search order. The current position takes on the value of the PO Value defined in the adjustment screen, with the reference point found in accordance with the type defined in the configuration.
|
|
Forced reference point
|
Forced reference point order with an incremental encoder. The current position is forced to the value defined in the Param field.
This type of reference point does not shift the moving part
|
|
Reference cancellation
|
In order to be able to shift the moving part without soft stop fault: non-referenced axis crossing order with an absolute encoder
|
|
Referencing
|
With an absolute encoder in direct offset, referenced axis crossing order
|
|
Calculation offset
|
With an offset-assisted absolute encoder, trigger the encoder offset calculation to make the current position coincide with the value in length units entered in the Param field. The axis is referenced at the end of this calculation.
|
|
Auxiliary output
|
Sets auxiliary output to 1 or 0
|
|
LED / Button
|
State
|
Indication
|
|---|---|---|
|
Command Refused
|
Lit
|
Last command refused
|
|
Hardware
|
Lit
|
External hardware fault (e.g. encoder, variable speed controller, outputs, etc.)
|
|
Axis
|
Lit
|
Application fault (e.g. following error, soft stops etc.)
|
|
Ack.
|
/
|
Fault acknowledgment button. Activating this button acknowledges all faults which have disappeared
|
