This topic describes the embedded Web pages that allow you to change the configuration parameters.
Changing the Current IP Configuration
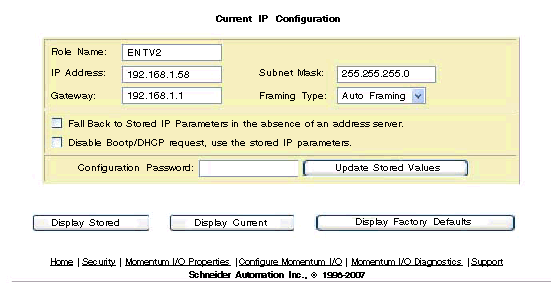
This page allows you to specify the IP parameters and to provide parameters to be used in the event of a FDR/BOOTP/DHCP server not being available.
NOTE: The Schneider Electric default configuration password is httpcfguser (lower case).
The Current IP Configuration page permits configuring the following IP address parameters:
-
role name
-
IP address
-
subnet mask
-
gateway
-
framing type
-
fall back to stored IP parameters in the absence of an address server
-
disable BOOTP/DHCP request, use the stored IP parameters
Two check boxes appear on this page.
|
Check Box Name
|
Description
|
|
Fall back to stored IP parameters in the absence of an address server.
|
If the device can not get parameters from an FDR Server, then the device will use stored parameters when the check box is selected. Otherwise, the device will go to SAFE IO mode (I/O disable).
|
|
Disable BOOTP/DHCP request, use the stored IP parameters
|
With this option selected, the communication adapter will use the static IP address stored in the adapterís flash memory when powered up. In this instance, the communication adapter will not send out BOOTP or DHCP requests.
If there is not a stored IP address in the flash memory and this option is selected, the communication adapter will send out a request for an IP address.
|
The first three command buttons change the view, and the fourth command button carries out the changes made to the parameters.
|
Button Selected
|
Result
|
|
Display stored
|
Reread the page and display the stored values, the values in the flash.
|
|
Display current
|
Reread the page with current values, the values in the RAM.
|
|
Display factory defaults
|
Reread the page and display the factory defaults.
|
|
Update stored values
|
Make changes to any of the fields.
-
Enter the configuration password (httpcfguser).
-
Click the Update Stored Values button.
-
Changes are stored in RAM and FLASH and in the FDR server (if using FDR).
|
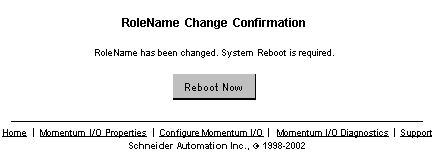
If the role name is changed, a corresponding confirmation page appears.
NOTE: If you have further configuration (runtime) changes to make, Schneider Electric recommends that you make configuration (runtime) parameter changes first and then change the role name.
After all changes are made, click Reboot Now.
There are three important facts about role names:
-
After a role name change, you must reboot the device. Click the Reboot Now button.
-
Role names are case sensitive.
-
Valid characters are [a ... z], [A ... Z], [0 ... 9], and [underscore].
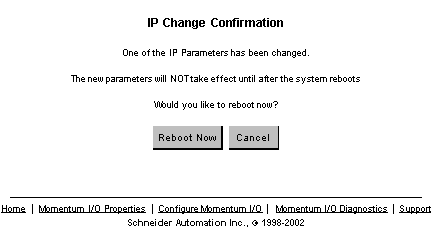
The system displays an IP Change Confirmation page. You may reboot the system, or you may click Cancel and continue working.
NOTE: If you choose to continue working, your IP parameter changes will not take effect until after the next reboot.
Schneider Automation recommends that you reboot by clicking Reboot Now.
Reboot on the IP Change Confirmation page.
-
IP Change Confirmation page
The IP Change Confirmation page is used to change these five (5) parameters: IP Address, Gateway, Subnet Mask, Framing Type, and Fall Back to Stored IP Parameters in the absence of an address server button.
Reboot is optional but recommended. The new parameters will not take effect until the device is rebooted.


