|
B872-200 Calibration
|
|


|
(Original Document)
|
|
B872-200 Calibration
|
|
|
(Original Document)
|
|
Step
|
Action
|
|---|---|
|
1
|
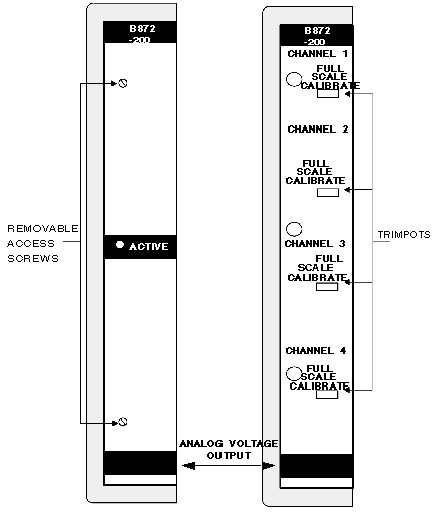
Remove the two screws and the label located on the front panel of the analog output module. This allows you access to the trim-pots. There is one trim-pot per output. The first trim-pot is for output number one, the second set is for output two, etc. The trim-pots adjusts the range's total magnitude (full scale). Refer to the figure below.
Note The 0.1% tolerance is the maximum FSR accuracy achievable thru calibration for any volt range. Calibrating any range to the 0.1% tolerance throws the other slightly off; i.e., tolerances for the remaining ranges available to that channel cannot be assumed better than +/- 0.25% FSR.
|
|
2
|
Open the analog output module handle to expose the connectors and terminals.
|
|
3
|
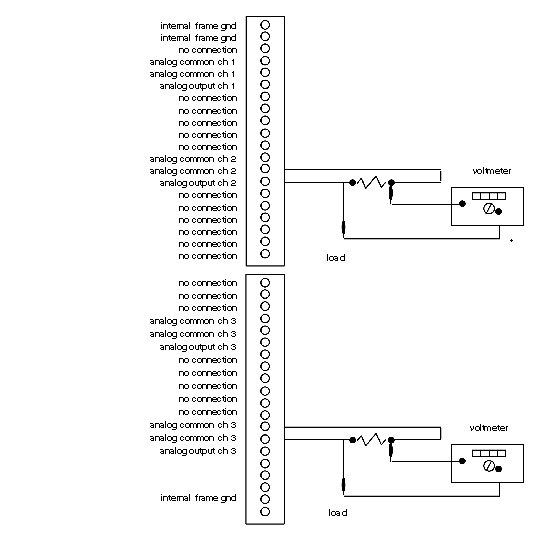
Connect the voltmeter minus lead (-) to the channel 1 (Analog Common CH1) and the plus lead (+) to the channel 1 (Analog Output CH1) terminal. Refer to the voltmeter connections diagram below.
Note Field wiring may remain connected during calibration.
|
|
4
|
With the desired voltage range already selected. Manually program a data value of 4095 into the output register for channel two. Compare channel output voltage with anticipated voltmeter reading given in the table below.
|
|
5
|
Adjust the (full scale calibrate) trim-pot for corresponding channel to get desired voltmeter reading.
|
|
6
|
Repeat steps 3 through 5 for remaining channels.
|
|
7
|
After the calibration procedure is complete, disconnect the voltmeter, return all connections to their original state, close the module handle, and replace the front label that covers the trim-pots.
END OF PROCEDURE
|
|
Selected Voltage Range
|
Data Value
|
Voltmeter Reading
|
|---|---|---|
|
-5 to 5 V
|
4095
|
4.9976
|
|
-10 to 10 V
|
4095
|
9.99951
|
|
0 to 5 V
|
4095
|
4.9988
|
|
0 to 10 V
|
4095
|
9.9976
|
