|
800 Series I/O Modules, Installation
|
|


|
(Original Document)
|
|
800 Series I/O Modules, Installation
|
|
|
(Original Document)
|
|
Step
|
Action
|
|---|---|
|
1
|
Remove module from its shipping box and check for damage. If damaged, contact salesman or distributor for correct replacement procedure.
|
|
2
|
Ensure power to housing is off.
|
|
3
|
Designate housing slot for this module.
|
|
4
|
Locate required connector assembly. (Part number AS-8534-000 or AS-8535-000). This assembly consists of one or two 20-pin connectors.
|
|
Step
|
Action
|
|---|---|
|
5
|
Remove old duct, if a different connector/cabling duct assembly is already present in designated housing slot.
If there is a module to immediate left of slot designated for module’s installation, temporarily remove it.
|
|
6
|
As shown below, mount the new field connector/duct assembly to the left of the module’s designated housing slot and secure it to the housing top and bottom using the two Phillips-head machine screws provided.
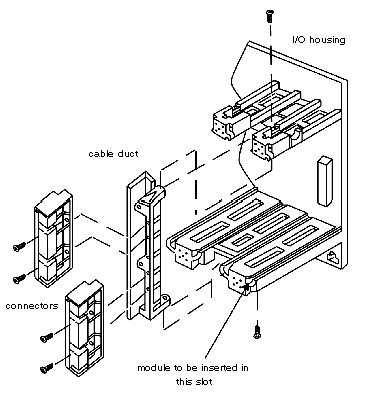 |
|
Step
|
Action
|
|---|---|
|
7
|
Connect field-side wiring to proper pins on field connector.
|
|
Step
|
Action
|
|---|---|
|
8
|
Reinstall any module temporarily removed.
|
|
Step
|
Action
|
|---|---|
|
9
|
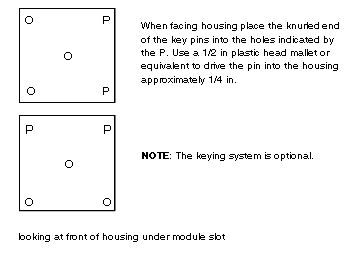
When using key pins (provided with housing shipment), install them above and below housing slot selected for installation of module.
The following illustration shows this optional mechanical keying system used to match the module type with a particular slot in the housing to ensure proper module replacement.
 |
|
10
|
Insert module into housing, firmly but carefully, seating edge connector in backplane.
|
|
Step
|
Action
|
|---|---|
|
11
|
Insert module into housing, firmly but carefully, seating edge connector in backplane.
|
|
12
|
Secure module to housing using captive slotted mounting screws at top and bottom of module front panel.
|
|
13
|
After confirming all modules are properly installed, apply proper field power and reapply power to programmable controller.
|
|
14
|
I/O map module.
|
|
15
|
Start controller.
|
|
16
|
Confirm that active light of module is illuminated.
|
