|
Processor Configuration Screen
|
|


|
Original instructions
|
|
Processor Configuration Screen
|
|
|
Original instructions
|
|
Step
|
Action
|
|---|---|
|
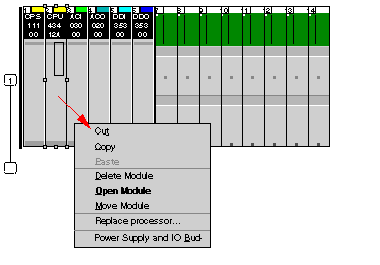
1
|
Open the Bus Editor of Control Expert
|
|
2
|
Select the CPU module
|
|
3
|
Click the right mouse button
Result: The context menu appears
 |
|
4
|
Choose Open Module
Result: The module opens with the Summary tab
|
|
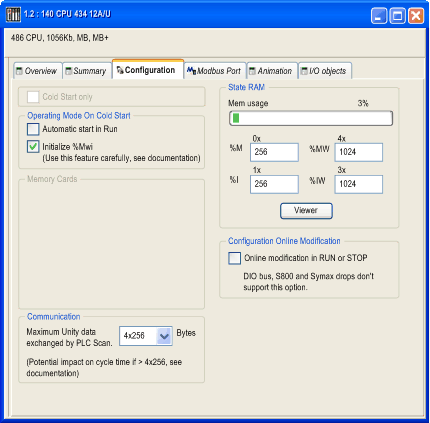
5
|
Choose one of the tabs:
The tabs with configuration features are in bold type.
|

|
Item
|
Detail
|
Option/Value
|
Description
|
|---|---|---|---|
|
CPU Name/Model:
|
Quantum CPU
|
||
|
Peer Cop:
|
Disabled
|
Enabled
|
Peer Cop=Enabled only possible in combination with NOM
|
|
Time:
|
.....
|
|
Item
|
Option
|
Value
|
Description
|
|---|---|---|---|
|
Cold Start Only
|
x
|
If you wish, enable the Cold Start Only feature.
|
|
|
Operating Mode On Cold Start
|
Automatic start in Run
|
x
|
Determines the operating condition during Cold Start
|
|
Initialize %MWi
|
x
|
||
|
Communication
|
By default, the bandwidth is 4x256 bytes, supported by the OS versions prior to V2.80 for the CPU and V4.60 for the NOE.
|
The maximum data volume exchanged each cycle between the NOE and CPU modules.
|
|
|
For Quantum processors:
|
4x256
4x1024
|
||
|
State RAM
|
Mem usage
|
(1)
|
A bar displays percent of memory used.
|
|
%M-0x
|
(2)
|
Size of the different memory areas
Note: The values for %IW and %MW have to be divisible by 8.
|
|
|
%MW-4x
|
(2)
|
||
|
%I-1x
|
(2)
|
||
|
%IW-3x
|
(2)
|
||
|
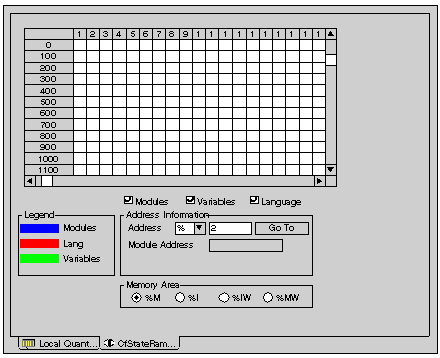
Viewer
|
N/A
|
Opens the State RAM Viewer tab, which displays the allocation of used memory. (See the illustration following.)
|
|
|
Configuration Online Modification
|
Online modification in RUN or STOP
|
x
|
This check box allows you to:
NOTE: These modifications can be done in RUN. |
(1)The value is expressed as a percentage and displayed on the scale. (2)Enter the appropriate values. |
|||
|
|
Power ON:
without cold start
|
Power ON:
with cold start
|
|
|---|---|---|---|
|
Initialize %MWi box
|
Unselected
|
%MWi keep their value
|
%MWi keep their value
|
|
Selected
|
%MWi take their initial value
|
||
|
Item
|
Detail
|
Option/Value
|
Description
|
|---|---|---|---|
|
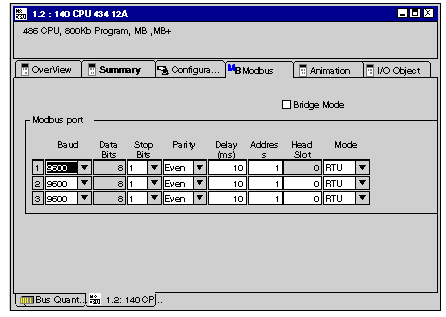
Modbus port
|
|||
|
Baud
|
9600
|
50-19200 kBit/s
|
These data must be specified for every Link separately
|
|
Data Bits
|
8
|
7 when ASCII mode is selected
|
|
|
Stop Bits
|
1
|
2
|
|
|
Parity
|
EVEN
|
ODD, NONE
|
|
|
Delay (ms)
|
10 ms
|
10..1000 in 10 ms increments
|
|
|
Address
|
1
|
1..247
|
|
|
Head Slot
|
0
|
1..16
|
|
|
Mode
|
RTU
|
ASCII
|
|
|
Item
|
Detail
|
Option/Value
|
Description
|
|---|---|---|---|
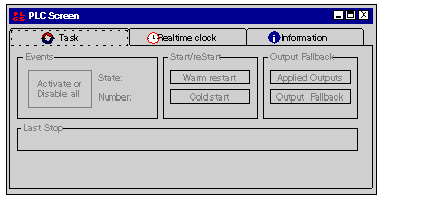
|
Events
|
State:
Number:
|
...
...
|
Online available Status information of events
|
|
Activate or Disable all
|
Button to control the events
|
||
|
Start/reStart
|
Warm Start
|
||
|
Cold Start
|
|||
|
Output fallback
|
Applied Outputs
|
Specifies the output behavior
|
|
|
Output Fallback
|
|||
|
Last Stop
|
.../.../...
|
|
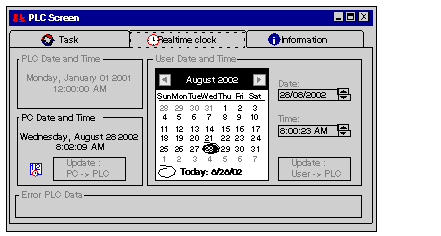
Item
|
Detail
|
Description
|
|---|---|---|
|
PLC Date and Time
|
Indication of the current PLC date and time
|
|
|
PC Date and Time
|
Update PC->PLC
|
To update the PLC with the PC system time
|
|
User Date and Time
|
Update User->PLC
|
To update the PLC with the time set by the user
|
|
Item
|
Detail
|
Option/Value
|
Description
|
|---|---|---|---|
|
System Information
|
PLC / Identification
|
PLC Range
Processor Name
Processor Version
Hardware ID
Network address
|
Only Online available
|
|
PLC / Memory
|
RAM CPU
|
||
|
Application / Identification
|
Name
Creation Product
Date
Modification Product
Date
Version
Signature
|
||
|
Application / Option
|
Empty Terminal Support
Upload Information
Comments
Animation Table
Global Protection
Section Protection
Application Diagnostic
Forced Bits
|
|
Step
|
Action
|
|---|---|
|
1
|
Open the Bus Editor of Control Expert
|
|
2
|
Move the mouse over the rectangle of the CPU module
Result: The mouse pointer changes to a hand
 |
|
3
|
Double-click.
Result: A subdialog appears
|
|
4
|
Choose one of the following options:
|
