Configuring the Address Server
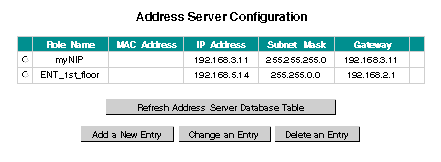
To configure the Address Server you use Web pages generated by the embedded Web server. The first page that appears is the Address Server Configuration page. The first column contains buttons used for selecting devices. The Address Server Configuration page displays configuration information for each device in the system and has seven columns in the table.
Displayed on this page is information about:
-
Role Name
-
MAC Address
-
IP Address
-
Subnet Mask
-
Gateway
An additional, unnamed column indicates any difference between the current and stored configuration. If a difference exists, an exclamation point is displayed.
This is the Address Server Configuration page. In this sample page, the configured and stored configurations are the same for each device.
On the Address Server Configuration page you can:
-
Add a New Entry
-
Change an Entry
-
Delete an Entry
-
Refresh the data table
The Address Server Configuration page allows you to choose different options for adding or altering the configurations of your NOE. The options available to you are:
-
select an entry
-
add an entry
-
change an entry
-
delete an entry
Below we describe the method and options chosen to perform any of the four options listed above. Screen shots are presented to accompany the Adding an entry section.
Selecting an Entry
When the page displays, by default no entries are selected. Use the radio buttons in the first column to select an entry. Only one entry may be selected at a time.
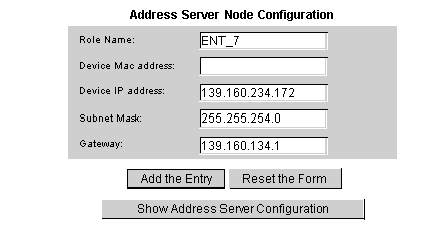
Adding an Entry
When the Add a New Entry button is selected, the Address Server Node Configuration page appears. This page displays information about a device.
If you selected a device, this page displays the device’s configuration. Configuration information appears in four of the five fields of the dialog box. Only the Role information field is blank. You should enter a Role name, for example ENT_7.
If no device is selected, default values appear in each field.
Changing an Entry
Before using this button, you must select an entry in the database by choosing one of the radio buttons in the first column. If you do not choose an entry, a message appears.
When the
Change an Entry button is selected, the
Address Server Node Configuration page appears. The information displayed is for the device selected.
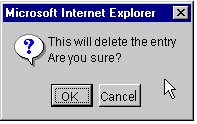
The entry selected will be removed from the database. Before completely deleting an entry, a warning message appears. Click Yes if you want to delete the entry, No if you don’t.
If you click Yes, a dialog box appears.
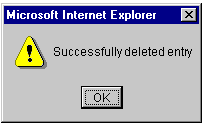
Click OK. Another dialog box appears notifying you that the deletion was successful.
If there are anomalies with the entered configuration parameter information, the system indicates anomalies using a highlighting mechanism. Valid device configurations appear in purple and italic. A device with configuration anomalies appears in red and bold.
The system detects the following anomalies:
-
Bad Role Name
The valid Role Name characters are:
-
a through z (lower case)
-
A through Z (upper case)
-
"_" (underscore)
-
Bad MAC Address
The valid MAC Address characters are:
-
Wrong IP Address
-
Wrong Subnet Mask
-
Wrong Gateway
-
Double Entry
Each entry needs a unique Role Name or MAC Address. If a duplicate Role Name or MAC Address is entered, the system highlights the duplication.
Erroneous entries are not loaded into the DHCP server. Therefore, correct erroneous before loading. There are two ways of correcting the erroneous entries: