|


|
Original instructions
|
|
|
Original instructions
|
|
Address
|
Element
|
Function
|
|---|---|---|
|
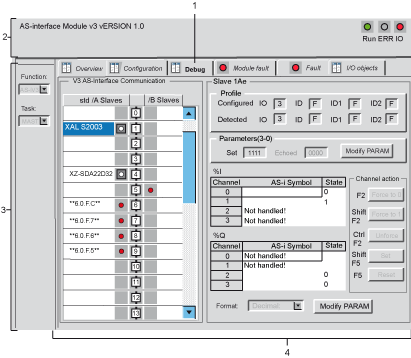
1
|
Tabs
|
The front tab indicates the mode in progress (Debug for this example). Each mode can be selected with the corresponding tab.
Possible modes are:
The tab I/O Objects is used to presymbolize the Input/Output objects.
|
|
2
|
Module
|
This zone specifies the abbreviated title of the module.
In the same field there are 3 LEDs which provide information on the operating mode of the module:
|
|
3
|
General parameters
|
This zone specifies the parameter setting of the task MAST or FAST configured for the AS-Interface communication channel.
|
|
4
|
AS-Interface configuration and slave
|
This zone displays the slave devices connected to the bus.
It also displays the status of the slave channels and gives access to the debug functions.
|
