|
Creating the Operator Screen
|
|


|
Original instructions
|
|
Creating the Operator Screen
|
|
|
Original instructions
|
|
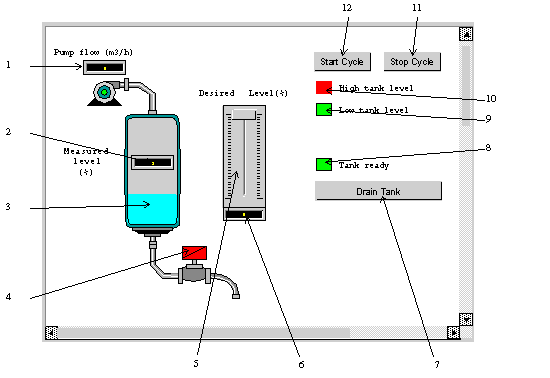
N°
|
Description
|
Associated variable
|
|---|---|---|
|
1
|
Pump flow indicator
|
Pump_Flow
|
|
2
|
Mesured level indicator
|
Level
|
|
3
|
Representation of the level in the tank
|
Level
|
|
4
|
Valve
|
Lim_Valve_Closure
|
|
5
|
Scale indicator
|
Desired_Level
|
|
6
|
Desired level indicator
|
Desired_Level
|
|
7
|
Tank Draining button
|
Drain
|
|
8
|
"Tank ready" indicator light
|
Tank_Ready
|
|
9
|
"Low tank level" indicator light
|
Tank_Low_Level
|
|
10
|
"High tank level" indicator light
|
Tank_High_Level
|
|
11
|
Stop button
|
Stop
|
|
12
|
Start button
|
Run
|
 . By clicking on this button, you can validate what is written.
 |
Step
|
Action
|
|---|---|
|
1
|
In the Project browser, right click on Operator screens and click on New screen.
The operator screen editor appears.
|
|
2
|
|
|
3
|
Click on
 to select the other lines one by one and apply the same procedure. to select the other lines one by one and apply the same procedure. |
|
Step
|
Action
|
|---|---|
|
1
|
In the Project browser, right click on Operator screens and click on New screen.
The operator screen editor appears.
|
|
2
|
Click on the
 and position the new button on the operator screen. Double click on the button and in the Control tab, select the Run variable by clicking the button and position the new button on the operator screen. Double click on the button and in the Control tab, select the Run variable by clicking the button  and confirm with OK. Then, enter the button name in the text zone. and confirm with OK. Then, enter the button name in the text zone. |
 to access the I/O objects list.
 button (in the place of %MW0). In our application, this will be Tank_vol.
  button, and fill in the entry fields according to the tank.