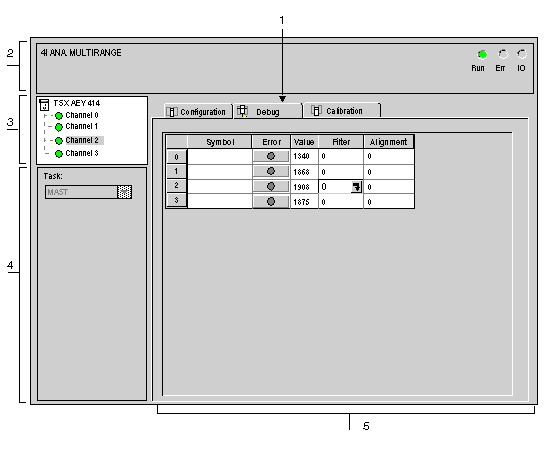
Description of the Analog Module Debug Screen
(Original Document)
At a Glance
The Debug Screen displays, in real time, the current value and status for each of the selected module's channels.
Illustration
The figure below shows a sample debug screen.
Description
The table below shows the different elements of the debug screen and their functions.
Number
Element
Function
1
Tabs
The tab in the foreground indicates the mode in progress (Debug in this example). Each mode can be selected using the respective tab. The available modes are:
  • Debug which can be accessed only in online mode,
  • Calibration which can be accessed only in online mode,
  • Configuration.
2
Module area
Specifies the abbreviated heading of the module.
In the same area there are 3 LEDs which indicate the status of the module in online mode:
  • RUN indicates the operating status of the module,
  • ERR indicates an internal fault in the module,
  • I/O indicates a fault from outside the module or an application fault.
3
Channel area
Is used:
  • By clicking on the reference number, to display the tabs:
    • Description which gives the characteristics of the device.
    • I/O Objects which is used to presymbolize the input/output objects.
    • Fault which shows the device faults (in online mode).
  • To select a channel,
  • To display the Symbol, name of the channel defined by the user (using the variable editor).
4
General parameters area
Specifies the MAST, FAST or AUXi task configured. This heading is frozen.
5
Viewing and control area
Displays the value and status for each channel in the module in real-time. The symbol column displays the symbol associated with the channel when the user has defined this (from the variable editor).
This provides direct access to channel by channel diagnostics when these are faulty (indicated by the LED built into the diagnostics access, which turns red).
  • Access to the settings of the filtering, alignment and fallback values of the outputs,
  • To channel-by-channel diagnostics when channels have an error (indicated by the LED built into the diagnostics access button, which turns red)
NOTE: All unavailable LEDs and commands appear in gray.