|
Add an EDS File to the Control Expert Hardware Catalog
|
|


|
(Original Document)
|
|
Add an EDS File to the Control Expert Hardware Catalog
|
|
|
(Original Document)
|
|
Step
|
Action
|
|---|---|
|
1
|
If the DTM Browser is not already open, in the Control Expert main menu select Tools → DTM Browser.
|
|
2
|
In the DTM Browser, select a communication module, then click the right mouse button.
A pop-up menu opens.
|
|
3
|
In the pop-up menu, select Device menu → Add EDS to library.
The introductory page of the wizard opens.
|
|
4
|
Click Next.
Page 2 of the wizard opens:
 |
|
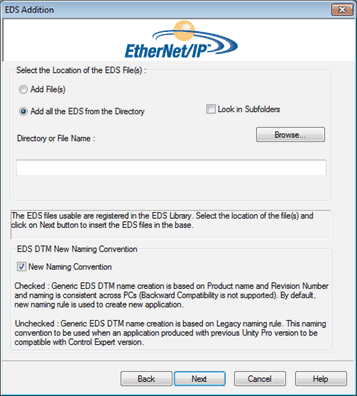
5
|
In the Select the Location of the EDS File(s) section, select either:
|
|
6
|
Click the Browse button.
The Open dialog opens.
|
|
7
|
Use the Open dialog to navigate to and select:
|
|
8
|
After you have made your selections, click Open.
The dialog closes and your selection appears in the Directory or File Name field.
|
|
9
|
Choose the naming convention rule for the EDS DTM name creation.
The new naming convention is based on Model Name / Product Name and Revision. A random character is automatically suffixed when Model Name / Product Name and Revision of an EDS file of the library are identical. The new naming convention is irrespective of the order in which EDS files are added to device library.
By default, the New Naming Convention check box is selected and the new naming rule applies.
NOTE: To keep backward compatibility with Control Expert versions, unchecked the New Naming Convention check box and the naming rule is based on Model Name / Product Name. |
|
10
|
Click Next.
The wizard compares the selected EDS files against existing files in the library.
|
|
11
|
(Conditional) If one or more selected EDS files is a duplicate, a File Already Exists message opens.
Close the message.
|
|
12
|
Page 3 of the wizard opens indicating the Status of each device you attempted to add:
(Optional) Select a file in the list, then click View Selected File to open it.
|
|
13
|
Click Next to add the non-duplicate files.
Page 4 of the wizard opens, indicating the action is complete.
|
|
14
|
Click Finish to close the wizard.
|
|
15
|
The next step is to update the Control Expert Hardware Catalog, so that the newly added device is available for inclusion in a Control Expert project.
|

 indicates the EDS file can be added
  indicates a redundant file
  indicates an invalid EDS file