|
Configuring 1734-AENT PointIO Adapter Properties
|
|


|
Original instructions
|
|
Configuring 1734-AENT PointIO Adapter Properties
|
|
|
Original instructions
|
|
In this page...
|
Do the following...
|
|---|---|
|
General
|
|
|
Chassis
|
Add 2 I/O modules to the chassis:
|
|
Connections
|
Accept the default settings.
|
|
Online Parameters
|
Accept the default settings, if any.
|
|
Module Informations
|
(Read-only page - no configuration required)
|
|
Port Configuration
|
(Read-only page - no configuration required)
|
|
EDS File
|
(Read-only page - no configuration required)
|
|
Step
|
Action
|
||
|---|---|---|---|
|
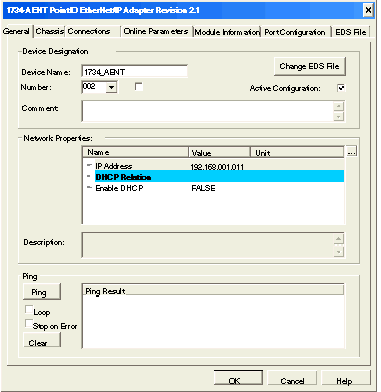
1
|
Click on the General page:
 |
||
|
2
|
In the General page, edit the following settings:
|
||
|
Device Name
|
1734_AENT
|
||
|
Number
|
The sequence of the device in the Devices window. for this example, type in 003.
|
||
|
Active Configuration
|
Be sure this checkbox is selected.
|
||
|
IP Address
|
192.168.001.011
|
||
|
3
|
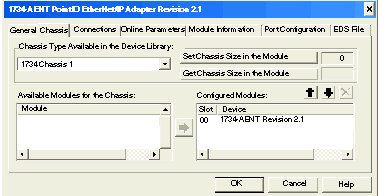
Click on the Chassis page:
 |
||
|
4
|
In the Chassis page, do the following:
|
||
|
a
|
Select 1734 Chassis 3 in the Chassis Type Available in the Device Library list.
The Available Modules for the Chassis list is populated and two [Empty] rows appear in the Configured Modules list.
|
||
|
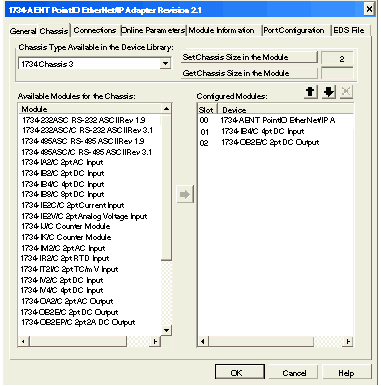
b
|
Select 1734-IB4/C 4pt DC Input in the Available Modules for the Chassis list.
|
||
|
c
|
Click the Insert button
 . The module appears in position 01 in the Configured Modules list. . The module appears in position 01 in the Configured Modules list. |
||
|
d
|
Select 1734-OB2E/C 2pt DC Output in the Available Modules for the Chassis list.
|
||
|
e
|
Click the Insert button
 . The module appears in position 02 in the Configured Modules list. . The module appears in position 02 in the Configured Modules list. |
||
|
5
|
The configured Chassis page looks like this:
 |
||
|
6
|
Click OK to save your settings and close the properties window.
A node is added to the project configuration in the Devices window:
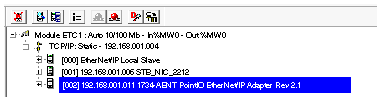 The next step is to view the remote device’s inputs and outputs.
|
||
