|
Configuring the TSX ETC 100 EtherNet/IP Communication Module
|
|


|
Original instructions
|
|
Configuring the TSX ETC 100 EtherNet/IP Communication Module
|
|
|
Original instructions
|
|
Step
|
Action
|
|---|---|
|
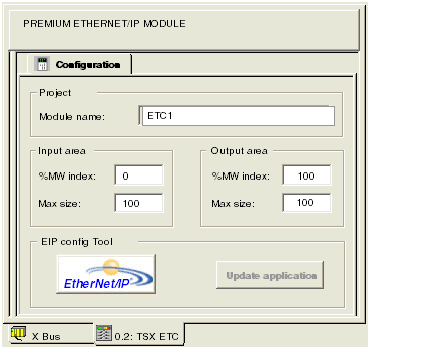
1
|
In the Project section, type in a name for your module in the Module name input box - in this example: ETC1
Note: After the module name is entered and the EtherNet/IP configuration is validated (by clicking the
 button), the module name cannot be edited. button), the module name cannot be edited. |
|
2
|
In the Input area and Output area, type in the size and starting position of both the inputs and outputs. These values can later be edited. For this example, the following values are entered:
In the Input area:
In the Output area:
Notes:
|
|
3
|
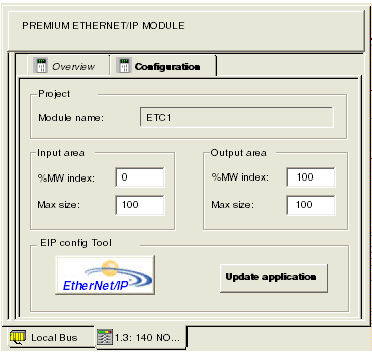
In Control Expert, select Edit → Validate (or click the Validate
 button) to: button) to:
|

|
Step
|
Action
|
|---|---|
|
1
|
Return to Control Expert and select the Configuration page of the EtherNet/IP configurable server module, below. Note that the Update application button is now enabled.
 |
|
2
|
Click the Update application button.
|
|
3
|
The Control Expert software converts the EtherNet/IP configuration data to variables and derived data types, then prepares to import them into the Control Expert project. If any conflict exists between a newly created item and an existing one, Control Expert displays those conflicts in the Import Trouble Report, below:
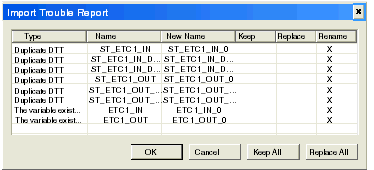 In this example, the Control Expert project configuration already includes the listed variables and derived data types.
|
|
4
|
If the Import Trouble Report opens, use its command buttons as follows:
|
|
5
|
After you have determined how to handle each imported item, click OK.
|
|
6
|
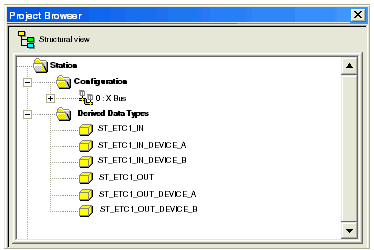
After you click OK, the Project Browser displays the new or edited derived data types, below:
 |
|
Step
|
Description
|
|
|---|---|---|
|
1
|
Return to the main screen in Control Expert.
|
|
|
2
|
In the Project Browser open the branch Variables & FB Instances and double-click on the Derived Variables sub-branch.
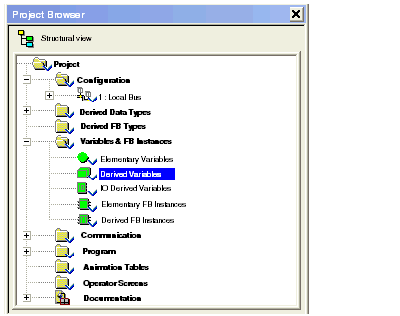 The Data Editor window opens, displaying the Variables tab. A check mark appears in the DDT checkbox. (If not, select the DDT checkbox.)
|
|
|
3
|
The Status variable—describing the status of all connections—is found beneath the first device in the first position. To display the Status variable’s 16-byte array, expand the first device as depicted below
 |
|
|
4
|
To determine which Status bit is mapped to a specific remote device:
|
|
|
a
|
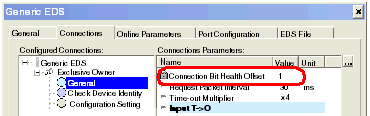
In the Control Expert EtherNet/IP configuration tool, open the Properties window for a remote device.
|
|
|
b
|
Open the Connections page, and click on the General node, below:
 |
|
|
c
|
In the above example, the Connection Bit Health Offset value of 1 maps to the first bit in the first byte of the Status variable, which can be represented as Status[0].1.
|
|
|
5
|
You can also use the Data Editor to display DDT variables. DDT variables are either:
The Data Editor presents DDT variables in separate input and output groups, sorted by device, as shown below:
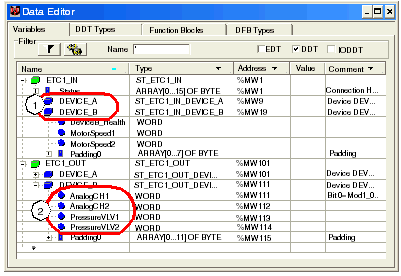 1device names: user-created in the Control Expert EtherNet/IP configuration tool 2variable names: user-created as I/O items in the Control Expert EtherNet/IP configuration tool, or defined as a property by the EDS file of the remote device |
|
