|
Data Editor (Standard)
|
|


|
Original instructions
|
|
Data Editor (Standard)
|
|
|
Original instructions
|
 WARNING WARNING |
|
Unintended Equipment Operation
The data editor makes it possible to write to application variables and change application data values.
Failure to follow these instructions can result in death, serious injury, or equipment damage.
|
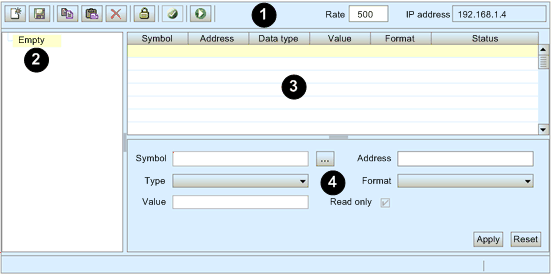
1Toolbar
2Data template list
3Data template
4Configuration Area
|
Command or Field
|
Icon
|
Description
|
|---|---|---|
|
New
|
 |
|
|
Save
|
 |
Saves changes made to both the data template list and each data template.
|
|
Copy
|
 |
|
|
Paste
|
 |
NOTE: When adding a copied item, or row, to a data template, the paste command will overwrite item data in the selected row. To insert a copied row between existing rows, first use the New command to create an empty row, then paste the copied data into the new row. |
|
Delete
|
 |
Deletes the selected data template from the list, or the selected item from the data template.
|
|
Change password
|
 |
Opens the Change password dialog, where you can change the Data Editor Write password.
NOTE: The Data Editor Write password can also be changed in the Setup → Security web page. |
|
Read PLC symbols
|
 |
Loads the existing Control Expert symbol—or variable—names into the Lookup Variable dialog. Variables that have been loaded into this dialog can be added to the currently open data template.
|
|
Start animation
|
 |
Starts the dynamic display of value and status for the items contained in the selected data template.
NOTE: The Start animation icon is visible only when animation is turned OFF. |
|
Stop animation
|
 |
Stops the dynamic display of value and status for the items contained in the selected data template.
NOTE: The Stop animation icon is visible only when animation is turned ON. |
|
Rate
|
—
|
The refresh rate of the dynamic display of data template items, in milliseconds.
|
|
IP address
|
—
|
The IP address of the Ethernet communication module and its embedded web server.
|
|
Field
|
Description
|
|
|---|---|---|
|
Symbol
|
Contains the names of Control Expert symbols (variables).
|
|
|
Address
|
Contains direct addresses and the addresses of Control Expert symbols (variables). Any direct address can be viewed by entering its reference in this field. Valid direct addresses include:
|
|
|
%Mi
|
same as for 0X coils
|
|
|
%Ii
|
same as 1x for discreet inputs
|
|
|
%IWi
|
same as 3x for input registers
|
|
|
%MWi, %MDi, %MFi
|
same as 4x for holding registers
|
|
|
NOTE:
|
||
|
Data type
|
Contains the data type of the symbol (variable) or direct address. Symbol (variable) data types appear automatically when the symbol (variable) is located. Select direct address data types from a drop-down list. The following data types are valid:
|
|
|
INT
|
16-bit signed integer
|
|
|
UINT
|
16-bit unsigned integer
|
|
|
DINT
|
32-bit signed integer
|
|
|
UDINT
|
32-bit unsigned integer
|
|
|
REAL
|
32-bit IEEE floating point
|
|
|
TIME
|
32-bit unsigned integer (in ms)
|
|
|
DATE
|
Date (32-bit BCD)
|
|
|
TOD
|
Time of day (32-bit BCD)
|
|
|
BOOL
|
1 bit discrete (Boolean)
|
|
|
Value
|
When animation has started, this field displays the value of the symbol (variable) or direct address. This field is updated continuously.
|
|
|
Format
|
Contains the format type for displaying the value of the symbol (variable) or direct address. The following formats are available:
|
|
|
bool
|
Boolean
|
|
|
dec
|
Decimal
|
|
|
hex
|
Hexadecimal
|
|
|
binary
|
Binary
|
|
|
ASCII
|
bytes displayed as ASCII characters
|
|
|
time
|
day_hr_min_sec_ms
|
|
|
date
|
YYYY-MM-DD or HH:MM:SS
|
|
|
Status
|
Contains messages describing the status of communication with the direct address:
|
|
|
if communication is normal
|
The status message reads OK
|
|
|
if communication is interrupted
|
The status field displays a system message describing the interruption
|
|
