|
Configuring EtherNet/IP Connections
|
|


|
Original instructions
|
|
Configuring EtherNet/IP Connections
|
|
|
Original instructions
|
|
Step
|
Action
|
|---|---|
|
1
|
Double-click the DTM for the BMENOC0301 in slot 3 (<192.168.20.10> BMENOC0301_slot3) to access the configuration.
NOTE: This example uses a BMENOC0301 module. Use the same instructions for other M580 communications modules (like the BMENOC0311 or BMENOC0321). |
|
2
|
In the navigation tree, expand the Device List to see the associated local slave instances.
|
|
3
|
Expand (+) the device that corresponds to the name NIC2212_01.
|
|
4
|
Select Read Input/ Write Output Data to see the Connection Settings and Connection Information tabs.
|
|
Parameter
|
Description
|
|---|---|
|
Connection Bit
|
The (read-only) offset for both the health bit and the control bit for this connection. Offset values are auto-generated by the Control Expert DTM.
|
|
Request Packet Interval (RPI)
|
The refresh period for this connection in ms (2 ... 65535). Default = 12 ms. Enter 30 ms.
NOTE: This parameter can be set in the DTM for the communication module or the remote device. |
|
This setting, multiplied against the RPI, produces a value that triggers an inactivity timeout. Setting selections include: x4, x8, x16, x32, x64, x128, x256 and x512.
For this example, accept the default (x4).
NOTE: To view the Time-out Multiplier parameter, confirm that Control Expert is operating in Advanced Mode. |
|
|
Input Fallback Mode
|
This value is Set To Zero when communication is lost.
|
|
Step
|
Action
|
|---|---|
|
1
|
In the DTM Browser, expand the master DTM for the BMENOC0301 in slot 3 (<192.168.20.10> BMENOC0301_slot3).
|
|
2
|
Double-click the device DTM that corresponds to the name NIC2212_01 to open the configuration window.
|
|
3
|
To view the connection type, expand NIC2212_01 in the navigation pane.
If the connection type is not of the type Read Input / Write Output Data, delete the existing connection and add a new one:
a.
Select the connection in the left pane.
b.
Click the Remove Connection button to remove the existing connection.
c.
Click the Add Connection button to open the Select the connection to add dialog.
d.
Scroll to the Read Input / Write Output Data connection type.
e.
Click OK to close the Select the connection to add dialog and add the new connection node to the NIC2212_01.
f.
Click Apply to save the new connection and leave the configuration window open.
|
|
Parameter
|
Description
|
|---|---|
|
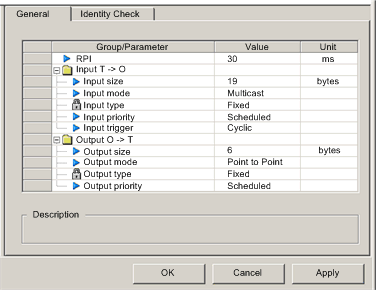
RPI
|
The refresh period for this connection. Accept the value of 30 ms. (This parameter can be set in the DTM for the communication module or the remote device.)
|
|
Input size
|
The number of bytes (0 ... 509) configured in the STB NIC 2212 module. For this example, enter 19 to reserve 20 bytes of input memory.
|
|
Input mode
|
Transmission type:
For this example, accept the default (Multicast).
|
|
Input type
|
Ethernet packet type (fixed or variable length) to be transmitted. (Only Fixed length packets are supported.)
|
|
Input priority
|
The transmission priority value depends upon the device DTM. These are the available values:
For this example, accept the default selection (Scheduled).
NOTE: For remote modules that support more than one priority value, you can use this setting to specify the order in which the Ethernet communication module handles packets. For more information, refer to the topic describing QoS packet prioritization. |
|
Input trigger
|
These are the available transmission trigger values:
For input I/O data, select Cyclic.
|
|
Output size
|
The number of bytes configured in the STB NIC 2212 module in increments of 4 bytes (2 words). For this example, enter 6 to reserve 8 bytes of output memory.
|
|
Output mode
|
Accept the default (Point to Point).
|
|
Output type
|
(Read-only). Only Fixed length packets are supported.
|
|
Output priority
|
Accept the default (Scheduled).
|
|
Parameter
|
Description
|
|---|---|
|
Compatibility Mode
|
True: For each of the following selected tests, the DTM/EDS and remote device need only be compatible.
|
|
False: For each of the following selected tests, the DTM/EDS and remote device need to match exactly.
|
|
|
Compatibility Mode
|
Make a selection for each of these parameters:
|
|
Minor Version
|
|
|
Major Version
|
|
|
Product Code
|
|
|
Product Type
|
|
|
Product Vendor
|
