|
Standby CPU Coprocessor Update
|
|


|
|
|
Standby CPU Coprocessor Update
|
|
|
|
|
Step
|
Action
|
|---|---|
|
1
|
Note the Modbus or Modbus Plus address of the Standby CPU using the keypad functions:
|
|
2
|
Stop the Standby CPU with the keypad functions.
NOTE: The Standby CPU goes to STOP Offline mode; the Primary CPU operates as a standalone CPU. |
|
3
|
Disconnect all the communication links (Hot Standby fiber optic cable, Ethernet cables, Modbus Plus cables …) from the Standby rack.
|
|
4
|
Switch off the power of the Standby rack.
|
|
5
|
When using an application in the PCMCIA card:
|
|
6
|
Power on the Standby CPU.
|
|
7
|
If not set to 1, change the Modbus or Modbus Plus address of the Standby CPU to 1 with the keypad functions:
|
|
Step
|
Action
|
|---|---|
|
1
|
Disable the antivirus and firewall of your computer and enable them again once the module is updated.
|
|
2
|
Click Start → Programs → EcoStruxure Control Expert → OS Loader to launch OS Loader.
Result: The Welcome window is displayed.
|
|
3
|
Click Next.
Result: The Communication Protocol window is displayed.
|
|
4
|
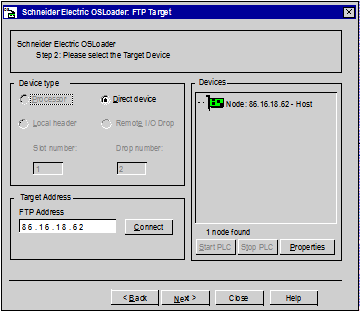
Select the FTP communication driver and click Next.
Result: The Target window is displayed (the information displayed in the following example are for illustration purpose only):
 |
|
5
|
In the Device Type dialog box, select Direct device.
|
|
6
|
In the Target Address dialog box, type the Standby CPU IP address.
Read the CPU IP address on the Standby CPU display: Quantum Communications → Communications TCP/IP Ethernet → TCP/IP Ethernet IP address.
|
|
7
|
Click Connect to connect the PC to the Hot Standby coprocessor.
|
|
8
|
If requested, type the MAC address of the Hot Standby coprocessor that is written in front of the CPU.
|
|
9
|
In the Devices dialog box, select the Hot Standby coprocessor to update.
|
|
10
|
Click Properties if you need to display the firmware version.
|
|
11
|
Click Next.
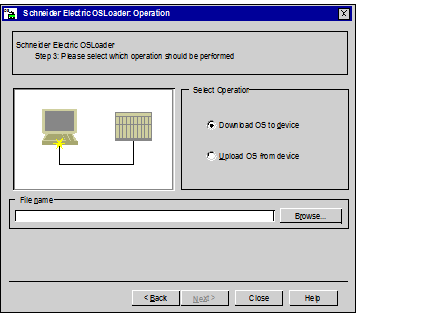
Result: The Operation window is displayed.
|
|
NOTICE
|
|
EQUIPMENT DAMAGE
During the download:
Failure to follow these instructions can result in equipment damage.
|
|
Step
|
Action
|
|---|---|
|
1
|
Select Download OS to device and click Browse.
 |
|
2
|
|
|
3
|
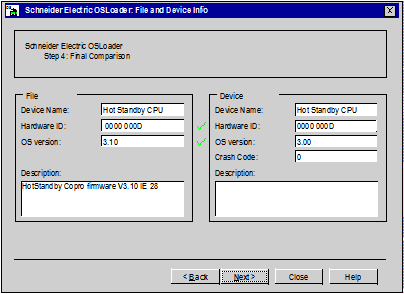
Click Next.
Result: The File and Device Info window displays information on the firmware file to download and the device connected:
 |
|
4
|
Click Next.
Result: The Summary window is displayed.
|
|
5
|
Click Download.
Result: A popup window is displayed.
|
|
6
|
Click Yes to validate the information displayed and launch the transfer.
Result: The Progress window is displayed with the remaining time. The duration depends on the protocol used and the PC configuration.
|
|
7
|
In the Progress window, check if the download is completed.
Result: The SUCCESS message is displayed.
NOTE: If the SUCCESS message is not displayed, check each step and contact your local Schneider Electric office for assistance. |
|
8
|
Click Close and exit OS Loader.
|
|
9
|
Reset the Standby CPU by performing a power cycle.
|
|
Step
|
Action
|
|---|---|
|
1
|
Open OS Loader.
Result: The Welcome window is displayed.
|
|
2
|
Click Next.
Result: The Communication Protocol window is displayed.
|
|
3
|
Select the FTP communication driver and click Next.
Result: The Target window is displayed.
|
|
4
|
In the Device Type dialog box, select Direct device.
|
|
5
|
In the Target Address dialog box, type the device IP address.
|
|
6
|
Click Connect to connect the PC to the Hot Standby coprocessor.
|
|
7
|
If requested, type the MAC address of the Hot Standby coprocessor that is written in front of the CPU.
|
|
8
|
In the Devices dialog box, select the Ethernet port node updated.
|
|
9
|
In the Devices dialog box, click Properties to check the firmware version.
|
|
10
|
Click Close and exit OS Loader.
|
