Use these instructions to install Quantum and Modicon X80 modules that operate in a Quantum EIO system:
-
140CRP31200 remote I/O head module (on the local rack)
-
remote I/O module:
-
140CRA31200 remote I/O adapter module (on a Quantum remote I/O drop)
-
BMXCRA312•0 adapter module (on a Modicon X80 remote I/O drop)
-
140CRA31908 adapter module facilitates the use of S908 hardware and applications in M580 Ethernet I/O architectures.
-
140NOC78000 distributed I/O head module (on the local rack)
-
140NOC78100 control head module (on the local rack)
Do not apply power to a Quantum rack until connections are made at both ends of the Ethernet cable. For example, connect the cable to both the 140CRP31200 and another device (adapter module) or ConneXium dual-ring switch before you turn on the power.
Refer to the Quantum EIO System Planning Guide for details on dual-ring switches (DRSs).
Use fiber-optic cable to establish a communications link when it is not possible to master potential between distant grounds.
|
Step
|
Action
|
|
1
|
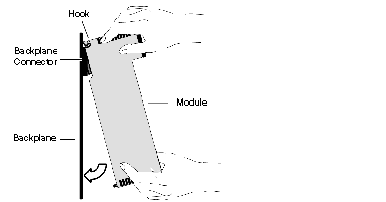
Hold the module at an angle and mount it on the 2 hooks near the top of the backplane. The figure shows the correct way to hold the module:
|
|
2
|
Swing the module down so the connector engages the backplane connector.
|
|
3
|
Use a Phillips-head screw driver to tighten the screw at the bottom of the module from 2 to 4 in-lbs or from .22 through .45 N•m of torque.
|
NOTE: The figure above shows a Quantum module being mounted from top to bottom. Modicon X80 modules mount from bottom to top.
You can replace a Quantum EIO module at any time using another module with compatible firmware. The replacement module obtains its operating parameters over the backplane connection from the CPU. The transfer occurs immediately at the next cycle to the device.
The operating parameters that the CPU sends to a replacement module do not include any parameter values that were edited in the original module using explicit messaging SET commands.


 DANGER